
Labeling Text
Model training requires a large amount of labeled data. Therefore, before the model training, add labels to the files that are not labeled. In addition, you can modify, delete, and re-label the labeled text.
Text classification classifies text content based on labels. Before labeling text content, pay attention to the following:
- Text labeling supports multiple labels. That is, you can add multiple labels to a labeling object.
- A label name can contain a maximum of 1,024 characters, including letters, digits, hyphens (-), underscores (_), and special characters.
Named entity recognition assigns labels to named entities in text, such as time and locations. Before labeling, pay attention to the following:
- A label name of a named entity can contain a maximum of 1,024 characters, including letters, digits, hyphens (-), underscores (_), and special characters.
Triplet labeling is suitable for scenarios where structured information, such as subjects, predicates, and objects, needs to be labeled in statements. With this function, not only entities in statements, but also relationships between entities can be labeled. Triplet labeling is often used in natural language processing tasks such as dependency syntax analysis and information extraction. Before labeling, pay attention to the following:
- Ensure that the entity label and relationship label of the labeling job are defined. For Relationship Label, set its Source entity and Target entity. Relationship Label must be between the defined Source entity and Target entity.
- You can define multiple entity and relationship labels for a text object.
- The Entity Label defined during dataset creation cannot be deleted.
For example, if two entities are labeled as Place, you cannot add any relationship label between them. If a relationship label cannot be added, a red cross is displayed.
Starting Labeling
- Log in to the ModelArts management console. In the navigation pane on the left, choose Data Preparation > Label Data.
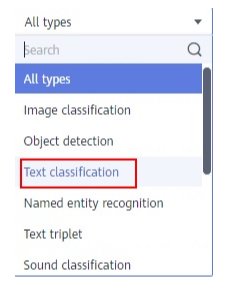
- In the labeling job list, select a labeling type from the All type drop-down list, click the job to be performed based on the labeling type. The details page of the job is displayed.
Figure 1 Selecting a labeling type
- The job details page displays all data of the labeling job.
Labeling Text (Text Classification)
The labeling job details page displays the Unlabeled and Labeled tabs. The Unlabeled tab is displayed by default.
- In the Unlabeled tab, the objects to be labeled are listed in the left pane. In the list, click the text object to be labeled, and select a label in the Label Set area in the right pane. Multiple labels can be added to a labeling object.
You can repeat this operation to select objects and add labels to the objects.
Figure 2 Labeling for text classification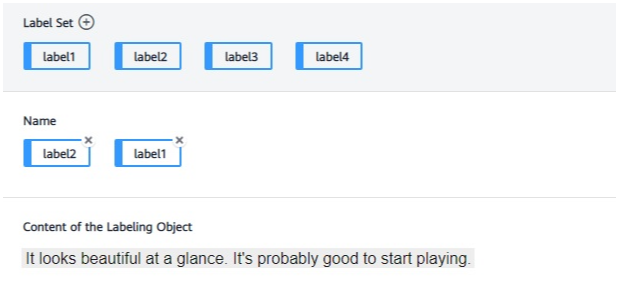
- After all objects are labeled, click Save Current Page at the bottom of the page.
Adding a Tag (Text Classification)
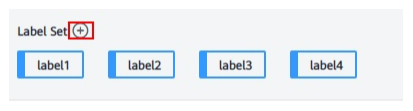
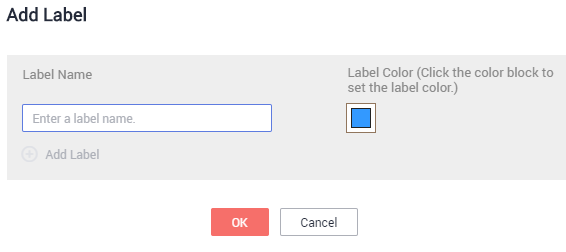
- Adding labels on the Unlabeled tab page: Click the plus sign (+) next to Label Set. On the Add Label page that is displayed, add a label name, select a label color, and click OK.
Figure 3 Adding a label (1)
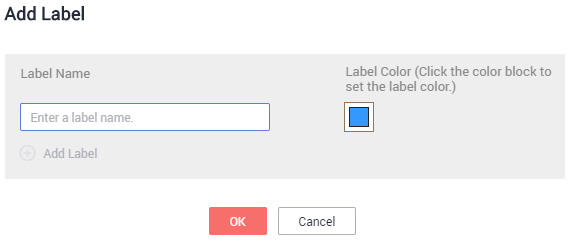
- Adding labels in the Labeled tab: Click the plus sign (+) next to Label Set. On the displayed Add Label page, add a label name, select a label color, and click OK.
Figure 4 Adding a tag
Labeling Text (Named Entity Recognition)
The labeling job details page displays the Unlabeled and Labeled tabs. The Unlabeled tab is displayed by default.
- In the Unlabeled tab, the objects to be labeled are listed in the pane on the left. In the list, click the text object to be labeled, select a part of text displayed under Label Set for labeling, and select a label in the Label Set area in the right pane.
You can repeat this operation to select objects and add labels to the objects.
- Click Save Current Page in the lower part of the page to complete the labeling.
Adding a Tag (Named Entity Recognition)
- Adding labels in the Unlabeled tab: Click the plus sign (+) next to Label Set. On the displayed Add Label page, add a label name, select a label color, and click OK.
- Adding labels in the Labeled tab: Click the plus sign (+) next to Label Set. On the displayed Add Label page, add a label name, select a label color, and click OK.
Figure 5 Adding a named entity label
Labeling Text (Text Triplet)
The labeling job details page displays the Unlabeled and Labeled tabs. The Unlabeled tab is displayed by default.
- In the Unlabeled tab, the objects to be labeled are listed in the pane on the left. In the list, click a text object, select the corresponding text content on the right pane, and select an entity name from the displayed entity list to label the content.
- After labeling multiple entities, click the source entity and target entity in sequence and select a relationship type from the displayed relationship list to label the relationship.
- After all objects are labeled, click Save Current Page at the bottom of the page.

You cannot modify the labels of a dataset in the text triplet type on the labeling page. Instead, click Label Management and modify the Entity Label and Relationship Label.
Modify Label (Text Triplet)
After labeling data, you can modify labeled data in the Labeled tab.
On the labeling job details page, click the Labeled tab. Select a text object in the left pane and the right pane displays the detailed label information. You can move your cursor to the entity or relationship label, and right-click to delete it. You can also click the source entity and target entity in sequence to add a relationship label.
You can click Delete Labels on Current Item at the bottom of the page to delete all labels in the selected text object.

Feedback
Was this page helpful?
Provide feedbackThank you very much for your feedback. We will continue working to improve the documentation.See the reply and handling status in My Cloud VOC.
For any further questions, feel free to contact us through the chatbot.
Chatbot


