
Labeling Images
Training a model uses a large number of labeled images. Therefore, label images before the model training. You can add labels to images by manual labeling or auto labeling. In addition, you can modify the labels of images, or remove their labels and label the images again.
Before labeling an image in image classification scenarios, pay attention to the following:
- You can add multiple labels to an image.
- A label name can contain at most 1,024 characters, including letters, digits, hyphens (-), and underscores (_).
Before labeling an image in object detection scenarios, pay attention to the following:
- All target objects in the image must be labeled.
- Target objects are clear without any blocking and contained within bounding boxes.
- Only the entire object can be contained within a bounding box. The bounding box contains the entire object. The edge of the bounding box cannot intersect the edge outline of the object to be labeled. Ensure that there is no gap between the edge and the object to be labeled to prevent the background from interfering with the model training.
Before labeling an image in image segmentation scenarios, pay attention to the following:
- All objects whose contours need to be extracted from the image must be labeled.
- Polygons can be used for labeling.
- In polygon labeling, draw a polygon based on the outline of the target object.
- When labeling an image, ensure that the polygons are within the image. Otherwise, an error will occur in subsequent operations.
Starting Labeling
- Log in to the ModelArts management console. In the navigation pane on the left, choose Data Preparation > Label Data.
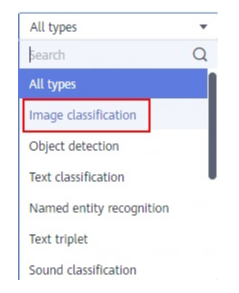
- On the right of the labeling job list, select a labeling type from the job type drop-down list. Click the job to be performed based on the labeling type. The details page of the job is displayed.
Figure 1 Selecting a labeling type
- The job details page displays all data of the labeling job.
Image Classification
The labeling job details page displays the All statuses, Unlabeled, and Labeled tabs. The Unlabeled tab is displayed by default. Click an image to preview it. For images that have been labeled, the label information is displayed at the bottom of the preview page.
- In the Unlabeled tab, select the images to be labeled.
- Manual selection: In the image list, click the selection box in the upper left corner of an image to enter the selection mode, indicating that the image is selected. You can select multiple images of the same type and add labels to them together.
- Batch selection: If all the images on the current page of the image list belong to the same type, you can click Select Images on Current Page in the upper right corner to select all the images on the current page.
- Add labels to the selected images.
- In the label adding area on the right, set a label in the Label text box.
Click the Label text box and select an existing label from the drop-down list. If the existing labels cannot meet the requirements, input a label in the text box.
- Click OK. The selected images are automatically moved to the Labeled tab page. In the Unlabeled and All statuses tabs, the labeling information is updated along with the labeling process, including the added label names and the number of images for each label.
Figure 2 Adding a label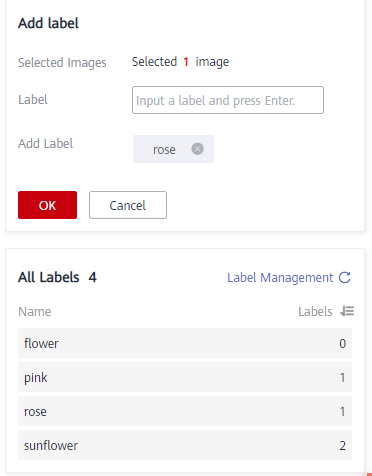

For details about how to label data, see Labeling Description on the dataset details page.
- Log in to the ModelArts management console. In the navigation pane on the left, choose Data Preparation > Label Data. The Data Labeling page is displayed.
- In the My Creations or My Participations tab, locate the dataset to be labeled.
- Click the dataset name. The labeling details page is displayed. The Unlabeled tab is displayed by default.
- Click Labeling Description in the upper right corner.
- In the label adding area on the right, set a label in the Label text box.
Object Detection
The labeling job details page displays the All statuses, Unlabeled, and Labeled tabs. The Unlabeled tab is displayed by default.
- In the Unlabeled tab, click an image. The system automatically directs you to the page for labeling the image. For details about how to use common buttons on this page, see Table 2.
- In the tool bar, select a proper labeling shape. The default labeling shape is a rectangle. In this example, the rectangle is used for labeling.
In the tool bar, multiple tools are provided for you to label images. After you select a shape to label the first image, the shape automatically applies to subsequent images. You can switch the shape as required.
Table 1 Supported bounding boxes Icon
Description

Rectangle. You can also press 1. Click the edge of the upper left corner of the object to be labeled. A rectangle will be displayed. Drag the rectangle to cover the object and click to label the object.

Polygon. You can also press 2. In the area where the object to be labeled is located, click to label a point, move the mouse and click multiple points along the edge of the object, and then click the first point again. All the points form a polygon. In this way, the object to be labeled is within the bounding box.

Round. You can also press 3. Click the center point of an object, and move the mouse to draw a circle to cover the object and click to label the object.

Straight. You can also press 4. Click to specify the start and end points of an object, and move the mouse to draw a straight line to cover the object and click to label the object.

Dashed line. You can also press 5. Click to specify the start and end points of an object, and move the mouse to draw a dashed line to cover the object and click to label the object.

Dot. You can also press 6. Click the object in an image to label a point.
- In the Add Label text box, enter a new label name, select the label color, and click Add. Alternatively, select an existing label from the drop-down list.
Label all objects in an image. Multiple labels can be added to an image. After labeling an image, click the right arrow in the upper right corner of the image (or press D) to switch to the next image.
- Click Back to Data Labeling Preview in the upper left corner of the page to view the labeling information. In the displayed dialog box, click Yes to save the labeling settings.
The selected images are automatically moved to the Labeled tab. In the Unlabeled and All tabs, the labeling information is updated along with the labeling process, including the added label names and the number of images for each label.
|
Icon |
Description |
|---|---|
|
|
Cancel the previous operation. You can also press Ctrl+Z. |
|
|
Redo the previous operation. You can also press Ctrl+Shift+Z. |
|
|
Zoom in an image. You can also use the scroll wheel. |
|
|
Zoom out an image. You can also use the scroll wheel. |
|
|
Delete all bounding boxes on the current image. You can also press Shift+Delete. |
|
|
Show or hide a bounding box. This operation can be performed only on a labeled image. You can also press Shift+H. |
|
|
Drag a bounding box to another position or drag the edge of the bounding box to resize it. You can also use X + left mouse button. |
|
|
Reset a bounding box. After dragging a bounding box, you can click this button to quickly restore the bounding box to its original shape and position. You can also press Esc. |


Image Segmentation
The labeling job details page displays the All statuses, Unlabeled, and Labeled tabs. The Unlabeled tab is displayed by default.
- In the Unlabeled tab, click an image. The system automatically directs you to the page for labeling the image. For details about how to use common buttons on this page, see Table 4.
- Select a labeling method.
On the labeling page, common labeling methods and buttons are provided in the toolbar. By default, polygon labeling is selected. For details, see Table 3 and Table 4. Use polygon or pole labeling as needed.
After you select a method to label the first image, the labeling method automatically applies to subsequent images.
Table 3 Labeling methods Icon
Description

Polygon. In the area where the object to be labeled is located, click to label a point, move the mouse and click multiple points along the edge of the object, and then click the first point again. All the points form a polygon. In this way, the object to be labeled is within the bounding box.
Table 4 Toolbar buttons Button
Description

Cancel the previous operation.

Redo the previous operation.

Zoom in an image.

Zoom out an image.

Delete all bounding boxes on the current image.

Show or hide a bounding box. This operation can be performed only on a labeled image.

Drag a bounding box to another position or drag the edge of the bounding box to resize it.

Reset a bounding box. After dragging a bounding box, you can click this button to quickly restore the bounding box to its original shape and position.

Display the labeled image in full screen.
- Label an object.
Identify an object in an image. Click the top, bottom, leftmost, and rightmost points on the object contour. In the displayed dialog box, set the label name and click Add. After labeling an image, click
 below the image to view the image in the list, and click an unlabeled image for labeling.
 - Click Back to Data Labeling Preview in the upper left corner of the page to view the labeling information. In the displayed dialog box, click Yes to save the labeling settings.
The selected images are automatically moved to the Labeled tab. In the Unlabeled and All tabs, the labeling information is updated along with the labeling process, including the added label names and the number of images for each label.
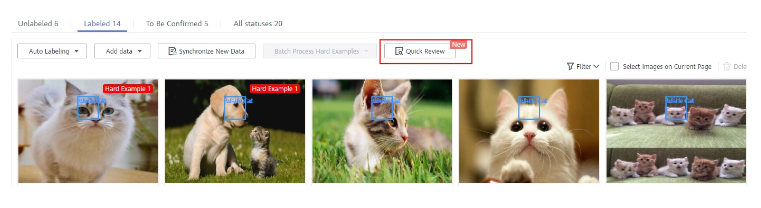
Quick Review
Current labeling jobs cannot be reviewed in batches. If the label of a sample is modified or deleted, you need to go to the label details page to operate, which is complex. To simplify the operations, you can now review or modify labeling information in batches, improving efficiency.
- Log in to the ModelArts management console. In the navigation pane on the left, choose Data Preparation > Label Data. In the My Creations tab, select the target labeling job type from the All types drop-down list in the upper right corner. (Only object detection and image segmentation support quick review.)
- In the labeling job list, click the target labeling job. The labeling details page is displayed.
- Click Quick Review in the Labeled tab. On the displayed page, confirm the labeling results.
Figure 3 Quick review
- Batch review images of the same label.
- On the review page, select the label type from the drop-down list next to Filter by Label.
- Sort images of the selected label type by bounding box area or aspect ratio.
- Click an incorrectly labeled image, and then drag the labeling box to relabel the image. (Modified is displayed on the modified images.)
- You can select the incorrectly labeled images, and then click
 in the upper right corner to delete the label. (Deleted is displayed on the images whose label has been deleted.)
Figure 4 Modified
in the upper right corner to delete the label. (Deleted is displayed on the images whose label has been deleted.)
Figure 4 Modified
- You can also modify the label of a labeled image.
- Select the target images and click
 in the All Labels area on the right.
 - Type a new label and click OK.
Figure 5 All labels
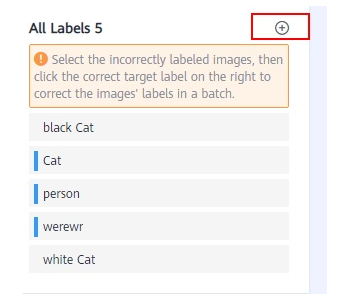 Figure 6 Adding a label
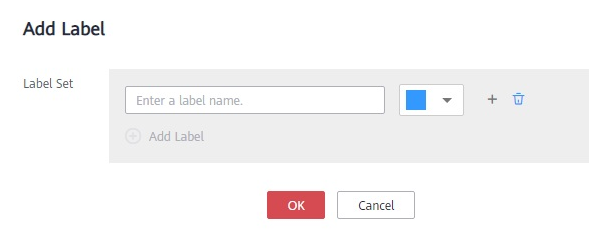
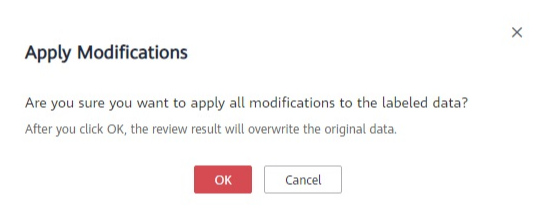
- Select the target images and click
- After the modification, click Apply Modifications. In the displayed dialog box, click OK. The system automatically returns to the labeling overview page and overwrites the original labeling data.
Figure 7 Applying modifications
- If you are not satisfied with the modified data, you can click Cancel Modifications to retain the original labeling data.
Figure 8 Canceling modifications
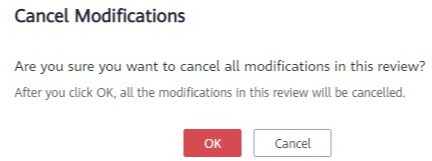
Table 5 Buttons on the quick review page Icon
Description

Delete the label.

Undo all operations on the current page.

Undo the previous operation.

Redo the previous operation.
Feedback
Was this page helpful?
Provide feedbackThank you very much for your feedback. We will continue working to improve the documentation.See the reply and handling status in My Cloud VOC.
For any further questions, feel free to contact us through the chatbot.
Chatbot


