Starting an Immediate Baseline Check
Scenarios
To learn about the latest status of the cloud service baseline configurations, execute or let SecMaster execute a check plan. Then you can view which configurations are unsafe in the check results. The baseline inspection supports periodic and immediate checks.
- Periodic check: SecMaster periodically executes the default check plan or the check plans you configure.
- Immediate check: You can start check items in all security standards or a specific check plan anytime.
This topic describes how to start an immediate baseline inspection. You can select the following check types:
- Immediate Check on All Compliance Packs: Check the compliance of all automatic check items in in-use compliance packs.
- Starting a Check Based on a Check Plan: Check the compliance of the check items in the compliance pack configured in a selected check plan.
- Immediate Checks for Certain Check Items: check the selected check items.
Limitations and Constraints
- An immediate check task can be executed only once within 10 minutes.
- A periodic check can be manually started only once within 10 minutes.
- You can set auto check items in Cloud Security Compliance Check 1.0, Network Security, and Huawei Cloud Security Configuration compliance packs. For check items that support only manual check, SecMaster generates check items whose check results are To be checked. For those check items, you need to perform a manual check offline and then report the check results to the SecMaster console.
Basic Concepts
- Operation accounts: An operations account, or parent account, is an account that can manage member accounts. An operations account can manage multiple service accounts.
- Service account: A service account is a member account, or child account, managed by an operations account. A service account (child account) can be managed by only one operations account.
- Primary workspace: The first workspace created by SecMaster is the primary workspace by default. The workspace is pinned on top of the page. You can also change the primary workspace. On the page, click
 next to the target workspace. On the workspace details page displayed, toggle on Primary workspace.
Immediate Check on All Compliance Packs
This part describes how to start an immediate check for automatic check items in in-use compliance packs.
- Log in to the SecMaster console.
- Click
 in the upper left corner of the management console and select a region or project.
 - Click
 in the upper left corner of the page and choose Security & Compliance > SecMaster.
 - In the navigation pane on the left, choose Workspaces > Management. In the workspace list, click the name of the target workspace.
Figure 1 Workspace management page

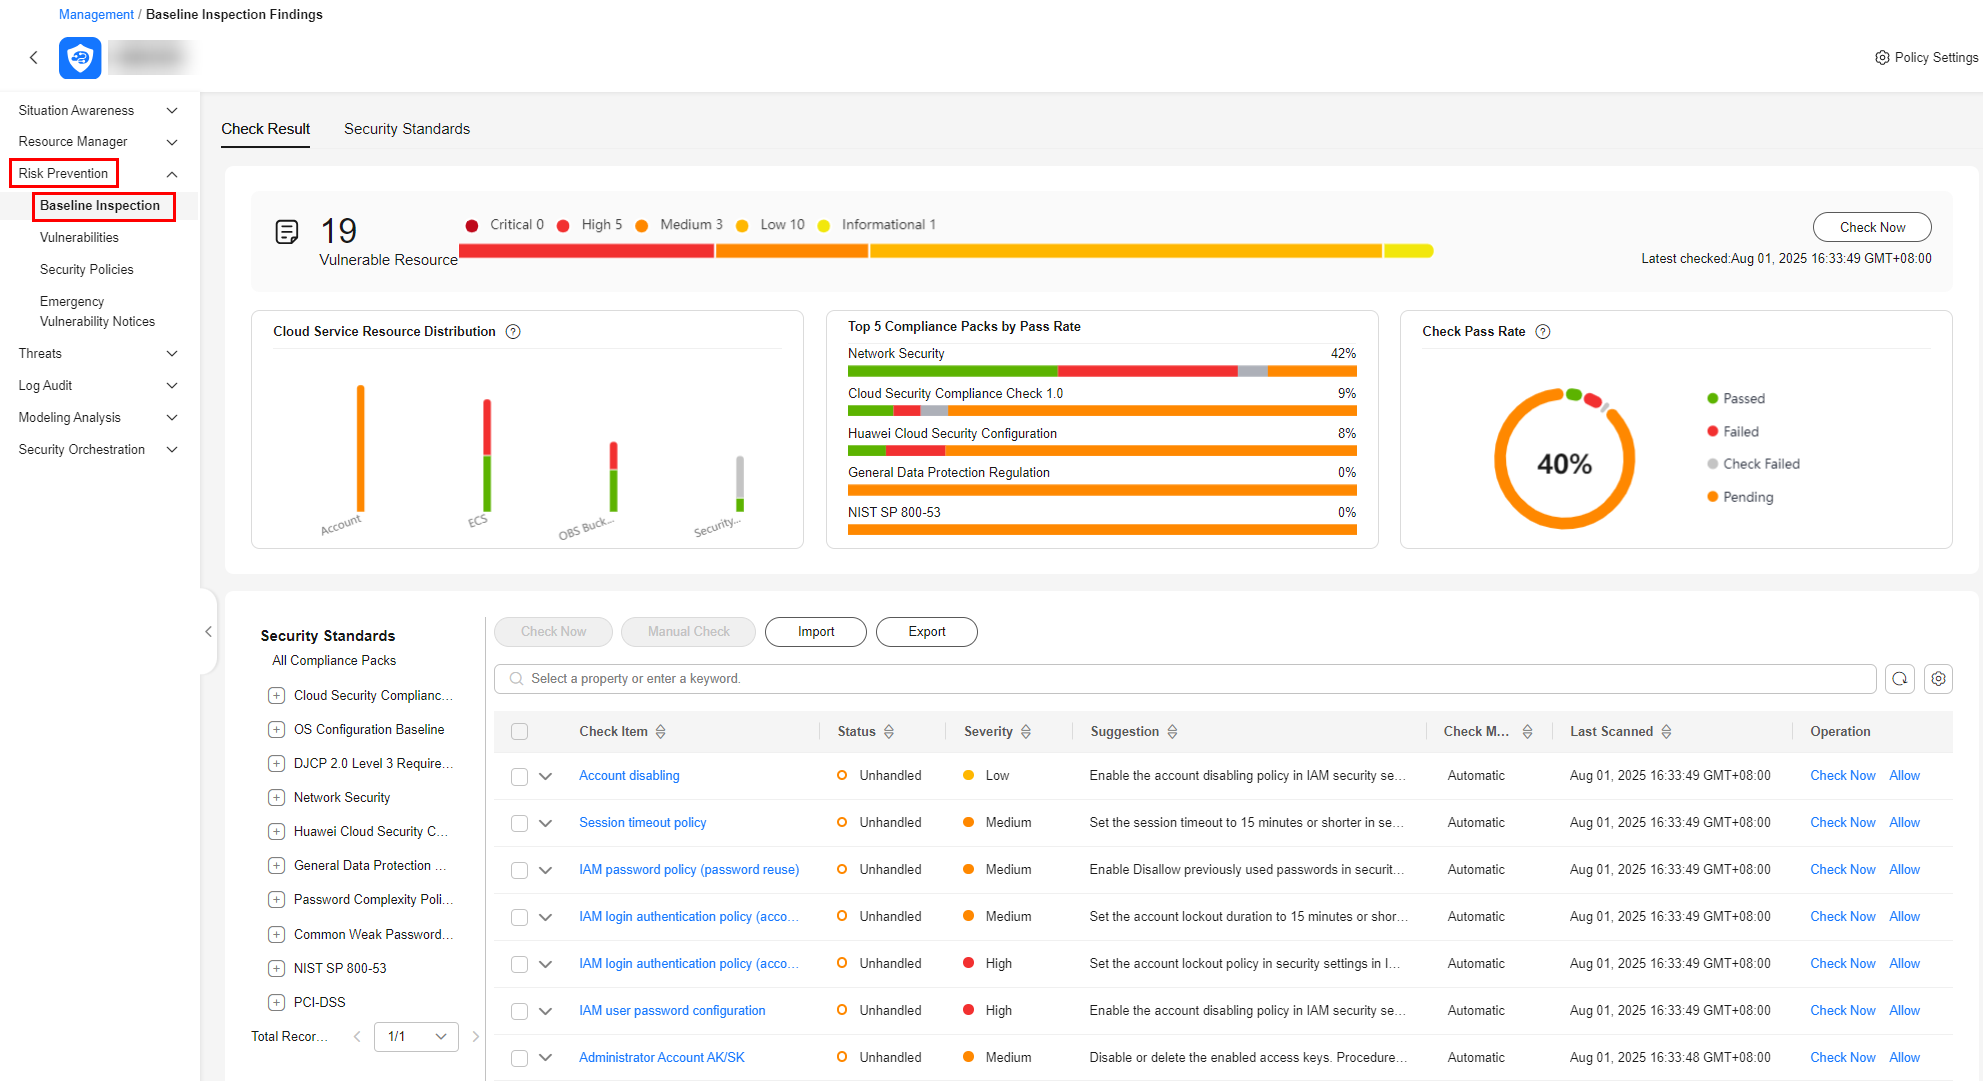
- In the navigation pane on the left, choose Risk Prevention > Baseline Inspection.
Figure 2 Accessing the check result page

- On the Check Result tab, click Check Now. In the dialog box displayed, click OK.
Refresh the page. To check whether the displayed result is the latest, click View Details in the Operation column and check the time in Latest Check.
Starting a Check Based on a Check Plan
This part describes how to immediately execute a check plan. Once a check plan is kicked off, SecMaster immediately executes each check item included in compliance packs in the check plan.
- Log in to the SecMaster console.
- Click
 in the upper left corner of the management console and select a region or project.
 - Click
 in the upper left corner of the page and choose Security & Compliance > SecMaster.
 - In the navigation pane on the left, choose Workspaces > Management. In the workspace list, click the name of the target workspace.
Figure 3 Workspace management page

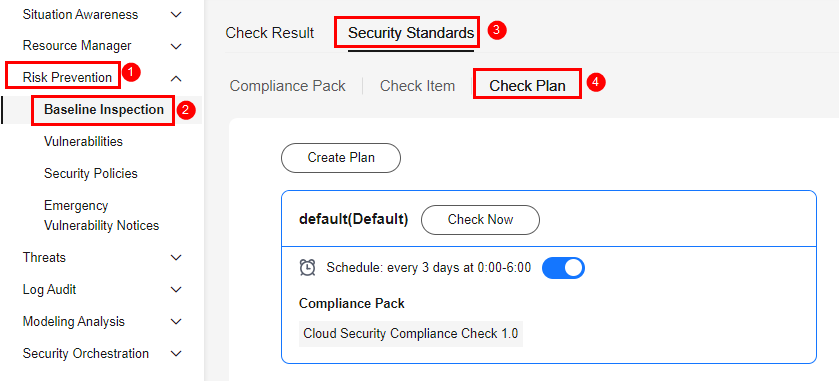
- In the navigation pane on the left, choose . On the displayed page, click the Security Standards tab. Then, click the Check Plan tab.
Figure 4 Accessing the Check Plan tab

- In a check plan box, click Check Now.
SecMaster immediately executes the selected baseline check plan.
Immediate Checks for Certain Check Items
This part describes how to start an immediate check on certain check items.
- Log in to the SecMaster console.
- Click
 in the upper left corner of the management console and select a region or project.
 - Click
 in the upper left corner of the page and choose Security & Compliance > SecMaster.
 - In the navigation pane on the left, choose Workspaces > Management. In the workspace list, click the name of the target workspace.
Figure 5 Workspace management page

- In the navigation pane on the left, choose Risk Prevention > Baseline Inspection.
Figure 6 Accessing the check result page

- Check one or more check items immediately.
- Check for a certain check item
- In the check item list in the lower part of the Check Result tab, locate the target automatic check item and click Check Now in the Operation column.
- In the displayed dialog box, click OK.
Refresh the page and check the details next to Last checked and ensure that the latest scan result is displayed.
- Checks on some check items
- In the check item list in the lower part of the check result tab, select multiple auto check items and click Check Now in the upper left corner above the check item list.
- In the displayed dialog box, click OK.
Refresh the page and check the details next to Last checked and ensure that the latest scan result is displayed.
- Check for a certain check item
Feedback
Was this page helpful?
Provide feedbackThank you very much for your feedback. We will continue working to improve the documentation.See the reply and handling status in My Cloud VOC.
For any further questions, feel free to contact us through the chatbot.
Chatbot


