
Security Automation Test Cases (New Version)
HaydnCSF supports website, host, and binary scans. After a scan is complete, a scan report is generated for you to view vulnerability details and solutions. After a requirement is created, a security automation test case can be designed and executed.
Adding Indicator Parameters
Indicator parameters, such as vulnerability quantity statistics, compliance statistics, and security configurations, are used to measure whether the automatic security tests are passed. You need to add indicator parameters before executing security automation test cases. If you load a security automation test case (such as the test case for joint operations) from a requirement template or test case template with indicator parameters, the indicator parameters will be loaded synchronously.
- On the Case Management page, click Security Automation and then click View Indicator Parameters.
Figure 1 Adding indicator parameters for security automation tests
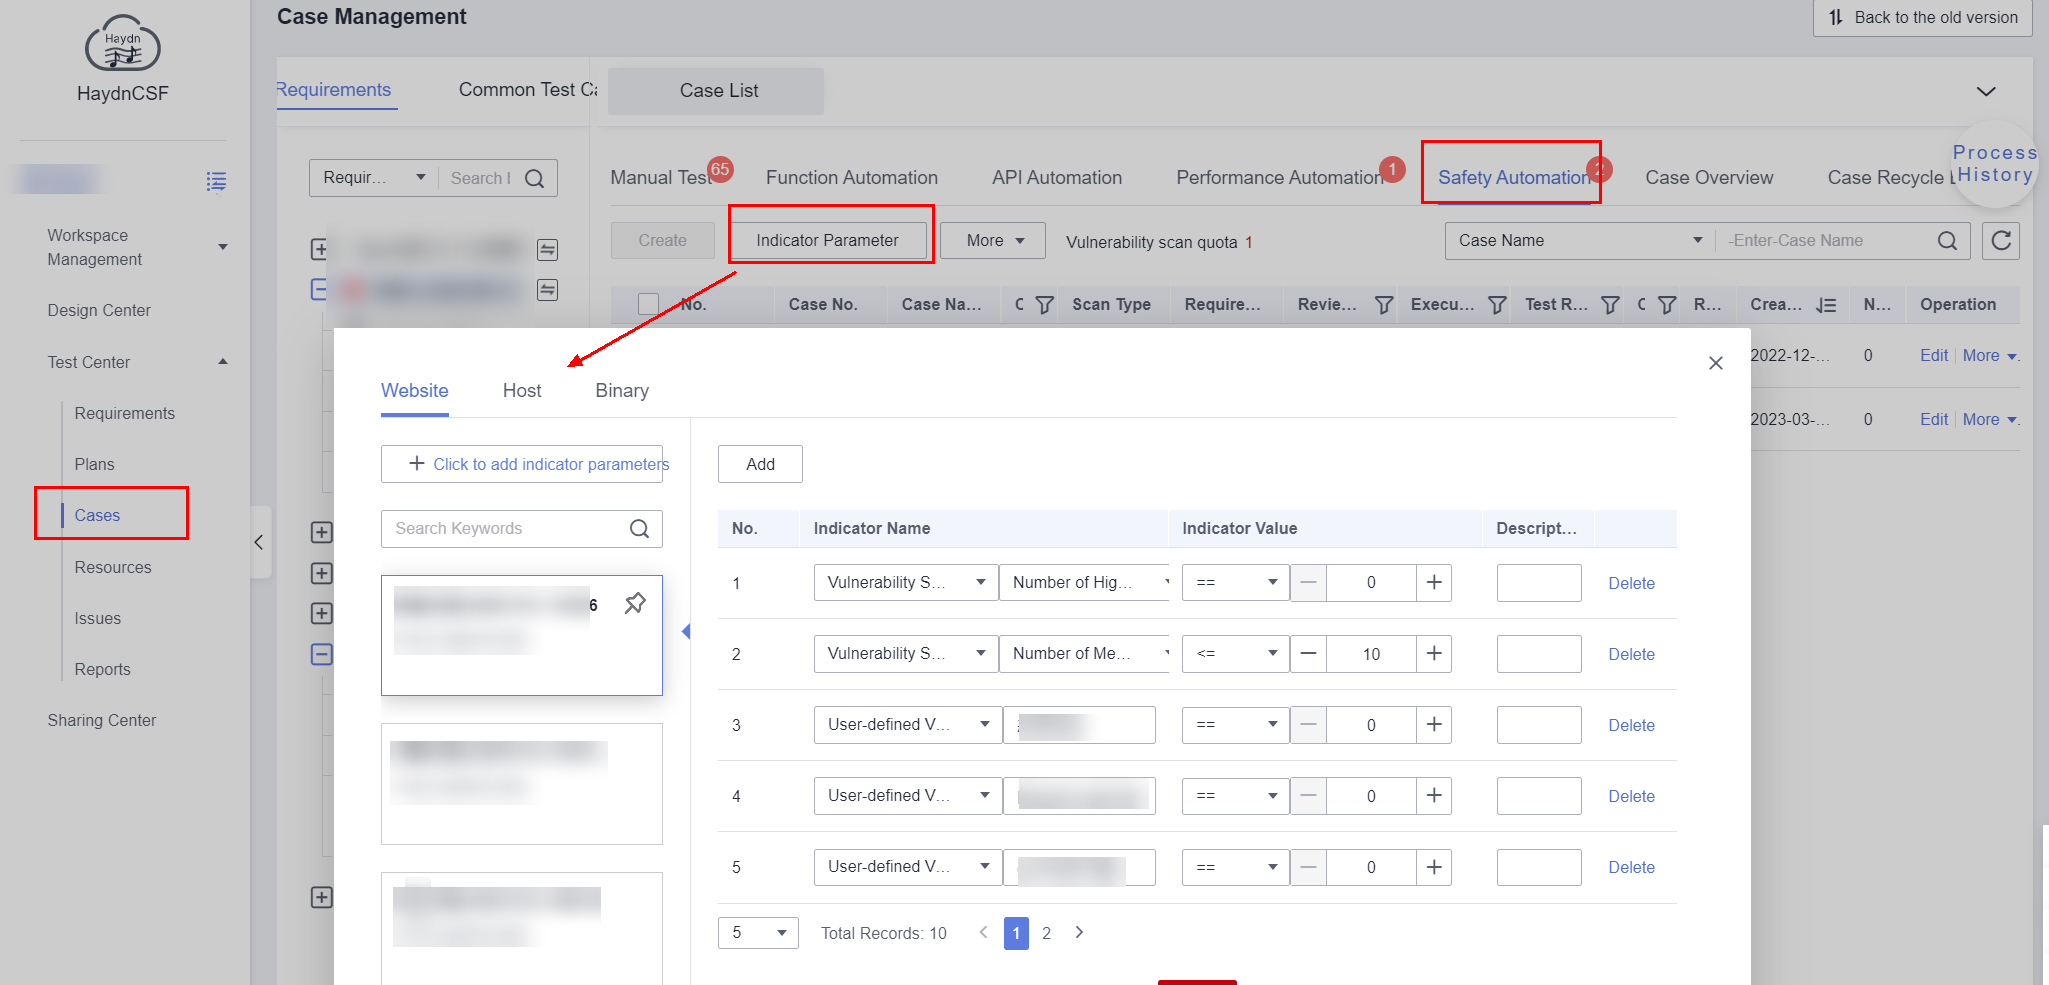
- In the displayed dialog box, click the scanning object (Website, Host, or Binary), and click Add Indicator Parameter. In the displayed dialog box, enter the indicator name and description, and click OK.
- Select the new indicator, click Add to configure the indicator name (such as Vulnerability Statistics) and value, and click OK.
You can group indicator parameters. For example, if there are multiple indicator parameters for scanning a website, the group marked with a pin is the default group. If no group is specified for test case execution, the default group will be selected by default.
Website Scan
Disguised as a common user, VSS uses web crawlers and add-ons to analyze websites and discover potential security threats. With a rich set of built-in scan rules, VSS also provides dynamic scan rate adjustment to prevent downtime.
Prerequisites
If a firewall or other security policies are configured for your website, IP addresses used by VSS for scanning the website will be blocked mistakenly as malicious attackers. To avoid this, add the following IP addresses to the trustlist before using VSS:
119.3.232.114, 119.3.237.223, 124.70.102.147, 121.36.13.144, 124.70.109.117, 139.9.114.20, and 119.3.176.1
Procedure
- Create a test case for scanning the website.
- Log in to the HaydnCSF platform and access the desired workspace. In the navigation pane on the left, choose Verification Center > Cases. On the Case Management page, select the security test requirement that a website scan test case belongs to from the test requirement tree. If no requirement is available, create it by referring to Creating a Requirement and Submitting It for Review.
Figure 2 Creating a security automation test case
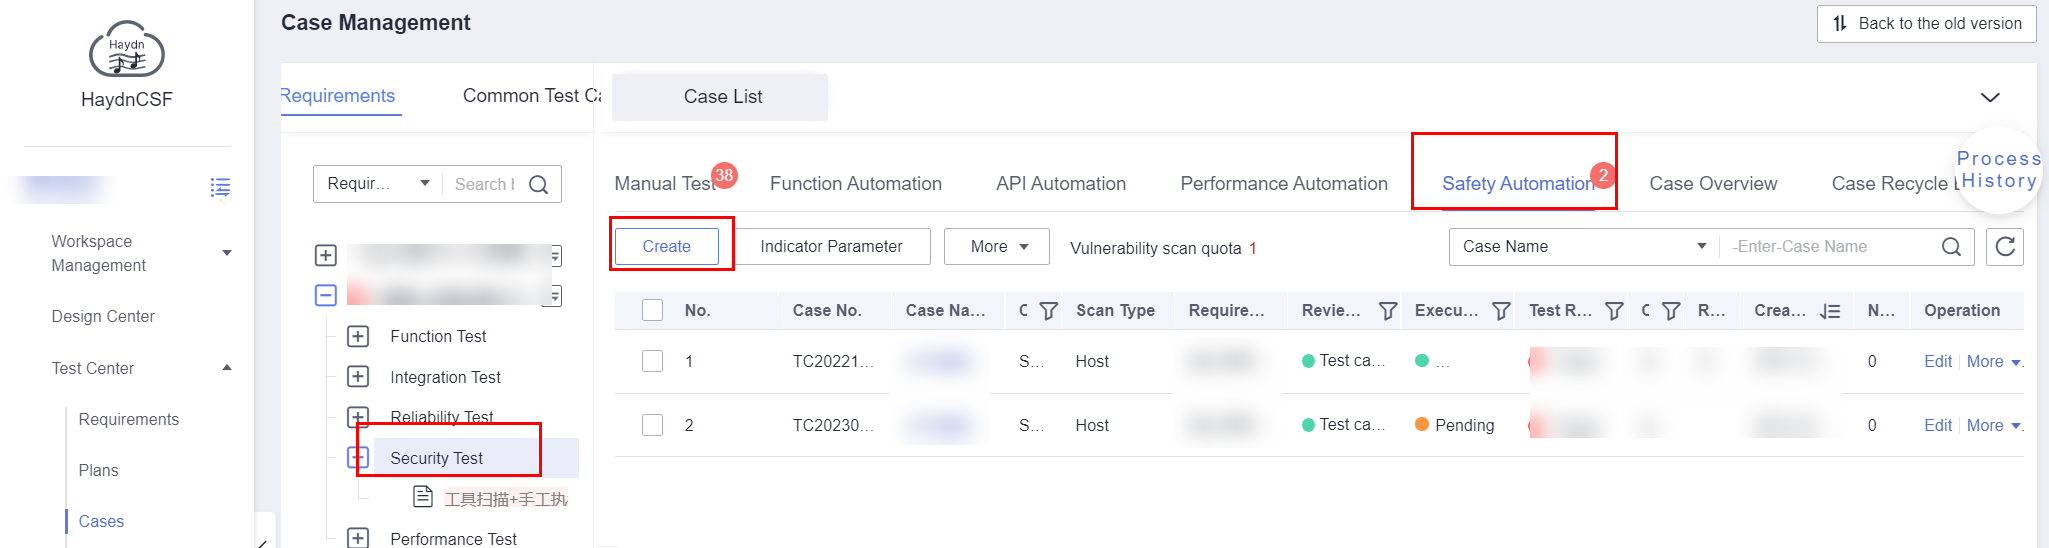
- Click Create and configure parameters.
Table 1 Parameters required for creating a security automation test case Parameter
Description
Requirement Description
(Mandatory) Select the requirement that the test case belongs to from the drop-down list.
Case Name
(Mandatory) Enter a name for the test case. It is recommended that you standardize the test case name, for example, xx website scan.
Deployment Environments
(Mandatory) Select the environment for deploying the test case from the drop-down list based on the associated requirement.
Priority
(Mandatory) Select the importance level of the test case from the drop-down list.
Vulnerability Scan
(Mandatory) Select Website from the drop-down list.
Description
Describe the test case.
Prerequisites
Enter the prerequisites for executing the test case.
Step Description
Enter the website scan steps.
Expected Result
Enter the expected result of each step.
Attachments
Upload the associated files required by the test case.
- Configure parameters for the website to be scanned.
Table 2 Parameters required for the website scan Parameter
Description
Domain Name/IP Address
Enter the domain name and IP address accessible from the public network.
Domain Alias
Enter a name that helps you to identify your website domain name.
Target URL
Homepage URL where the automatic crawling starts from, for example, http://www.domain.com/home.
Enter a complete URL.
Scan Mode
Quick Scan: detects vulnerabilities within a short time.
Standard Scan: detects more vulnerabilities with a longer time.
Depth Scan: detects the most vulnerabilities with the longest time. Select this option for the solution of joint operations products.
Figure 3 Website parameters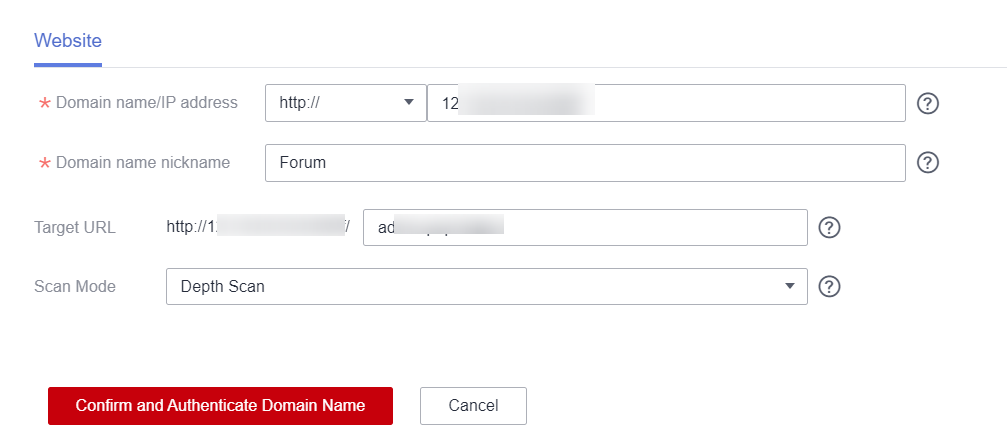
- Click Confirm and Authenticate Domain Name.

If you have loaded a security automation test case from the test case template (the loading method is the same as that in Loading a Template), click Edit to go to the editing page.
- Log in to the HaydnCSF platform and access the desired workspace. In the navigation pane on the left, choose Verification Center > Cases. On the Case Management page, select the security test requirement that a website scan test case belongs to from the test requirement tree. If no requirement is available, create it by referring to Creating a Requirement and Submitting It for Review.
- Authenticate the domain name.
On the displayed case details page, click Authenticate. Read the instructions carefully. If the conditions are met, select I have read and understand the above requirements. and I have read and agree Vulnerability Scan Service Statement. Click Complete Authentication.
Figure 4 Authentication entry of domain names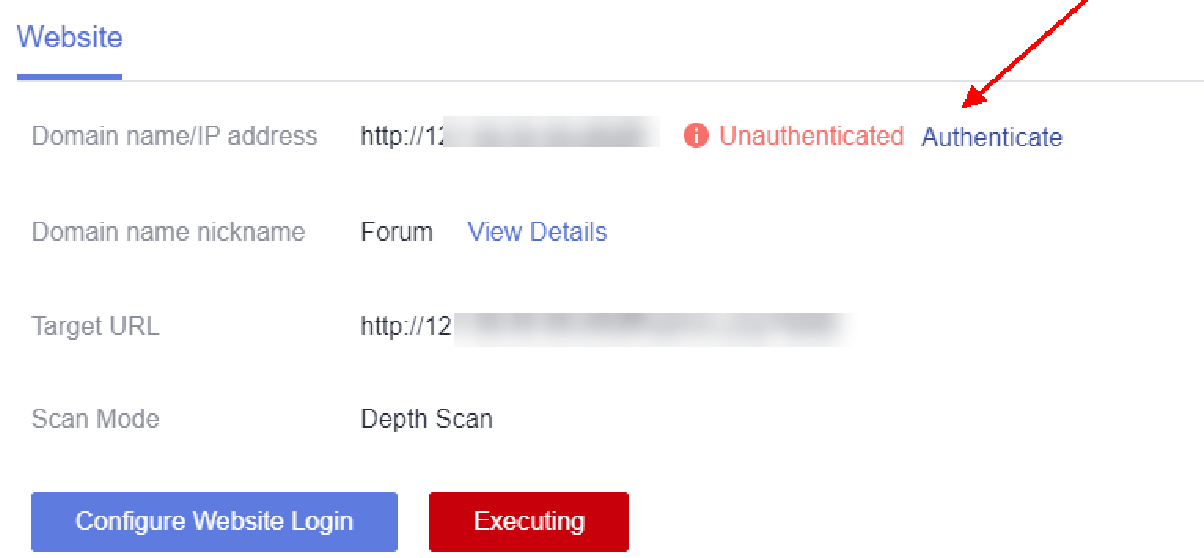 Figure 5 Rules that domain name authentication is not required
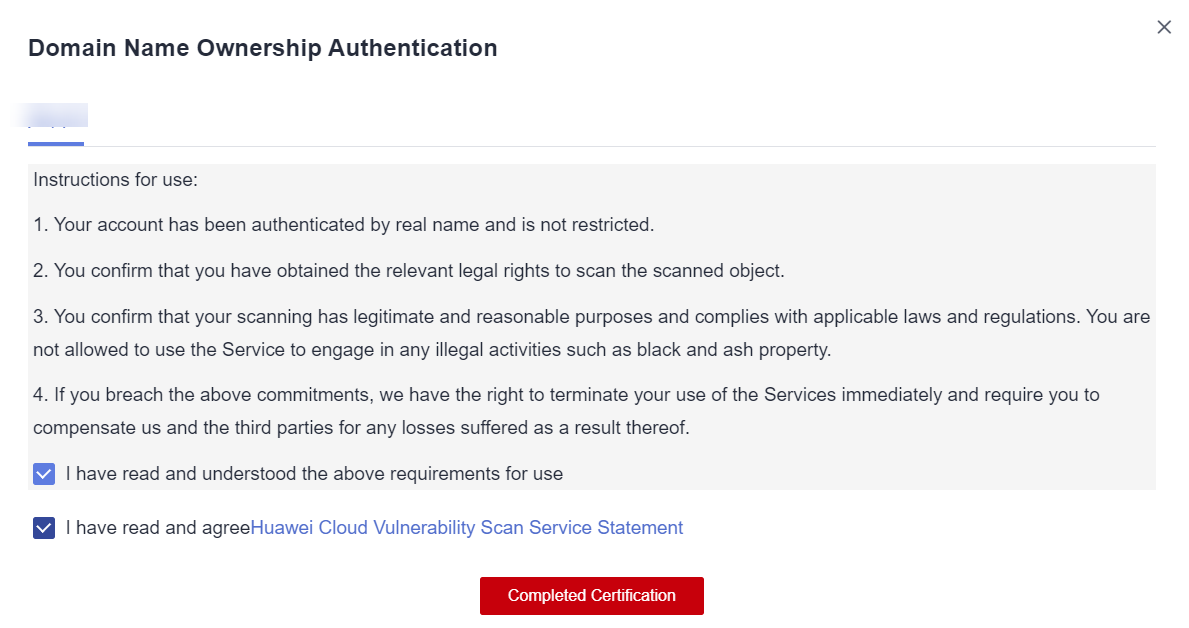
- Configure website login.
If your website is accessible to logged-in users only, configure login parameters so that VSS performs a thorough scan.
- On the basic test case information page, click Configure Website Login.
- In the Configure Website Login dialog box, configure the parameters as required. Table 3describes the parameters.
Figure 6 Website login parameters
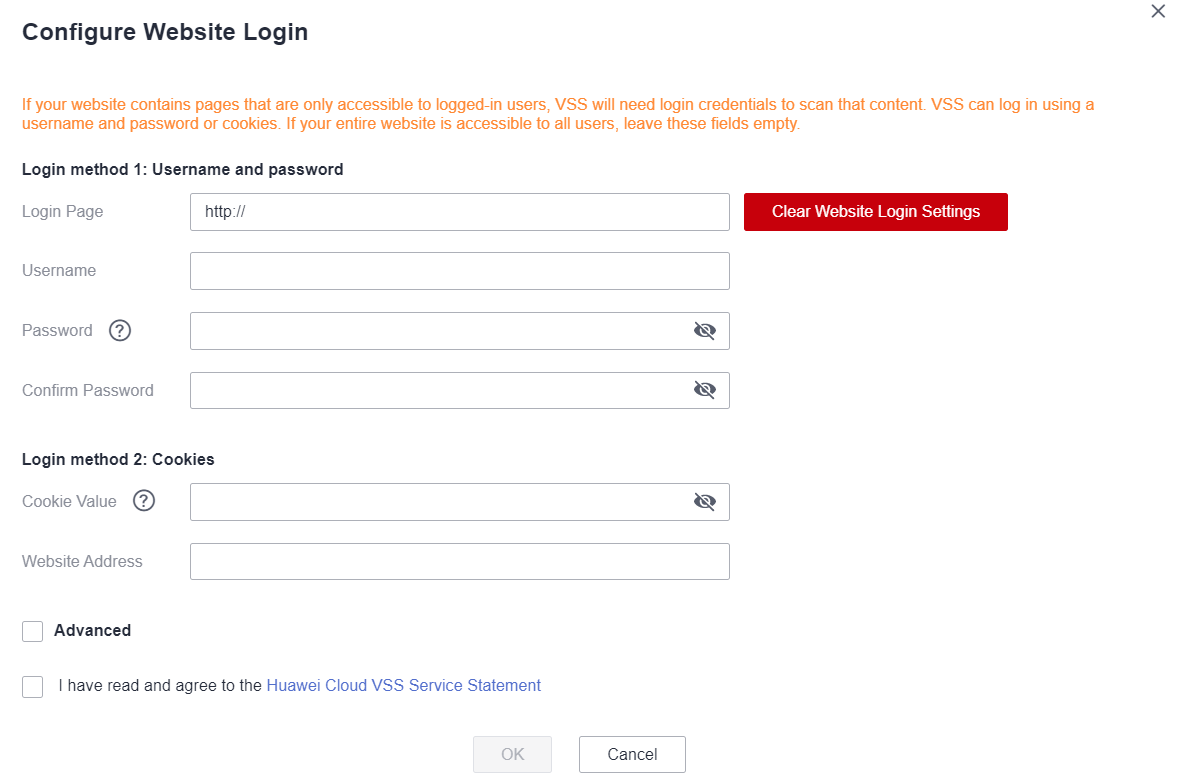
Table 3 Parameters required for website login Parameter
Description
Configure Website Login
If your website is accessible to logged-in users only, configure login parameters so that VSS performs a thorough scan.
- If your website requires only a username and password for logins, use method 1.
- If there are other access restrictions in addition to username and password, such as a dynamic verification code, use method 2.
Login method 1: Username and password
Login Page
Address of the website login page.
Username
Username for logging in to the website.
Password
Password for logging in to the website.
Confirm Password
Confirm password for logging in to the website.
Login method 2: Cookies
Cookie Value
Cookie value for logging in to the website.
For details about how to obtain the cookie value, see How Do I Obtain the Cookie Value of the Website?
NOTE:- If no cookie values are obtained, add a custom header in Advanced Settings.
- When you add a header, obtain the HTTP request header of the related session. For example, HTTP request headers that contain Token or Session.
Website Address
Enter a website that is only accessible to logged-in users for VSS to quickly determine whether your login information is valid.
Advanced Settings - Custom Header
HTTP request headers. A maximum of five HTTP request headers can be added.
If the website to be scanned requires a special HTTP request header, you can configure one.
- Select I have read and agree to the Vulnerability Scan Service Statement. and click OK.
- Add indicator parameters.
On the Case Management page, click Security Automation. On the displayed page, click View Indicator Parameters. In the displayed dialog box, click Website and Add Indicator Parameter, and configure parameters for comparing the test case execution result with the security scan report. For details, see Adding Indicator Parameters.
Figure 7 Indicator parameters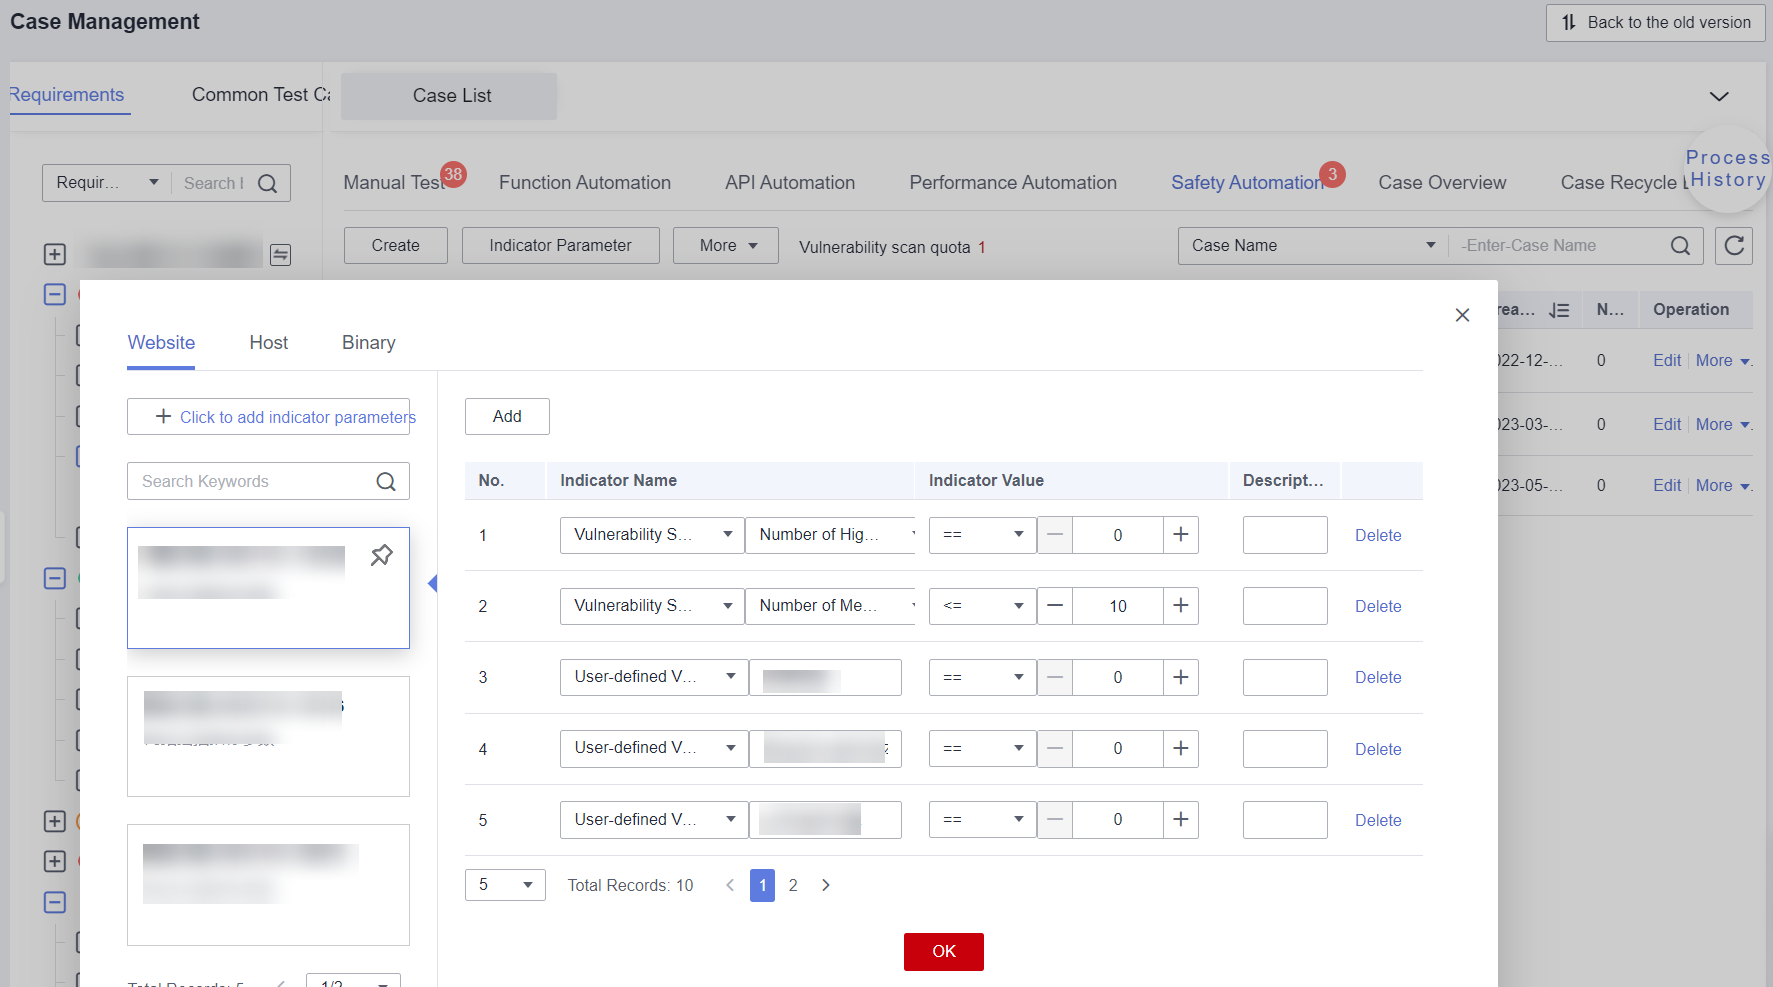
If you load the security automation case from a case template with indicator parameters, the indicator parameters will be loaded synchronously. You can modify the indicator parameters on the indicator parameter page as required.
- Execute the test case.
- Method 1: Use default indicator parameters to execute the test case.
- Method 2: Use indicator parameters in a group to execute the test case. Select this option when you want to select indicator parameters in a group from multiple groups. Select the group in the displayed dialog box.
Figure 8 Executing the test case by default indicator parameters
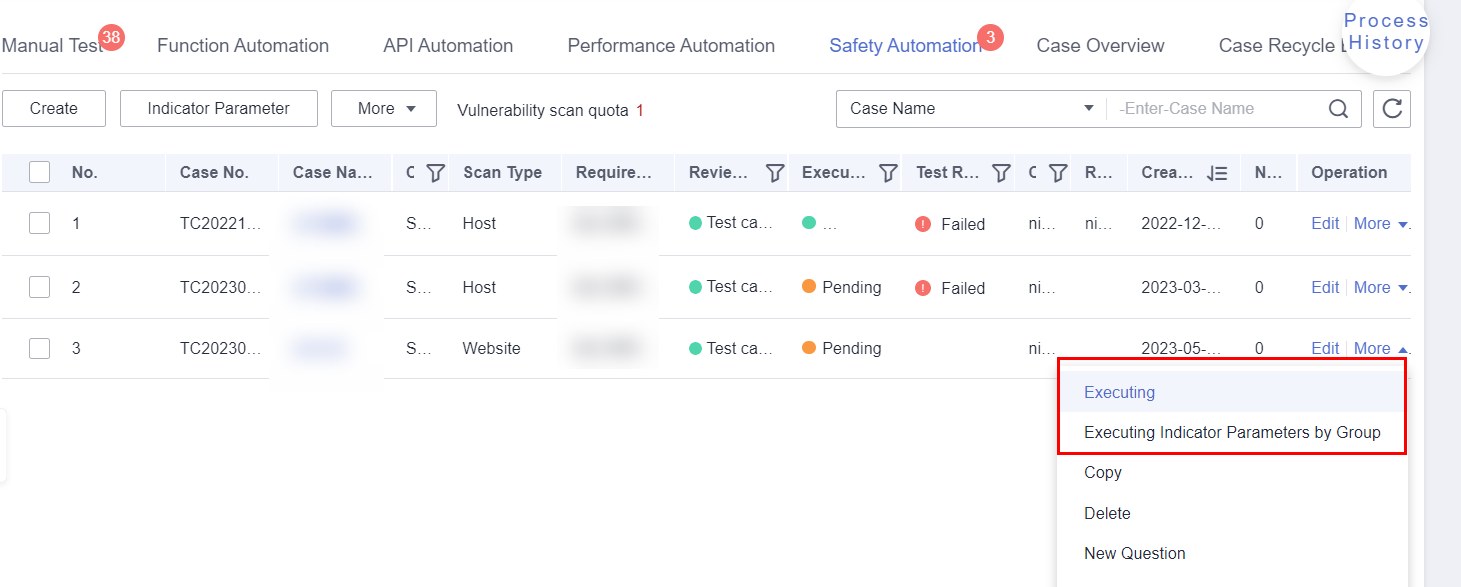
Figure 9 Executing the test case by indicator parameters in a group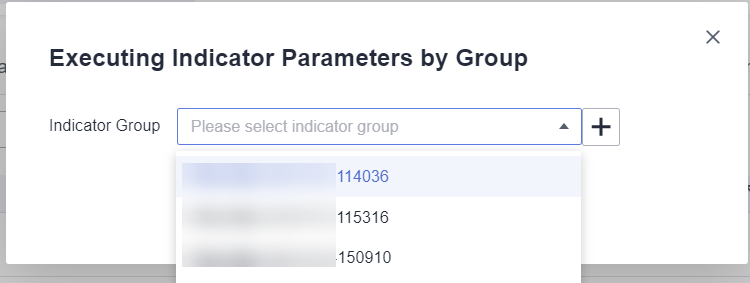
- Click the test case name to go to the case details page to view the execution result.
Under Execution History, view the detailed website scan result. You can click View in the Vulnerability column to view the solution or download the report to view the detailed analysis.
Figure 10 Website scan result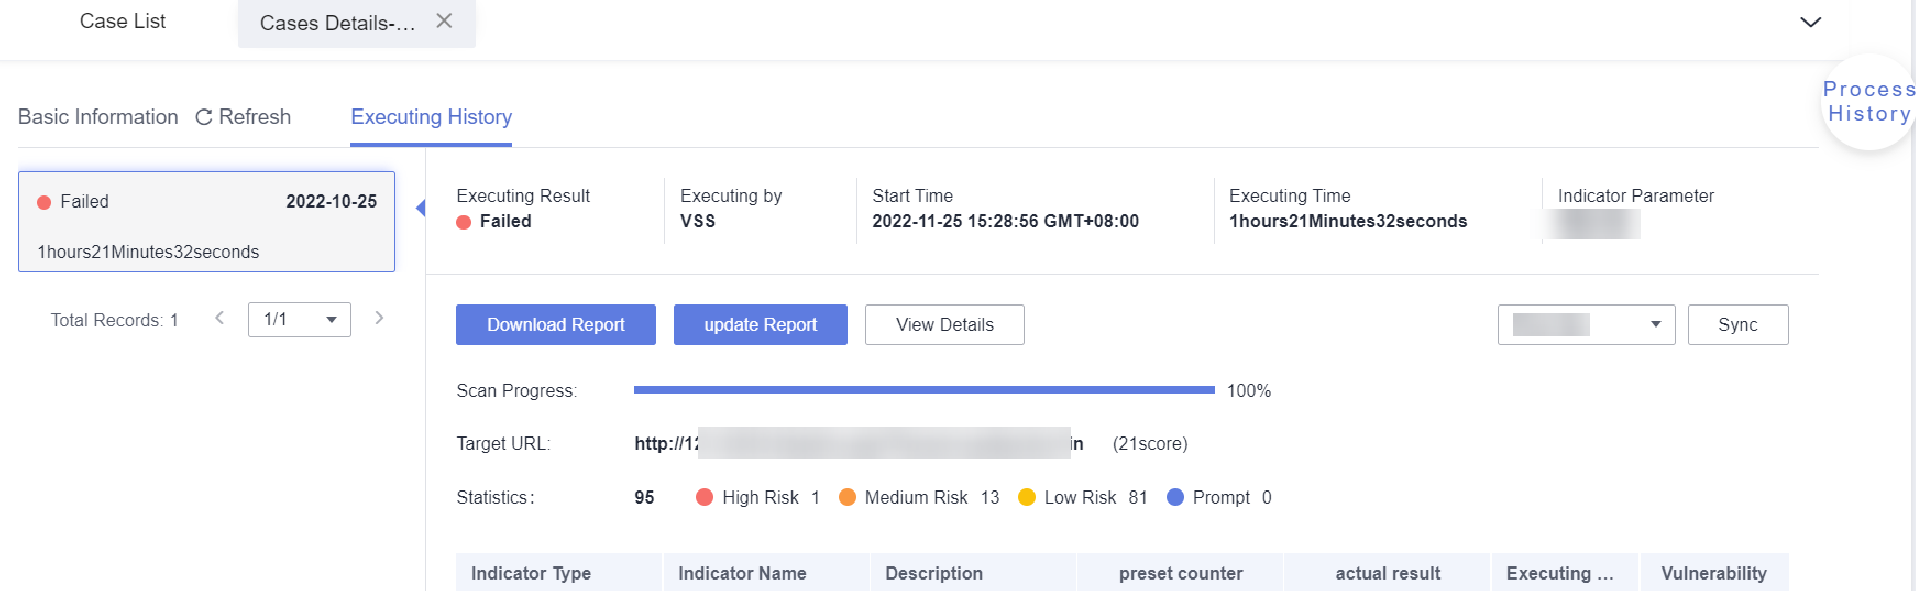
- If new indicator parameters are required for checking the result, modify the indicator parameters under Execution History.
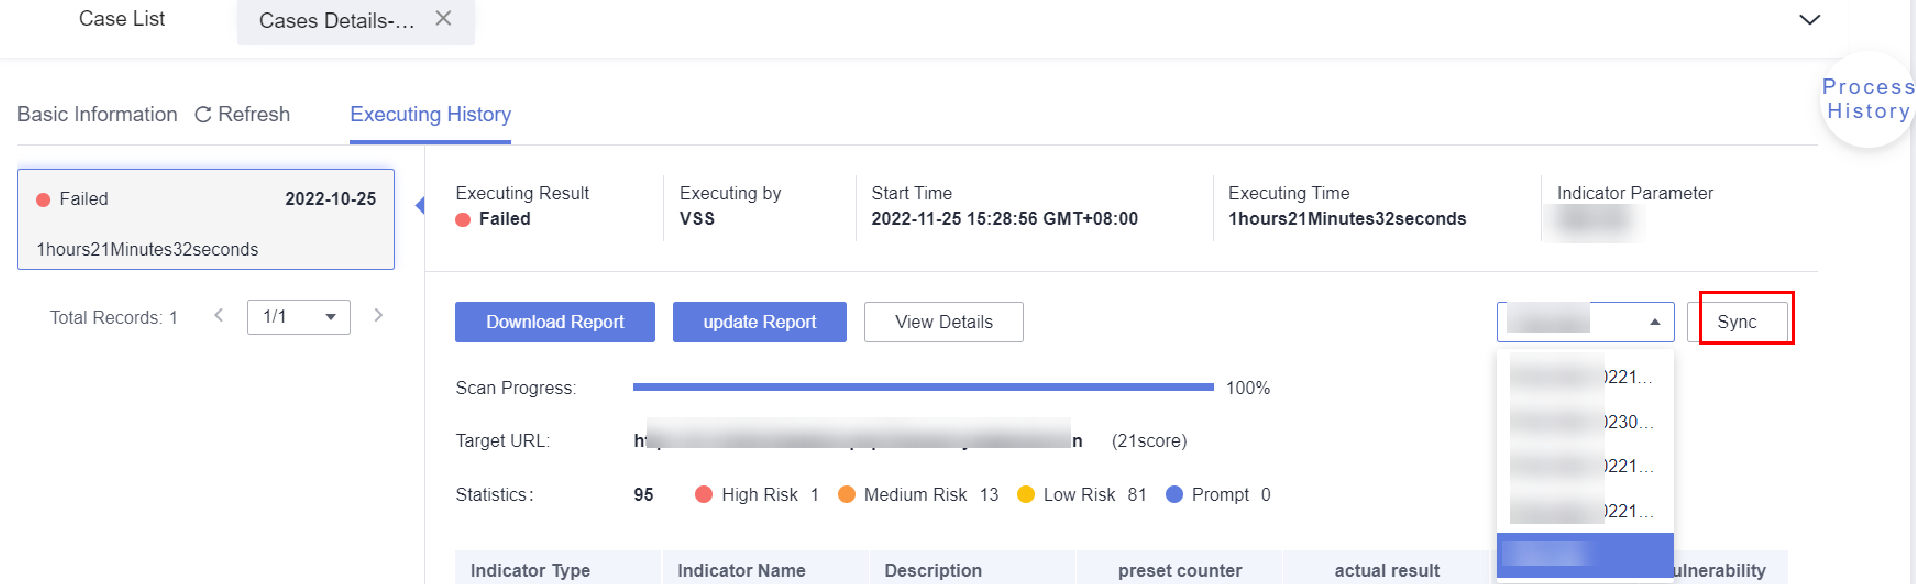
For example, you have created two indicator parameter groups. After using the indicator parameters in one group to scan the website successfully, you can use the indicator parameters in the other group to check the website scan result. After the change, click Sync to update the website scan report.Figure 11 Synchronizing the new indicator parameters
- If the website scan fails, rectify the fault based on the solution and scan the website again.
Host Scan
After VSS is authorized to access your hosts (using usernames and passwords), it automatically detects vulnerabilities and unsafe baseline settings in host OSs and middleware against the latest vulnerability libraries, helping you detect host security risks in a timely manner.
VSS can detect vulnerabilities, unsafe baseline settings, and compliance issues on Linux hosts.
- Create a test case for scanning hosts.
- Log in to HaydnCSF, access the workspace, and choose Verification Center > Cases. On the Case Management page, select the security test requirement that a host scan test case belongs to from the test requirement tree. If no requirement is available, create it by referring to Creating a Requirement and Submitting It for Review.
If you have loaded a security automation test case from the test case template (the loading method is the same as that in Loading a Template), click Edit to go to the editing page.
Figure 12 Creating a security automation test case
- Click Create and configure parameters.
Table 4 Parameters required for the host scan Parameter
Description
Requirement Description
(Mandatory) Select the requirement that the test case belongs to from the drop-down list.
Case Name
(Mandatory) Enter a name for the test case. It is recommended that you standardize the test case name, for example, xx host scan.
Deployment Environments
(Mandatory) Select the environment for deploying the test case from the drop-down list based on the associated requirement.
Priority
(Mandatory) Select the importance level of the test case from the drop-down list.
Vulnerability Scan
(Mandatory) Select Host from the drop-down list.
Description
Describe the test case.
Prerequisites
Enter the prerequisites for executing the test case.
Step Description
Enter the host scan steps.
Expected Result
Enter the expected result of each step.
Attachments
Upload the associated files required by the test case.
Figure 13 Basic Information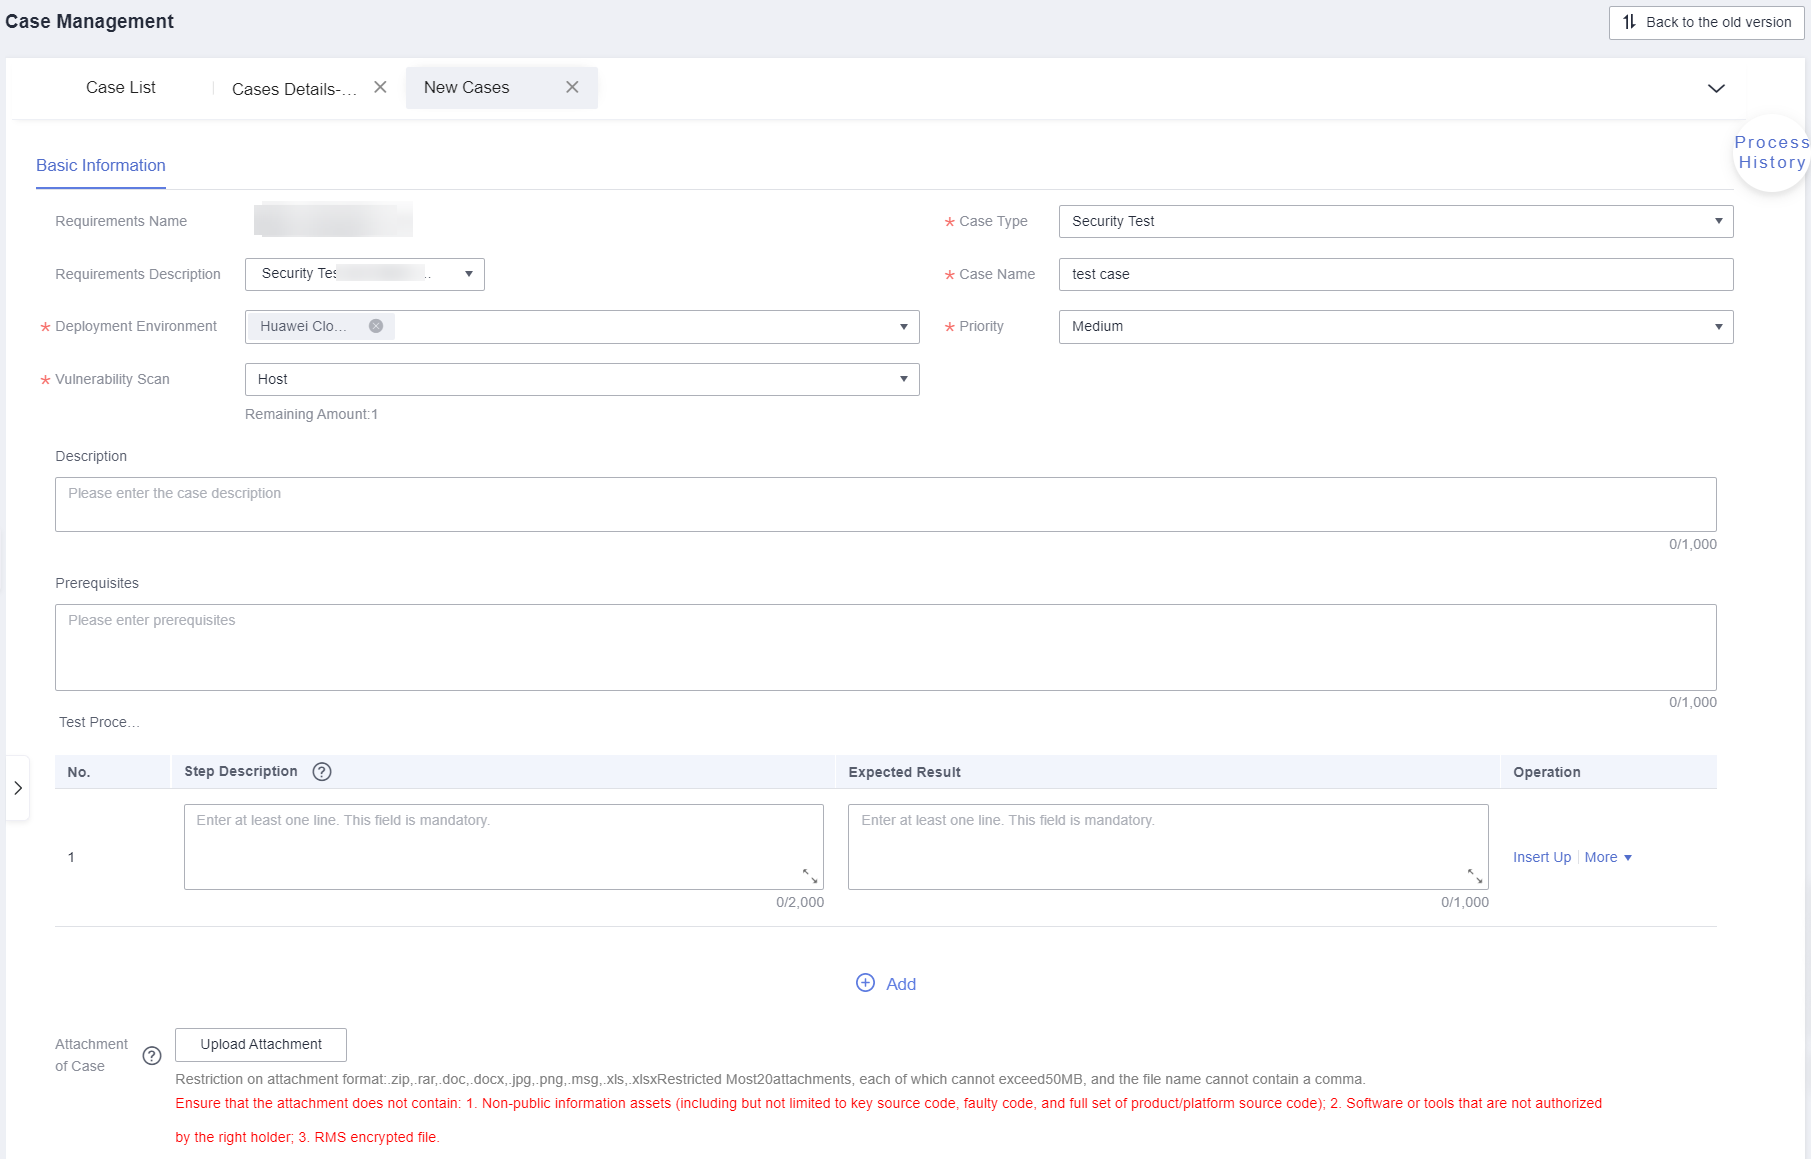
- Configure parameters for the hosts to be scanned.
- Host Name: Enter a unique name for each host for easy identification.
- IP Address: Enter the IP address of each host.
Figure 14 Parameters for the hosts to be scanned
- If you have multiple hosts to be scanned and the hosts can be accessed from the public network, directly add the hosts.
- If your hosts can be accessed only through a proxy IP address (private IP address), a jump server is required. Enter the internal IP address of each host in this step and configure the jump server in the next step.
- Click Confirm and Configure Hosts.
- Log in to HaydnCSF, access the workspace, and choose Verification Center > Cases. On the Case Management page, select the security test requirement that a host scan test case belongs to from the test requirement tree. If no requirement is available, create it by referring to Creating a Requirement and Submitting It for Review.
- Add a jump server.
If your hosts can be accessed only through the proxy IP address, configure the jump server first. If the hosts can be accessed from the public network, skip this step.
Click Configure Jump Server next to the host to be scanned. In the displayed dialog box, configure parameters. Currently, only Linux jump servers can be added.Table 5 Parameters required for configuring a jump server Parameter
Description
Host
Enter a jump server name.
Public IP Address
Enter a public IP address bound to the jump server.
Login Port
Enter a port number for logging in to the SSH account.
Ensure that the port has been added to the security group for the host to access VSS.
Login Method
The options are password login and key login.
Encrypted Key
An encryption key must be used to protect the login password or key of the host from being stored or disclosed.
You can select an existing encrypted key (if any). If no encrypted key is available, click the key creation button to create a default master key used for VSS.
Username
Enter a user name for logging in to the jump server. The default value is root.
Password
Set the password of the sudo user and click the encryption icon to encrypt the password.
Figure 15 Configure Jump Server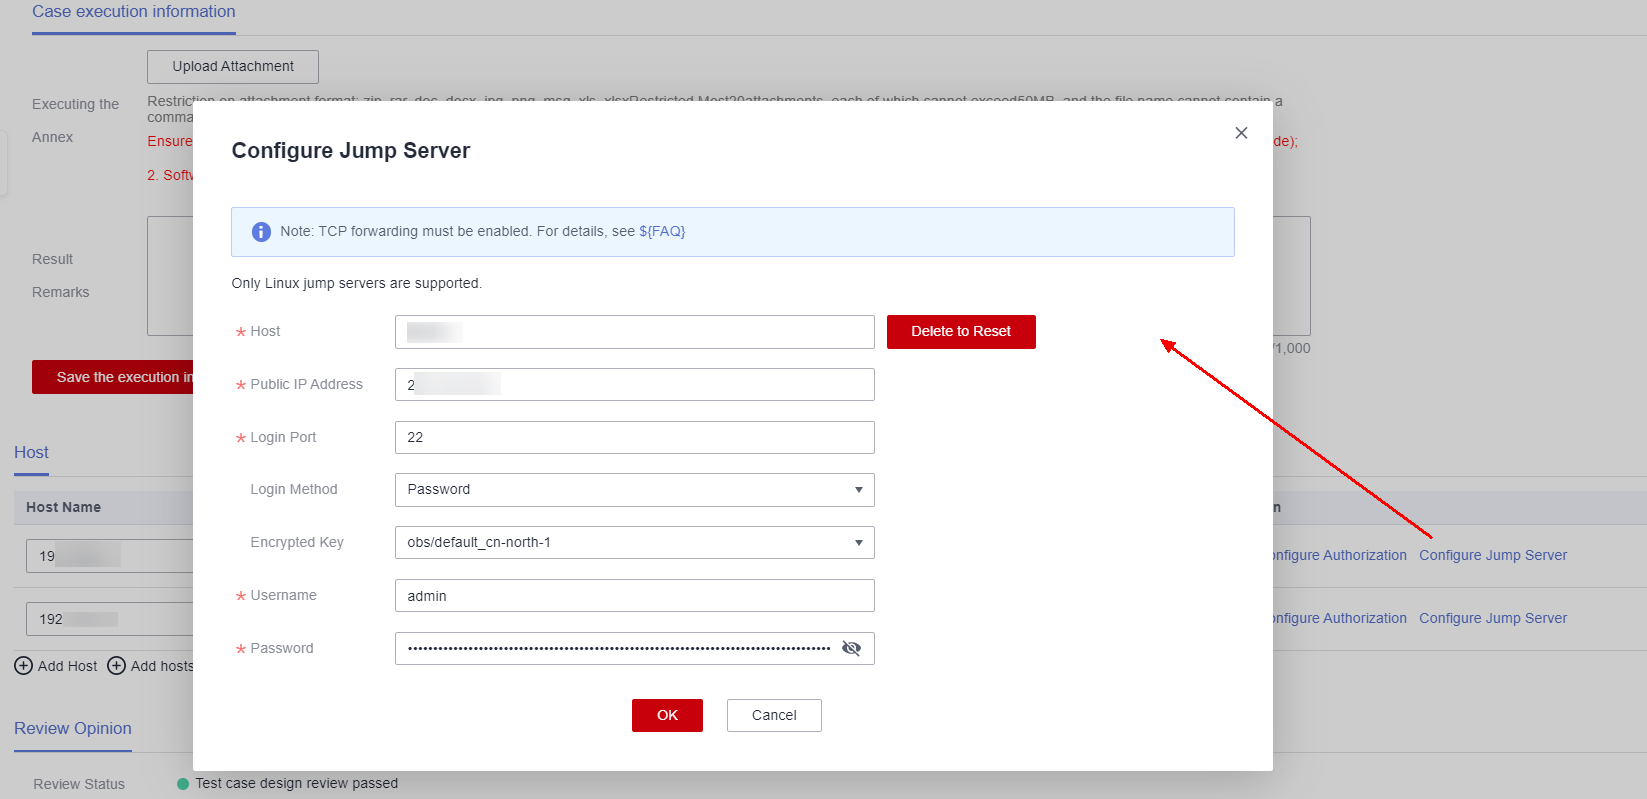
- Configure host authorization.
Click Configure Authorization in the Operation column, configure parameters, and click OK.Figure 16 Configure Authorization
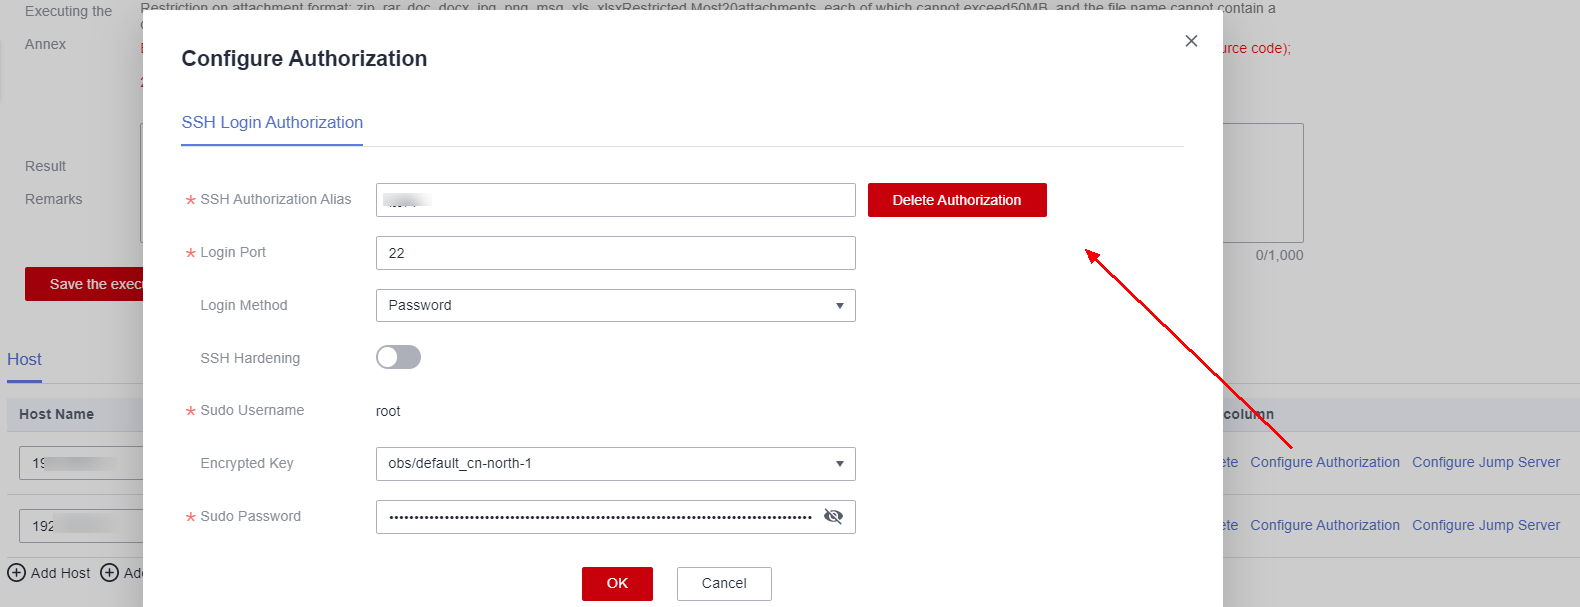
Table 6 Parameters required for Linux host authorization Parameter
Description
SSH Authorization Alias
Enter an SSH account name.
Login Port
Enter a port number for logging in to the SSH account.
Ensure that the port has been added to the security group for the host to access VSS.
Login Method
The options are Password and Key.
Encrypted Key
An encryption key must be used to protect the login password or key of the host from being stored or disclosed.
You can select an existing encrypted key (if any). If no encrypted key is available, click Create Key to create a default master key used for VSS.
SSH Hardening
If this option is enabled, you can log in as a common user and then switch to the root user.
Sudo Username
The default value is root.
Sudo Password
Set the password of the sudo user and click Encrypted to save the password.
If you no longer want VSS to scan hosts, cancel the authorization. After that, VSS will be unable to detect all host vulnerabilities. Click Configure Authorization in the Operation column of the scanned host. In the displayed dialog box, click Delete Authorization.
- Test the connectivity between hosts.
In the Host area, click Check All Connectivity. Subsequent scans can be performed only after all host connectivity tests are successful.
For details, see What Can I Do If a Host Connectivity Test Fails?
Figure 17 Host connectivity test
- Execute the test case.
- Method 1: Use default indicator parameters to execute the test case. Locate the test case and choose More > Execute.
- Method 2: Use indicator parameters in a group to execute the test case. Select this option when you want to select indicator parameters in a group from multiple groups. Select the group in the displayed dialog box.
- Click the test case name to go to the case details page to view the execution result.
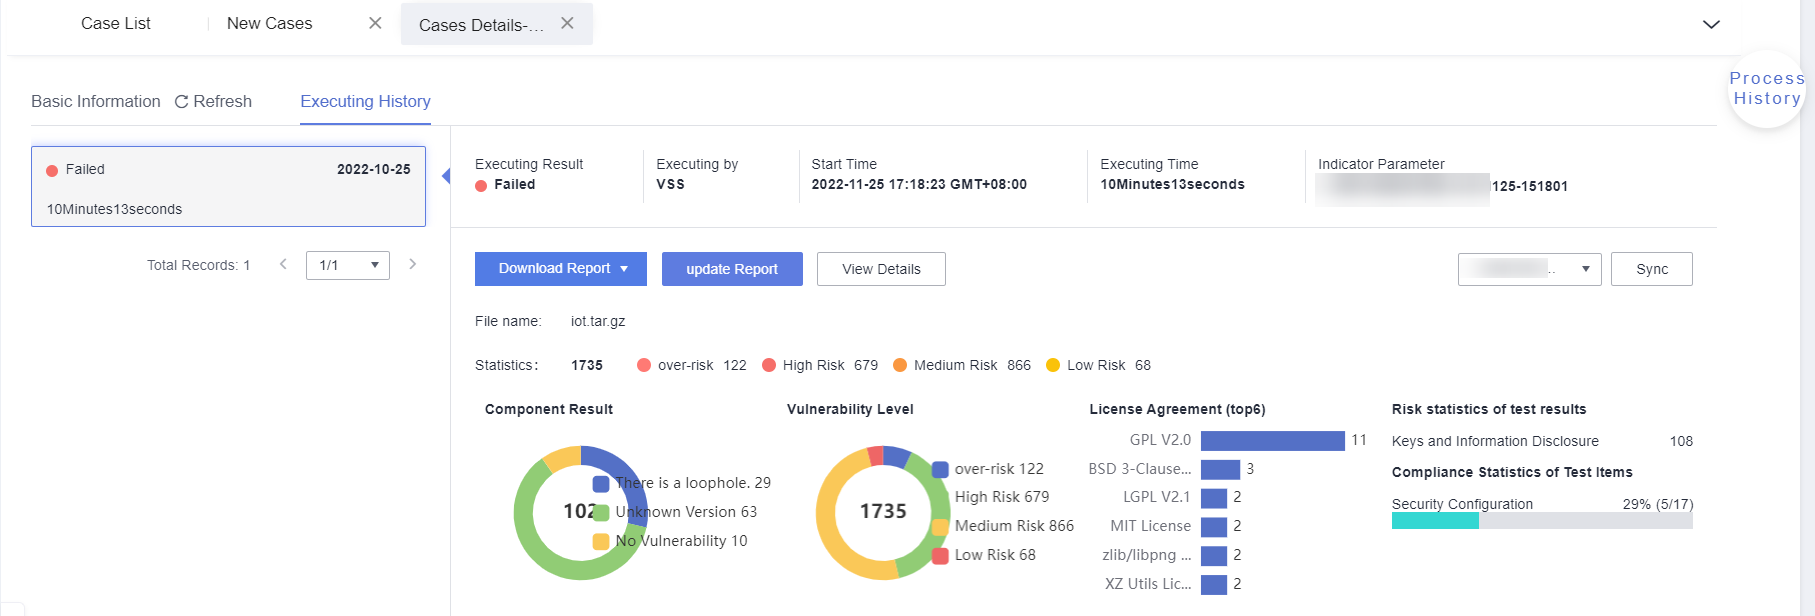
Under Execution History, view the detailed host scan result. You can click View in the Vulnerability column to view the solution or download the report to view the detailed analysis.

- If new indicator parameters are required for checking the result, modify the indicator parameters under Execution History, as shown in the preceding figure.
For example, you have created two indicator parameter groups. After using the indicator parameters in one group to scan the hosts successfully, you can use the indicator parameters in the other group to check the host scan result. After the change, click Sync to update the host scan report.
- If the host scan fails, rectify the fault based on the suggestions and scan the hosts again.
Binary Scan
Binary scan is to scan binary files decompressed from your software or firmware packages using component feature identification and static detection technologies, and various risk detection rules to obtain the component BOM list and potential risk list and output a professional analysis report.
- Create an indicator parameter, which is used to check whether the binary scan is successful based on the scan result. For details, see Adding Indicator Parameters.
- Log in to HaydnCSF, access the workspace, and choose Verification Center > Cases. On the Case Management page, select the security test requirement that a binary scan case belongs to from the test requirement tree. If no requirement is available, create it by referring to Creating a Requirement and Submitting It for Review.
If you have loaded a security automation case from the case template (the loading method is the same as that in Loading a Template), click Edit to go to the editing page.Figure 18 Creating a security automation test case

- Click Create and configure parameters.
Table 7 Parameters required for the binary scan Parameter
Description
Requirement Description
(Mandatory) Select the requirement that the test case belongs to from the drop-down list.
Case Name
(Mandatory) Enter a name for the test case. It is recommended that you standardize the test case name, for example, xx binary scan.
Deployment Environments
(Mandatory) Select the environment for deploying the test case from the drop-down list based on the associated requirement.
Priority
(Mandatory) Select the importance level of the test case from the drop-down list.
Vulnerability Scan
(Mandatory) Select Binary from the drop-down list.
Description
Describe the test case.
Prerequisites
Enter the prerequisites for executing the test case.
Step Description
Enter the binary scan steps.
Expected Result
Enter the expected result of each step.
Attachments
Upload the associated files required by the test case.
- Upload the object (product software or firmware package) to be scanned.
- Select an indicator parameter that can be used to determine whether the binary scan case passes the security test.
Figure 19 Configuring the binary scan object
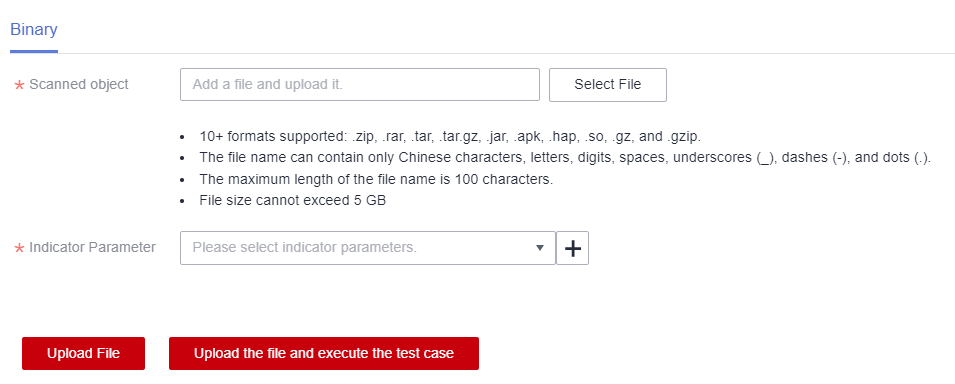
- Save the configurations and execute the test case.
- Execute: The uploaded binary package will not be saved and is only for executing the test case.
- Upload File: The uploaded binary package will be stored for three days by default.
- Upload File and Execute Test Case: The uploaded binary package will be stored for three days by default and the test case will be executed.
- After the test case execution is complete, go to the execution history page to view the execution result and details.
Feedback
Was this page helpful?
Provide feedbackThank you very much for your feedback. We will continue working to improve the documentation.See the reply and handling status in My Cloud VOC.
For any further questions, feel free to contact us through the chatbot.
Chatbot


