Migrating an SVN Repository to CodeArts Repo
This section uses a code repository with the standard SVN layout as an example to describe how to migrate an existing SVN repository to CodeArts Repo. The following figure shows the directory structure of the repository.

There are two methods of migrating the existing SVN code. Both methods effectively migrate the SVN code and operation records. The differences of the two methods are as follows. In the first method, the branches and tags folders of the SVN repository are mapped to Git branches and tags during the migration. This facilitates subsequent development on CodeArts Repo, but the migration process is complex. The second method is simple because the branch and tag folders of the SVN repository are migrated without mapping, but it is inconvenient for subsequent development. You can select a method as required.
- Migration Method 1: Import on the Git Bash Client: applicable to the scenarios where only part of code is stored in the SVN during project development
- Migration Method 2: Online Import Using HTTP: applicable to the scenarios where the complete project code is stored in the SVN when the project is complete
Migration Method 1: Import on the Git Bash Client
- Obtain committer information of the SVN repository.
- Use TortoiseSVN to download the repository to be migrated to the local computer.
- Go to the local SVN repository (KotlinGallery in this example) and run the following command on the Git Bash client:
svn log --xml | grep "^<author" | sort -u | \awk -F '<author>' '{print $2}' | awk -F '</author>' '{print $1}' > userinfo.txtThe userinfo.txt file is generated in the directory.

- Open the userinfo.txt file. You can view the information about all committers who have committed code to the repository in the file.
- Git uses an email address to identify a committer. To better map the SVN repository information to a Git repository, create a mapping between the SVN and Git usernames.
Modify the userinfo.txt file. Each line should be in the format of svn_committer = git_committer_nickname <email_address>.

- Create a local Git repository.
- Create an empty Git repository directory on the local computer, and copy the userinfo.txt file obtained in 1 to the directory.
- Start the Git Bash client in the directory and run the following command to clone a Git repository:
git svn clone <svn_repository_address> --no-metadata --authors-file=userinfo.txt --trunk=trunk --tags=tags --branches=branches
The following table lists parameters in the command. Set the parameters as required.
Parameter
Description
--no-metadata
Prevents the Git from exporting useless information contained in the SVN.
--authors-file
File that maps all SVN accounts to Git accounts
--trunk
Main development project
--branches
Branch projects
--tags
Tags
After the command is executed, a Git repository is generated locally.

- Run the following commands to go to the KotlinGallery folder and verify the current Git repository branch structure:
cd KotlinGallery
git branch -a

As shown in the preceding figure, all SVN directory structures are successfully migrated in the form of Git branches.
- Correct local branches.
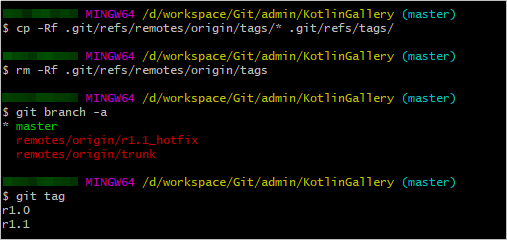
In 2, the git svn clone command is used to save the tags folder in the SVN repository as a branch, which does not comply with the Git usage specifications. Therefore, before uploading tags to CodeArts Repo, adjust the local branches to comply with the Git usage specifications.
- Go to the local Git repository and run the following commands on the Git Bash client to change the tags branch to appropriate Git tags:
cp -Rf .git/refs/remotes/origin/tags/* .git/refs/tags/
rm -Rf .git/refs/remotes/origin/tags
git branch -a
git tag

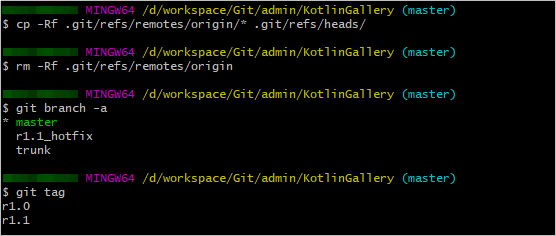
- Run the following commands to change the remaining indexes under refs/remotes to local branches:
cp -Rf .git/refs/remotes/origin/* .git/refs/heads/
rm -Rf .git/refs/remotes/origin
git branch -a
git tag

- Run the following commands to merge the trunk branch into the master branch and delete the trunk branch:
git merge trunk
git branch -d trunk
git branch -a
git tag

- Go to the local Git repository and run the following commands on the Git Bash client to change the tags branch to appropriate Git tags:
- Upload the local code.
- Set the SSH key of the repository by referring to Overview.
- Run the following commands to associate the local repository with the CodeArts Repo repository and push the master branch to CodeArts Repo:
git remote add origin <CodeArts Repo_repository_address>
git push --set-upstream origin master
After the push is successful, log in to CodeArts Repo and view the master branch of the repository after clicking the Code and Branches tabs.
- Run the following command to push other branches from the local computer to CodeArts Repo:
git push origin --all
After the push is successful, the r1.1_hotfix branch is added to the repository after clicking the Code and Branches tabs.
- Run the following command to push tags from the local computer to CodeArts Repo:
git push origin --tags
After the push is successful, click the Code and Branches tabs and view tags r1.0 and r1.1 added to CodeArts Repo.
Migration Method 2: Online Import Using HTTP
Ensure that your SVN server supports HTTP or HTTPS access. You can enter http(s)://SVN server address/Name of the repository to be accessed in any browser for verification.
- On the CodeArts Repo list page, click
 next to New Repository and choose Import Repository from the drop-down list.
 - Enter the source repository URL, enter the SVN username and password, select I have read and agree to the Privacy Statement and CodeArts Service Statement, and click Next.
Enter the name of the repository to be created, configure permissions, and click OK.
- After the repository is created, click the repository name to view details.
Feedback
Was this page helpful?
Provide feedbackThank you very much for your feedback. We will continue working to improve the documentation.See the reply and handling status in My Cloud VOC.
For any further questions, feel free to contact us through the chatbot.
Chatbot


