Migrating an SVN Code Repository
Constraints
- The repository domain must be connected to the service node.
- You need to create a new project or select an existing one.
- You have the permission to create a repository. If not, refer to Configuring Repo-Level Permissions.
Import an SVN repo to CodeArts Repo
- Go to the CodeArts Repo homepage, click New Repository, and select an existing project from the Project drop-down list box or create a project.
- Set repo type to Import and import from SVN. For details about how to set parameters, see Table 1.
Table 1 Parameters for importing the SVN repo Parameter
Description
Source Repository URL
Mandatory. Specify the repo path to be imported. The source repo path must start with http://.
Verification to Access Source Repo
Mandatory. There are two cases:
- If the imported source repository is open to all visitors, select Not needed.
- If the imported source repository is private, select Needed. Currently, two authentication modes are supported: By service endpoint and By personal access token. For details about how to set parameters, see Verifying the Import Permission.
- Click Next. On the Basic Information page, set parameters by referring to the parameter table.
- Set the parameters for syncing a repo by referring to table 1.
Helpful Links
- If the repo file is too large or the network quality is poor, it may take more than 30 minutes to import the repo file. If the import times out, you are advised to clone or push the client. For details, see Using Git Bash to Import an SVN repo to CodeArts Repo.
- Online import is simple, and branches and tags in the SVN can be moved. If you want to continue development based on the code repository, use the Git Bash client to import the code repository. For details, see Using Git Bash to Import an SVN repo to CodeArts Repo.
Using Git Bash to Import an SVN repo to CodeArts Repo
- Obtain committer information of the SVN repository.
- Use TortoiseSVN to download the repository to be migrated to the local computer.
- Go to the local SVN repository (KotlinGallery in this example) and run the following command on the Git Bash client:
svn log --xml | grep "^<author" | sort -u | \awk -F '<author>' '{print $2}' | awk -F '</author>' '{print $1}' > userinfo.txtAfter the command is executed, the userinfo.txt file is generated in the KotlinGallery directory, as shown in the following figure.

- Open the userinfo.txt file. You can view the information about all committers who have committed code to the repository in the file.
- Git uses an email address to identify a committer. To better map the SVN repository information to a Git repository, create a mapping between the SVN and Git usernames.
Modify userinfo.txt so that in each line, SVN author = Git author nickname <email address >. The following figure shows the mapping format.

- Create a local Git repository.
- Run the git init command to create an empty Git repo directory on the local PC.
- Copy the userinfo.txt file in step 1 to the directory and run the following command to switch to the directory:
cd Destination directory address
- Start the Git Bash client in the directory and run the following command to clone a Git repo:
git svn clone <svn_repository_address> --no-metadata --authors-file=userinfo.txt --trunk=trunk --tags=tags --branches=branches
The following table lists parameters in the command. Set the parameters as required.
Parameter
Description
--no-metadata
Indicates that the SVN metadata is not imported to the Git repo. In this way, the size of the Git code repo is reduced, but some SVN historical information may be lost.
--authors-file=userinfo.txt
Indicates that the specified user information file is used for author information mapping.
--trunk=trunk
Indicates that the trunk branch in SVN repo is used as the main branch of Git code repo.
--tags=tags
Indicates that the tags directory in the SVN code repo is used as the tag of the Git code repo.
--branches=branches
Indicates that the branches directory in the SVN code repo is used as the branch of the Git code repo.
After the command is executed successfully, a Git code repo named KotlinGallery is generated locally.

- Run the following commands to go to the KotlinGallery folder and verify the current Git repository branch structure:
cd KotlinGallery
git branch -a

As shown in the preceding figure, all directory structures in the SVN are successfully migrated in the form of Git branches.
- Correct local branches.
Therefore, before uploading tags to CodeArts Repo, adjust the local branches to comply with the Git usage specifications.
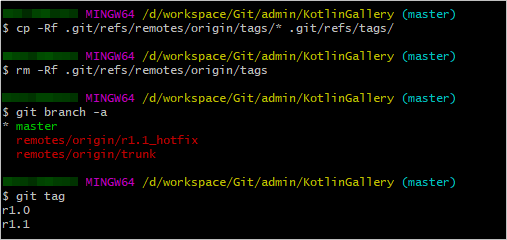
- Go to the local Git repository and run the following commands on the Git Bash client to change the tags branch to appropriate Git tags:
cp -Rf .git/refs/remotes/origin/tags/* .git/refs/tags/
rm -Rf .git/refs/remotes/origin/tags
git branch -a
git tag

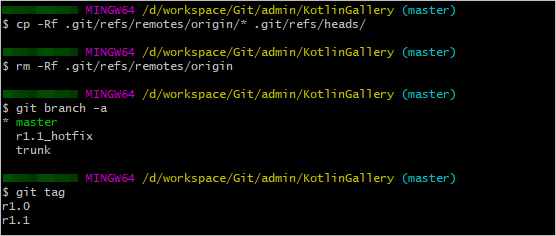
- Run the following commands to change the remaining indexes under refs/remotes to local branches:
cp -Rf .git/refs/remotes/origin/* .git/refs/heads/
rm -Rf .git/refs/remotes/origin
git branch -a
git tag

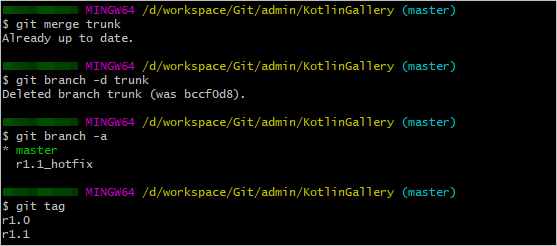
- Run the following commands to merge the trunk branch into the master branch and delete the trunk branch:
git merge trunk
git branch -d trunk
git branch -a
git tag

- Go to the local Git repository and run the following commands on the Git Bash client to change the tags branch to appropriate Git tags:
- Upload the local code repository to CodeArts Repo.
- Set the SSH key of the code repo. For details, see Configuring the SSH Key.
- Go to the CodeArts Repo homepage, click New Repository, and select an existing project from the Project drop-down list box or create a project.
- Set Repository Type to Common, enter related parameters, deselect Generate README and set .gitignore Programming Language to create a code repository. The homepage of the code repository is displayed.
- Choose Clone/Download > Clone with HTTPS in the upper right corner and copy the HTTPS address.
- Run the following command to associate the local code repo with CodeArts Repo and push the master branch to the code repo of CodeArts Repo: When running commands, enter the HTTPS account and password of CodeArts Repo.
git remote add origin HTTPS address of the new code repo
git push --set-upstream origin master
After the push is successful, go to the code repo homepage and choose Code > Branches to view the master branch in the current code repo.
- Run the following command to push other local branches to CodeArts Repo:
git push origin --all
After the push is successful, go to the code repo homepage and choose Code > Branches. The r1.1_hotfix branch is added to the code repo.
- Run the following command to push tags from the local host to CodeArts Repo:
git push origin --tags
After the push is successful, go to the code repo homepage and select the code > Tags. The r1.0 and r1.1 tags exist in the code repo.
Feedback
Was this page helpful?
Provide feedbackThank you very much for your feedback. We will continue working to improve the documentation.See the reply and handling status in My Cloud VOC.
For any further questions, feel free to contact us through the chatbot.
Chatbot


