
Montaje dinámico de un disco de EVS en un StatefulSet
Escenarios de aplicación
El montaje dinámico solo está disponible para crear un StatefulSet. Se implementa con una plantilla de reclamo de volumen (campo volumeClaimTemplates) y depende de la clase de almacenamiento para aprovisionar PV dinámicamente. En este modo, cada pod en un StatefulSet de múltiples pods está asociado con un PVC y un PV únicos. Después de reprogramar un pod, los datos originales todavía se pueden montar en él basándose en el nombre de PVC. En el modo de montaje común para una Deployment, si se admite ReadWriteMany, varios pods de la Deployment se montarán en el mismo almacenamiento subyacente.
Requisitos previos
- Ha creado un clúster e instalado el complemento de CSI (everest) en el clúster.
- Si desea crear un clúster mediante comandos, utilice kubectl para conectarse al clúster. Para obtener más información, véase Conexión a un clúster con kubectl.
(Consola) Montaje dinámico de un disco de EVS
- Inicie sesión en la consola de CCE y acceda a la consola del clúster.
- En el panel de navegación de la izquierda, haga clic en Workloads. En el panel derecho, haga clic en la ficha StatefulSets.
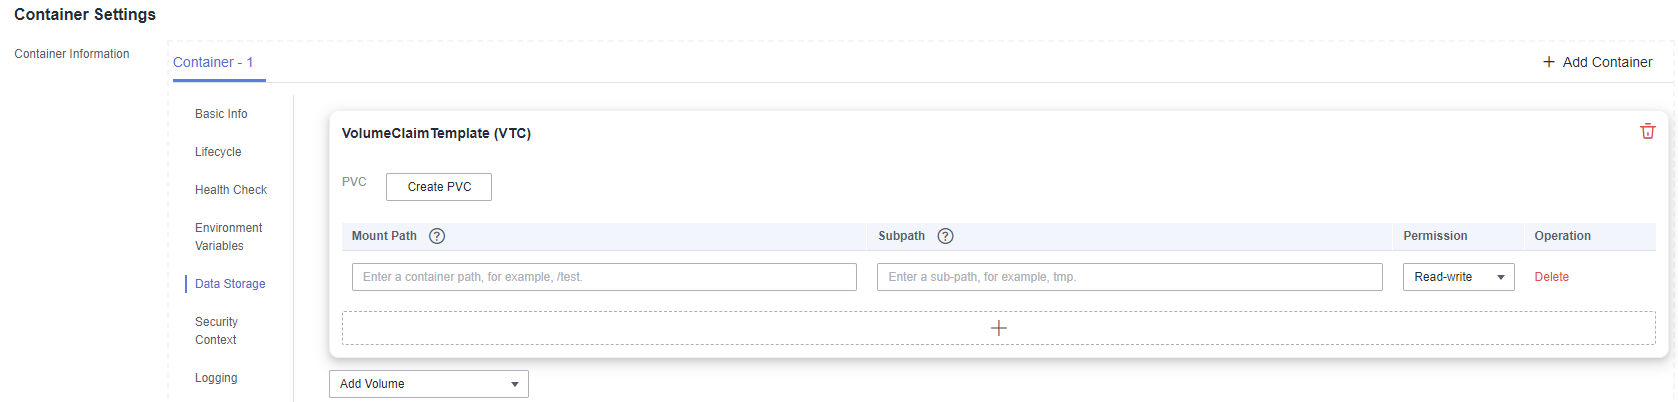
- Haga clic en Create Workload en la esquina superior derecha. En la página mostrada, haga clic en Data Storage en el área Container Settings y haga clic en Add Volume para seleccionar VolumeClaimTemplate (VTC).
- Haga clic en Create PVC. En el cuadro de diálogo que se muestra, configure los parámetros de plantilla de notificación de volumen. Montar y utilizar dinámicamente volúmenes de almacenamiento. Para obtener más información sobre otros parámetros, consulte Creación de un StatefulSet.
Parámetro
Descripción
PVC Type
En este ejemplo, seleccione EVS.
PVC Name
Escriba el nombre del PVC. Después de crear un PVC, se agrega automáticamente un sufijo en función del número de instancias. El formato es <Custom PVC name>-<Serial number>, por ejemplo, example-0.
Creation Method
Puede seleccionar Dynamically provision para crear un PVC, PV y almacenamiento subyacente en la consola en modo en cascada.
Storage Classes
La clase de almacenamiento para los discos de EVS es csi-disk.
AZ
Seleccione la AZ del disco de EVS. La AZ debe ser la misma que la del nodo del clúster.
NOTA:Un disco de EVS solo se puede montar en un nodo en la misma AZ. Después de crear un disco de EVS, no se puede cambiar su AZ.
Disk Type
Seleccione un tipo de disco de EVS.
Access Mode
Los discos de EVS solo admiten ReadWriteOnce, lo que indica que un volumen de almacenamiento se puede montar en un nodo en modo de lectura/escritura. Para obtener más información, véase Modos de acceso al volumen.
Capacity (GiB)
Capacidad del volumen de almacenamiento solicitado.
Encryption
Puede seleccionar Encryption y una clave de encriptación para cifrar el almacenamiento subyacente. Solo los discos de EVS y los sistemas de archivos SFS admiten encriptación.
Enterprise Project
Proyectos de empresa admitidos: predeterminado, al que pertenece el clúster o al que especifica la clase de almacenamiento.
- Introduzca la ruta en la que está montado el volumen.
En este ejemplo, el disco se monta en la trayectoria /data del contenedor. Los datos de contenedor generados en esta ruta se almacenan en el disco de EVS.
- Después de completar la configuración, haga clic en Create.
Una vez creada la carga de trabajo, puede probar Verificación de la persistencia de datos.
(kubectl) Uso de un disco de EVS existente
- Utilice kubectl para conectarse al clúster.
- Cree un archivo denominado statefulset-evs.yaml. En este ejemplo, el volumen de EVS se monta en la ruta /data.
apiVersion: apps/v1
kind: StatefulSet
metadata:
  name: statefulset-evs
  namespace: default
spec:
  selector:
    matchLabels:
      app: statefulset-evs
  template:
    metadata:
      labels:
        app: statefulset-evs
    spec:
      containers:
        - name: container-1
          image: nginx:latest
          volumeMounts:
            - name: pvc-disk           # The value must be the same as that in the volumeClaimTemplates field.
              mountPath: /data         # Location where the storage volume is mounted.
      imagePullSecrets:
        - name: default-secret
  serviceName: statefulset-evs         # Headless Service name.
  replicas: 2
  volumeClaimTemplates:
    - apiVersion: v1
      kind: PersistentVolumeClaim
      metadata:
        name: pvc-disk
        namespace: default
        annotations:
          everest.io/disk-volume-type: SAS    # EVS disk type.
          everest.io/crypt-key-id: <your_key_id>    # (Optional) Encryption key ID. Mandatory for an encrypted disk.
          everest.io/enterprise-project-id: <your_project_id>  # (Optional) Enterprise project ID. If an enterprise project is specified, you need to use the same enterprise project when creating a PVC. Otherwise, the PVC cannot be bound to a PV.
        labels:
          failure-domain.beta.kubernetes.io/region: <your_region>   # Region of the node where the application is to be deployed.
          failure-domain.beta.kubernetes.io/zone: <your_zone>       # AZ of the node where the application is to be deployed.
      spec:
        accessModes:
          - ReadWriteOnce               # The value must be ReadWriteOnce for EVS disks.
        resources:
          requests:
            storage: 10Gi             # EVS disk capacity, ranging from 1 to 32768.
        storageClassName: csi-disk    # Storage class type for EVS disks.
---
apiVersion: v1
kind: Service
metadata:
  name: statefulset-evs   # Headless Service name.
  namespace: default
  labels:
    app: statefulset-evs
spec:
  selector:
    app: statefulset-evs
  clusterIP: None
  ports:
    - name: statefulset-evs
      targetPort: 80
      nodePort: 0
      port: 80
      protocol: TCP
  type: ClusterIP
Tabla 1 Parámetros clave Parámetro
Obligatorio
Descripción
failure-domain.beta.kubernetes.io/region
Sí
Región donde se encuentra el clúster.
Para obtener más información sobre el valor de region, consulte Regiones y puntos de conexión.
failure-domain.beta.kubernetes.io/zone
Sí
AZ donde se crea el volumen de EVS. Debe ser la misma que la AZ prevista para la carga de trabajo.
Para obtener más información sobre el valor de zone, consulte Regiones y puntos de conexión.
everest.io/disk-volume-type
Sí
Tipo del disco de EVS. Todas las letras están en mayúsculas.- SAS: E/S con capacidad alta
- SSD: E/S con capacidad ultraalta
- GPSSD: SSD de uso general
- ESSD: SSD extremo
everest.io/crypt-key-id
No
Obligatorio cuando el disco de EVS está cifrado. Introduzca el ID de clave de encriptación seleccionado durante la creación del disco de EVS.
Para obtener el ID de clave de encriptación, inicie sesión en Cloud Server Console. En el panel de navegación, elija Elastic Volume Service > Disks. Haga clic en el nombre del disco de EVS de destino para ir a su página de detalles. En la página de ficha Summary, copie el valor de KMS Key ID en el área Configuration Information.
everest.io/enterprise-project-id
No
Opcional.
ID de proyecto de empresa del disco de EVS. Si se especifica un proyecto de empresa, debe especificar el mismo proyecto de empresa al crear un PVC. De lo contrario, el PVC no puede estar unido a un PV.
Para obtener el ID del proyecto de empresa, inicie sesión en Cloud Server Console. En el panel de navegación, elija Elastic Volume Service > Disks. Haga clic en el nombre del disco de EVS de destino para ir a su página de detalles. En la página de ficha Summary, haga clic en el proyecto de empresa de Management Information para acceder a la consola del proyecto de empresa. Copie el ID correspondiente para obtener el ID del proyecto de empresa al que pertenece el disco de EVS.
storage
Sí
Capacidad de PVC solicitada, en Gi. El valor oscila entre 1 y 32768.
storageClassName
Sí
El nombre de clase de almacenamiento para los discos de EVS es csi-disk.
- Ejecute el siguiente comando para crear una carga de trabajo en la que está montado el volumen de EVS:
kubectl apply -f statefulset-evs.yaml
Una vez creada la carga de trabajo, puede probar Verificación de la persistencia de datos.
Verificación de la persistencia de datos
- Vea la aplicación desplegada y los archivos de volumen de EVS.
- Ejecute el siguiente comando para ver el pod creado:
kubectl get pod | grep statefulset-evs
Producto esperado:statefulset-evs-0 1/1 Running 0 45s statefulset-evs-1 1/1 Running 0 28s
- Ejecute el siguiente comando para comprobar si el volumen de EVS se ha montado en la ruta /data:
kubectl exec statefulset-evs-0 -- df | grep data
Producto esperado:
/dev/sdd 10255636 36888 10202364 0% /data
- Ejecute el siguiente comando para ver los archivos en la ruta /data:
kubectl exec statefulset-evs-0 -- ls /data
Producto esperado:
lost+found
- Ejecute el siguiente comando para ver el pod creado:
- Ejecute el siguiente comando para crear un archivo llamado static en la ruta /data:
kubectl exec statefulset-evs-0 -- touch /data/static
- Ejecute el siguiente comando para ver los archivos en la ruta /data:
kubectl exec statefulset-evs-0 -- ls /data
Producto esperado:
lost+found
static
- Ejecute el siguiente comando para eliminar el pod llamado web-evs-auto-0:
kubectl delete pod statefulset-evs-0
Producto esperado:
pod "statefulset-evs-0" deleted
- Después de la eliminación, el controlador de StatefulSet crea automáticamente una réplica con el mismo nombre. Ejecute el siguiente comando para comprobar si se han modificado los archivos de la ruta /data:
kubectl exec statefulset-evs-0 -- ls /data
Producto esperado:
lost+found
static
Si el archivo static todavía existe, los datos en el volumen de EVS se pueden almacenar de forma persistente.
Operaciones relacionadas
| Operación | Descripción | Procedimiento |
|---|---|---|
| Ampliación de la capacidad de un disco de EVS | Amplíe rápidamente la capacidad de un disco de EVS montado en la consola de CCE. Solo se puede ampliar la capacidad de los discos de EVS de pago por uso en la consola de CCE. Para ampliar la capacidad de los discos de EVS anuales/mensuales, haga clic en el nombre del volumen para ir a la consola de EVS. |
|
| Consulta de eventos | Puede ver los nombres de eventos, los tipos de eventos, el número de ocurrencias, los eventos de Kubernetes, la hora de primera ocurrencia y la hora de última ocurrencia del PVC o PV. |
|
| Consulta de un archivo YAML | Puede ver, copiar y descargar los archivos YAML de un PVC o PV. |
|


