

Editing Basic Information in Profile
Basic information of a user profile includes the login name, ciphertext password, name, mobile number, email address, role, and department.
- In the Profile area, you can change your password, name, mobile number, and email address.
- The value of Login Name must be unique in a bastion host and cannot be changed once it is created.
- Role and department information can be managed only by users with the user management permission and cannot be modified by common individual users. For more details, see Modifying User Information.
This topic describes how to change your password and modify basic information in the Profile area.
Changing Your Password/Setting a Local Password
If you use an IAM, SAML, or Azure AD account to log in to the bastion host, you need to set a local password for resource operations. In other scenarios, you can change the user password on the bastion host.
- Log in to your bastion host system.
- On the Dashboard page, click the user name in the upper right corner and choose Profile. Figure 1 Profile

- On the Basic Info tab, click Change next to Password.
- Configure parameters depending on the login account.
- Setting a local password: Enter a new password. Figure 2 Setting a local password

- Changing your password: Enter the current password and specify a new password. Figure 3 Changing your password
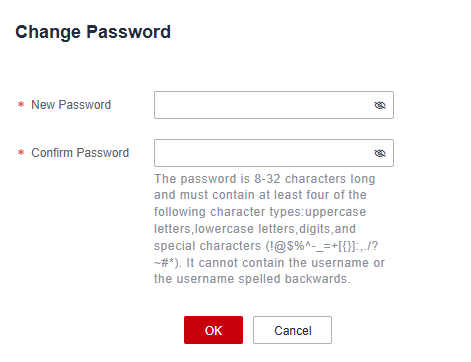
The new password:- Can contain 8 to 32 characters.
- Contain at least three of the following types of characters: uppercase letters (A to Z), lowercase letters (a to z), digits (0 to 9), and following special characters: !@$%^-_=+[{}]:,./?~#*
- Cannot contain the username or the username spelled backwards.
- Setting a local password: Enter a new password.
- Check the settings and click OK. The profile page is displayed.
Log out of the system. The new password takes effect after you log in to the system again.
Changing the Name or Email Address of a User
- Log in to your bastion host system.
- On the Dashboard page, click the user name in the upper right corner and choose Profile. Figure 4 Profile
- In the Basic Info area, click Edit on the right.
- Enter basic information.
Table 1 Parameters for modifying basic personal information Parameter
Description
Name
Name of the current login user.
The value can contain 1 to 255 characters. Only letters, digits, at signs (@), periods (.), underscores (_), and hyphens (-) are allowed.
Email
Email address of the current login user.
Enter a valid email address. Example: zhang@example.com
- Click OK.
Changing or Deleting Your Mobile Number
- Log in to your bastion host system.
- On the Dashboard page, click the user name in the upper right corner and choose Profile. Figure 5 Profile
- Change the mobile number. You can change the configured mobile number or enter a new one.
- In the Basic Info area, click Modify on the right of Mobile.
- Enter a mobile number.
Enter a valid mobile number. The format is [+][Country/Region code][Mobile number]. For mobile numbers in the Chinese mainland, you can omit [+][Country/Region code] and directly enter your 11-digit mobile number. Example: 185xxxx0000 or +86185xxxx0000
- (Optional) Click Send code and enter the SMS verification code in the text box. Perform this step if you have enabled mobile phone number clearance verification in Configuring Mobile Number Clearance Verification. If the mobile number clearance verification is not enabled or no mobile number is bound, skip this step.
- The mobile number can be changed only after the SMS verification is successful.
- If you cannot receive the SMS verification code because the bound mobile number is invalid or incorrect, you cannot modify the mobile number. In this case, contact the administrator.
- Click OK.
- Delete your mobile number.
- In the Basic Info area, click Clear on the right of Mobile.
- In the displayed dialog box, click OK.
- (Optional) Click Send code and enter the SMS verification code in the text box. Perform this step if you have enabled mobile phone number clearance verification in Configuring Mobile Number Clearance Verification. Otherwise, skip this step.
- The mobile number can be deleted only after the SMS verification is successful.
- If you cannot receive the SMS verification code because the bound mobile number is invalid or incorrect, you cannot delete the mobile number. In this case, contact the administrator.
- Click OK.
What is your overall rating for this page?
Thank you very much for your feedback. We will continue working to improve the documentation.See the reply and handling status in My Cloud VOC.
For any further questions, feel free to contact us through the chatbot.
Chatbot


