
(New) Installing UniAgents
UniAgents centrally manage the life cycle of collection plug-ins and deliver instructions (such as script delivery and execution). UniAgents do not collect metric data themselves. O&M data is collected by collection plug-ins. You can install collection plug-ins through the access center and create collection tasks to collect metric data.
- Current region: Install UniAgents on the hosts in the region where the AOM console is located.
- Outside current region: Install UniAgents on the hosts or non-Huawei Cloud hosts outside the region where the AOM console is located. For example, the hosts of self-built Internet Data Centers (IDCs), of third-party cloud vendors, or in the other regions of Huawei Cloud.
Prerequisites
- You have determined the servers where UniAgent is to be installed and have obtained the accounts with the root permission and passwords for logging in to them.
- To install UniAgent through a jump server, ensure that the jump server (where UniAgent has been installed) can communicate with the servers where UniAgent is to be installed.
- If no access code is available in this project, create one by referring to Creating an Access Code.
Constraints
- For details about the Linux and Windows OSs supported by the UniAgent, see Collection Management Restrictions.
- To switch from the old UniAgent page to the new one, choose Settings > Collection Settings > UniAgents in the navigation tree on the left and click Try New Version in the upper right corner. To go to the old UniAgent page, click Back to Old Version in the upper right corner of the UniAgents page.
- If the servers where UniAgent is to be installed contain CCE cluster-hosted servers, you are advised to install UniAgent on the K8s Clusters page.
- When you select Install via Script (Recommended) or Install via Console, the installation script install_uniagent will be downloaded to the /tmp directory of the server by default. If the script cannot be downloaded to the /tmp directory due to insufficient permissions, change /tmp/install_uniagent in the installation command to {path}/install_uniagent and add -f /{path} to the end of the command. Then run the installation command on the server to download the installation script to the specified directory. For example, if the specified directory is /root, the installation command should be:
set +o history;
curl ********** -o /root/install_uniagent *****;bash /root/install_uniagent ****** -y {Access_Code_ID}-{Access_Code} -f /root
set -o history;
Installation Methods
AOM allows you to install UniAgent on hosts. The following table lists the methods to install UniAgent.
| Method | Scenario |
|---|---|
| Install via Script (Recommended) | Suitable for initial installation and single-node installation scenarios. Use a remote login tool to log in to the host where UniAgent is to be installed and manually run the installation command. For details, see: |
| Install via Console | Applicable to the scenario where UniAgents are installed in batches on the AOM console. In the same VPC, use a jump server (an ECS where UniAgent has been installed) to install UniAgents on other ECSs in batches. For details, see Manually Installing UniAgents via Console (Current Region). Ensure that a server with UniAgent installed is available. If UniAgent is installed for the first time, you need to install it using the script. |
| Script-based installation using a jump server | Applicable to the scenario where UniAgents are installed by running scripts on the jump server. Use a remote login tool to log in to the jump server (a server where UniAgent has been installed) and run scripts on it to install UniAgent on one or more servers.
Ensure that a server with UniAgent installed is available. If UniAgent is installed for the first time, you need to install it using the script. |
- Quickly Installing UniAgents Using Scripts (Current Region)
- Quickly Installing UniAgents Using Scripts (Outside Current Region)
- Manually Installing UniAgents via Console (Current Region)
- Installing a UniAgent on a Single Server by Using a Transition Host
- Installing UniAgents on Multiple Servers in Batches by Using a Transition Host
- Log in to the AOM 2.0 console.
- In the navigation pane on the left, choose Settings > Global Settings.
- On the displayed page, choose Collection Settings > UniAgents and click Try New Version in the upper right corner of the page.
- On the displayed page, click the ECS tab and click Install UniAgent.
- On the displayed page, select Install via Script (Recommended). (For servers on the Other tab page, UniAgents can be installed only by script. After you click Install UniAgent on this page, there is no need to select an installation scenario. The Install UniAgent page is directly displayed.)
- On the Install UniAgent page, set parameters to install a UniAgent. Figure 1 Installing a UniAgent
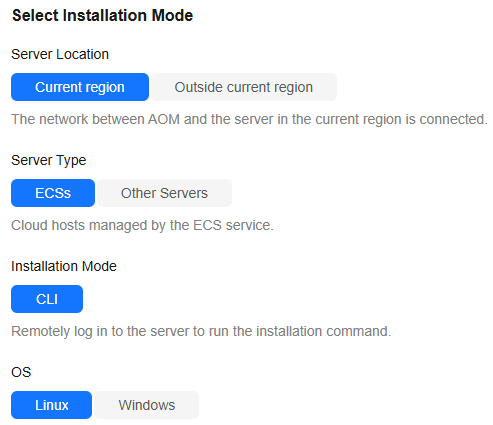
Table 2 Installation parameters Parameter
Description
Example
Server Region
Select the region where the target cloud server is located. Options:
- Current region: The network between AOM and the server in the current region is connected by default.
- Outside current region: The server is in a region different from AOM. The network between AOM and the server is not connected by default. Select a network connection solution as required.
Current region
Server Type
Options:- ECSs: hosts managed by the ECS service.
- Other servers: other hosts.
ECSs
Installation Mode
Option: CLI.
You need to remotely log in to the server to run the installation command provided on the console.
CLI
OS
Option: Linux or Windows.
Linux
UniAgent Version
Select a UniAgent version. The latest version is selected by default.
Latest Version
Copy and Run Installation Command
Command for installing the UniAgent. Commands for Linux and Windows are different.
- If the ECS OS is Linux:
- Click Copy to copy the installation command. You can obtain the access code ID and value on the Authentication page, and replace the access code ID and value in the installation command. You can also click Copy on the right to copy the installation command, log in to the host, run this command, and enter the access code ID and value as prompted.
set +o history; curl -k -X GET -m 20 --retry 1 --retry-delay 10 -o /tmp/install_uniagent https://aom-uniagent-***************.com/install_uniagent.sh;bash /tmp/install_uniagent -p ************************* -v 1.x.x -e xxxx -y {Access_Code_ID}-{Access_Code};set -o history; - Use a remote login tool to log in to the Linux server where the UniAgent is to be installed and run the copied installation command using an account with the root permission.
If neither the UniAgent nor the ICAgent is installed, run the preceding command to install both of them. If either the UniAgent or the ICAgent is installed, run the preceding command to install the uninstalled one.
- Click Copy to copy the installation command. You can obtain the access code ID and value on the Authentication page, and replace the access code ID and value in the installation command. You can also click Copy on the right to copy the installation command, log in to the host, run this command, and enter the access code ID and value as prompted.
- If the ECS OS is Windows (only the UniAgent can be installed in this mode):
- Log in to the Windows server where the UniAgent is to be installed.
- Download the installation package uniagentd-x.x.x.x-winxx.zip.
If you need to verify the SHA256 value of the Windows installation package, check the file downloaded from https://aom-uniagent-{region_name}.obs.{region_name}.{site domain name suffix}/uniagentd-{version}-win32.zip.sha256.
- Decompress the package, click uniagentd.msi, and specify path C:\uniagentd for installation.
- (Optional) Modify the C:\uniagentd\conf\uniagentd.conf file and enter the following configuration (this step is required only when you need to install UniAgent 1.1.3 or earlier):
master=https://xxxxxx.xxxxxxxxxxx,https://xx.xx.xx.xx:xxxxx
project_id=xxxxxxxxxxxxxx
public_net=xxxx
Click Copy to copy the preceding configuration.
- Run start.bat in the C:\uniagentd\bin directory as the administrator.
Copy and run the installation command.
- Check the UniAgent status in the UniAgent list.
- Log in to the AOM 2.0 console.
- In the navigation pane on the left, choose Settings > Global Settings.
- On the displayed page, choose Collection Settings > UniAgents and click Try New Version in the upper right corner of the page.
- On the displayed page, click the ECS tab and click Install UniAgent.
- On the displayed page, select Install via Script (Recommended). (For servers on the Other tab page, UniAgents can be installed only by script. After you click Install UniAgent on this page, there is no need to select an installation scenario. The Install UniAgent page is directly displayed.)
- On the Install UniAgent page, set parameters to install a UniAgent. Figure 2 Installing a UniAgent

Table 3 Installation parameters Parameter
Description
Example
Server Region
Select the region where the target cloud server is located. Options:
- Current region: The network between AOM and the server in the current region is connected by default.
- Outside current region: The server is in a region different from AOM. The network between AOM and the server is not connected by default. Select a network connection solution as required.
Outside current region
OS
Options: Linux and Windows.
Linux
Network
Option: Internet.
After hosts outside the current region are connected to the public network, their data can be uploaded to AOM through the public network.
Internet
Copy and Run Installation Command
Command for installing the UniAgent. Commands for Linux and Windows are different.
- If the ECS OS is Linux:
- Click Copy to copy the installation command. You can obtain the access code ID and value on the Authentication page, and replace the access code ID and value in the installation command. You can also click Copy on the right to copy the installation command, log in to the host, run this command, and enter the access code ID and value as prompted.
set +o history; curl -k -X GET -m 20 --retry 1 --retry-delay 10 -o /tmp/install_uniagent https://aom-uniagent-***************.com/install_uniagent.sh;bash /tmp/install_uniagent -o public -p ************************* -e ******** -y {Access_Code_ID}-{Access_Code};set -o history; - Use a remote login tool to log in to the Linux server where the UniAgent is to be installed and run the copied installation command using an account with the root permission.
If neither the UniAgent nor the ICAgent is installed, run the preceding command to install both of them. If either the UniAgent or the ICAgent is installed, run the preceding command to install the uninstalled one.
- Click Copy to copy the installation command. You can obtain the access code ID and value on the Authentication page, and replace the access code ID and value in the installation command. You can also click Copy on the right to copy the installation command, log in to the host, run this command, and enter the access code ID and value as prompted.
- If the ECS OS is Windows (only the UniAgent can be installed in this mode):
- Log in to the Windows server where the UniAgent is to be installed.
- Download the installation package uniagentd-x.x.x.x-winxx.zip.
If you need to verify the SHA256 value of the Windows installation package, check the file downloaded from https://aom-uniagent-{region_name}.obs.{region_name}.{site domain name suffix}/uniagentd-{version}-win32.zip.sha256.
- Decompress the package, click uniagentd.msi, and specify path C:\uniagentd for installation.
- Enter the following configuration (obtained from the installation page) to the C:\uniagentd\conf\uniagentd.conf file:
master=https://xxx.xx.xxx.xxx:xxxxx
project_id=******************
public_net=xxx
- Run start.bat in the C:\uniagentd\bin directory as the administrator.
Copy and run the installation command.
- Check the UniAgent status in the UniAgent list.
- Log in to the AOM 2.0 console.
- In the navigation pane on the left, choose Settings > Global Settings.
- On the displayed page, choose Collection Settings > UniAgents and click Try New Version in the upper right corner of the page.
- On the displayed page, click the ECS tab and click Install UniAgent.
- Select Install via Console. (Only hosts on the ECS tab page support manual installation of UniAgents through the console.)
- On the Install UniAgent page, set parameters.
- Configure basic information, select a server, and click Next. Figure 3 Configuring basic information
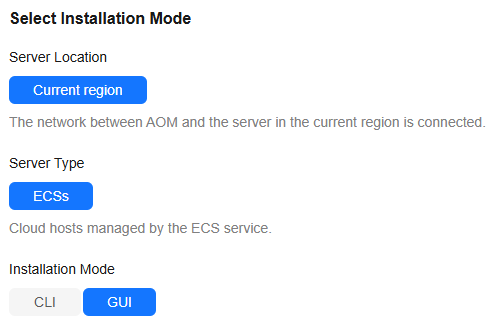
Table 4 Installation parameters Parameter
Description
Example
Server Region
The region where the target server is located can only be Current region.
The network between AOM and the server in the current region is connected by default.
Current region
Server Type
Only ECSs are supported.
ECSs
Installation Mode
Options: CLI and GUI.
CLI
OS
Option: Linux or Windows.
This parameter is required only when Installation Mode is CLI.
Linux
UniAgent Version
Select a UniAgent version. The latest version is selected by default.
Latest Version
Copy and run the installation command.
Command for installing the UniAgent. Commands for Linux and Windows are different. (This parameter is required only when Installation Mode is CLI.) :
- If the ECS OS is Linux:
- Click Copy to copy the installation command. You can obtain the access code ID and value on the Authentication page, and replace the access code ID and value in the installation command. You can also click Copy on the right to copy the installation command, log in to the host, run this command, and enter the access code ID and value as prompted.
set +o history; curl -k -X GET -m 20 --retry 1 --retry-delay 10 -o /tmp/install_uniagent https://aom-uniagent-***************.com/install_uniagent.sh;bash /tmp/install_uniagent -p ************************* -v 1.x.x -e xxxx -y {Access_Code_ID}-{Access_Code};set -o history; - Use a remote login tool to log in to the Linux server where the UniAgent is to be installed and run the copied installation command using an account with the root permission.
If neither the UniAgent nor the ICAgent is installed, run the preceding command to install both of them. If either the UniAgent or the ICAgent is installed, run the preceding command to install the uninstalled one.
- Click Copy to copy the installation command. You can obtain the access code ID and value on the Authentication page, and replace the access code ID and value in the installation command. You can also click Copy on the right to copy the installation command, log in to the host, run this command, and enter the access code ID and value as prompted.
- If the ECS OS is Windows (only the UniAgent can be installed in this mode):
- Log in to the Windows server where the UniAgent is to be installed.
- Download the installation package uniagentd-x.x.x.x-winxx.zip.
If you need to verify the SHA256 value of the Windows installation package, check the file downloaded from https://aom-uniagent-{region_name}.obs.{region_name}.{site domain name suffix}/uniagentd-{version}-win32.zip.sha256.
- Decompress the package, click uniagentd.msi, and specify path C:\uniagentd for installation.
- (Optional) Modify the C:\uniagentd\conf\uniagentd.conf file and enter the following configuration (this step is required only when you need to install UniAgent 1.1.3 or earlier):
master=https://xxxxxx.xxxxxxxxxxx,https://xx.xx.xx.xx:xxxxx
project_id=xxxxxxxxxxxxxx
public_net=xxxx
Click Copy to copy the preceding configuration.
- Run start.bat in the C:\uniagentd\bin directory as the administrator.
Copy and run the installation command.
Select Server
Click Add Server. In the dialog box that is displayed, select the cloud server where the UniAgent is to be installed. (This step is required only when Installation Mode is GUI.)- On the Add Server page, select one or more servers. Only Linux servers can be selected.
In some regions, both Linux and Windows servers can be selected. The OS of the selected server must be the same as the value of OS specified during UniAgent installation. The function of selecting Windows servers for UniAgent installation is not generally available. To use it, submit a service ticket.
- After selecting servers, perform the following operations if needed:
- To remove a selected server, click Remove.
- Filter servers by server ID or name.
- Click
 and select or deselect columns to display.
 - Click
 to manually refresh the server list.
Select servers.
- If the ECS OS is Linux:
- Check whether a transition host exists in the VPC to which the servers selected belong. (That is, check whether there is any server in the same VPC has been installed with the UniAgent. If yes, the server is automatically filtered out and used as a transition host.) Click Next. (This step is required only when Installation Mode is GUI.) Figure 4 Checking the transition host

On the Check Transition Host page, perform the following operations if needed:
- If there are multiple servers with the UniAgent installed in the VPC, click Change Transition Host in the Operation column of the VPC and select a desired host as the transition host.
- If the UniAgent is not installed on any server in the VPC, click Set Transition Host in the Operation column of the VPC, copy the installation command, and manually run the installation command on a server to install the UniAgent and set the server to be a transition host. To install a UniAgent on a Windows host, ensure that the installation or transition host has been installed with UniAgent 1.1.9 or later.
- Filter the list by VPC or Transition Host Set or Not.
- Click
 and select or deselect columns to display.
 - Click
 to manually refresh the transition host list.
- Perform a connectivity test. (This step is required only when Installation Mode is GUI.)
- Configure the login account, password, and port number. Ensure that the account has the root permissions for Linux and Administrator permissions for Windows.
- Click Test in the Operation column.
If multiple servers have the same account (with root permissions), password, and port number, select these servers, click Set Login Account and Password to set the account, password, and port number, and then click Test.
- After the connectivity test is successful, click Finish.
- Configure basic information, select a server, and click Next.
- Check the UniAgent status in the UniAgent list.
Use a transition host with the UniAgent installed to remotely install the UniAgent on another server. (This method is applicable only to Linux servers.)
- Prerequisites: The transition host (with the UniAgent installed) can communicate with the server where the UniAgent is to be installed. The SSH command can be executed.
- Procedure
- Use a remote login tool to log in to the transition host (with the UniAgent installed) as the root user and run the following command:
bash /usr/local/uniagentd/bin/remote_cmd.sh -ip x.x.x.x -command Installation command
- x.x.x.x: indicates the IP address of the server where the UniAgent is to be installed.
- Installation command: command used to install the UniAgent. You can copy the installation command from the installation page of the AOM console and replace the installation command in the preceding. (Do not include set +o history; or set -o history; when copying the installation command.)
- Enter the password of the root user of the server where the UniAgent is to be installed as prompted.
The UniAgent will be installed in the /usr/local/uniagentd directory. To view the UniAgent status of the server, choose Collection Settings > UniAgents in the navigation pane on the AOM console.
- Use a remote login tool to log in to the transition host (with the UniAgent installed) as the root user and run the following command:
Use a transition host with the UniAgent installed to remotely install UniAgents on other servers. (This method is applicable only to Linux servers.)
- Prerequisites
- The transition host (with the UniAgent installed) can communicate with the servers where the UniAgent is to be installed. The SSH command can be executed.
- You have collected the IP addresses and passwords of the root user of all servers where UniAgents are to be installed (currently, UniAgents can only be installed in batches using passwords), sorted the information in iplist.cfg file, and uploaded the information to the /usr/local/uniagentd directory of the transition host. (This directory can be customized, but must be the same as the directory where the installation command is executed in the following installation procedure.) The following is an example of the iplist.cfg file (Separate IP addresses and passwords by spaces. Spaces are not allowed in other positions.):
192.168.0.109 Password (Replace the IP address and password with the actual ones)
192.168.0.39 Password (Replace the IP address and password with the actual ones)
Because the iplist.cfg file contains sensitive information, you are advised to clear the information in time.
- Procedure
- Use a remote login tool to log in to the transition host (with the UniAgent installed) as the root user.
- Run the following command:
bash /usr/local/uniagentd/bin/remote_cmd.sh -batchModeConfig /usr/local/uniagentd/iplist.cfg -command "installation command"
Installation command: command used to install the UniAgent. You can copy the installation command from the installation page of the AOM console and replace the installation command in the preceding. (Do not include set +o history; or set -o history; when copying the installation command.)
The UniAgent will be installed in the /usr/local/uniagentd directory. To view the UniAgent status of the server, choose Collection Settings > UniAgents in the navigation pane on the AOM console.
Checking the UniAgent Status
On the UniAgents page, check the UniAgent status of the target host. For details, see Table 5.
- If a running UniAgent has a new version, Upgradeable will be displayed in the UniAgent Version column on the UniAgents page. You can upgrade the UniAgent by referring to Upgrading UniAgents. (If the UniAgent installed on the host in a CCE cluster has a new version, Upgradable will only be displayed on the K8s Clusters page. You can upgrade the UniAgent on that page by referring to Managing UniAgents and ICAgents in K8s Clusters.)
- After the UniAgent is installed on the host, corresponding ports will be enabled to query log levels and collection tasks. If the UniAgent version is 1.1.5 or earlier, ports 39338 and 39339 will be enabled. If the UniAgent version is later than 1.1.5, ports 29338 and 29339 will be enabled.
| Status | Description |
|---|---|
| Running | The UniAgent is working. |
| Offline | The UniAgent is abnormal. |
| Installing | The UniAgent is being installed. The installation takes about 1 minute to complete. |
| Installation failed | The UniAgent fails to be installed. Uninstall the UniAgent and then reinstall it. |
| Not installed | The UniAgent has not been installed. |
UniAgent Versions
On the UniAgents page, check the UniAgent version of the target host. You are advised to upgrade the UniAgent to the latest version as soon as possible. For details about UniAgent versions, see Table 6.
| Version | Description | Released |
|---|---|---|
| 1.2.0 | Supported UniAgent installation on self-built Kubernetes clusters. | 2025-11-13 |
| 1.1.9 | Supported remote UniAgent installation on Windows hosts. | 2025-06-18 |
| 1.1.8 |
| 2025-02-25 |
| 1.1.6 | Supported password-free login for Linux hosts. (Supported by Cloud Operations Center (COC) only.) | 2024-11-30 |
| 1.1.5 | Fixed the standard output cache issue during Python script execution. | 2024-09-18 |
| 1.1.4 | Resolved the exit code issue of script execution when environment variables are carried. | 2024-08-30 |
Other Operations
If needed, perform the following operations on the host where the UniAgent has been installed.
| Operation | Description |
|---|---|
| Searching for a host | In the search box above the host list, search for a host by host ID, name, status, or IP address. |
| Refreshing the host list | Click |
| Customizing columns to display | Click |
| Sorting hosts | In the table header of the host list, click |


Troubleshooting
If you encounter any problem when installing the UniAgent, see Collection Management FAQs.
Feedback
Was this page helpful?
Provide feedbackThank you very much for your feedback. We will continue working to improve the documentation.See the reply and handling status in My Cloud VOC.
For any further questions, feel free to contact us through the chatbot.
Chatbot


