How Do I Create a Container Image?
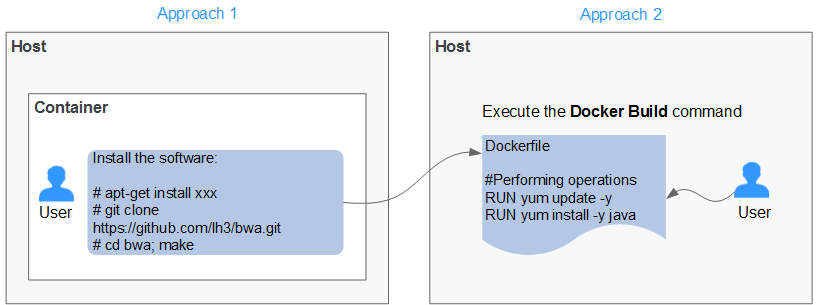
The following two approaches are for you to consider. Approach 1 is for images that will only be updated occasionally whereas approach 2 is for images that will be frequently updated.
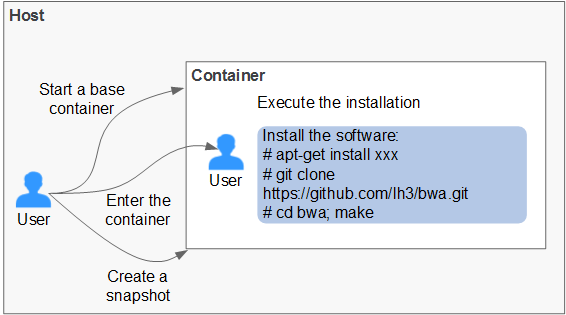
- Approach 1: creating a snapshot. This approach involves three key steps: (1) Install a container engine. (2) Start a base container from a base image (for example, Ubuntu image) and install applications. (3) Create a snapshot of the container.
- Approach 2: creating a Dockerfile. This approach involves two key steps: (1) Write software installation instructions into a Dockerfile. (2) Run docker build to build an image from the Dockerfile.
Approach 1: Creating a Snapshot
This approach is suitable for images that will only be updated occasionally.

Procedure:
- Install a container engine on a host.
- Start an empty base container in the interactive mode.
For example, start a CentOS container in the interactive mode.
docker run -it centos
- Run the following commands to install the target software:
git clone https://github.com/lh3/bwa.git
cd bwa;make

Install Git in advance and check whether an SSH key is set on the local host.
- Run the exit command to exit the container.
- Create a snapshot.
docker commit -m "xx" -a "test" container-id test/image:tag
- -a: indicates the author of the base image.
- container-id: indicates the ID of the container you have started in step 2. You can run the docker ps -a command to query the container ID.
- -m: indicates the commit message.
- test/image:tag: indicates the repository name/image name:tag name.
- Run the docker images command to list the built container image.
Approach 2: Creating a Dockerfile
This approach is suitable for images that will be frequently updated. In Approach 1, you create a snapshot of the whole container. This could be demanding if you need to frequently update your images. In this case, Approach 2 is put forward to automate the image build process.
The idea behind Approach 2 is to write the process of Approach 1 into a Dockerfile and then run the docker build -t test/image:tag. command to automatically build an image from the Dockerfile. The period (.) in this command indicates the path to the Dockerfile.

Example Dockerfile:

If an external network is required, ensure that network connectivity is available.
#Version 1.0.1
FROM centos:latest

# Setting the root user as the executor of subsequent commands
USER root

# Performing operations
RUN yum update -y
RUN yum install -y java

# Using && to concatenate commands
RUN touch test.txt && echo "abc" >>abc.txt

# Setting an externally exposed port
EXPOSE 80 8080 1038

# Adding a network file
ADD https://www.baidu.com/img/bd_logo1.png /opt/

# Setting an environment variable
ENV WEBAPP_PORT=9090

# Setting a work directory
WORKDIR /opt/

# Setting a start command
ENTRYPOINT ["ls"]

# Setting start parameters
CMD ["-a", "-l"]

# Setting a volume
VOLUME ["/data", "/var/www"]

# Setting the trigger operation for a sub-image
ONBUILD ADD . /app/src
ONBUILD RUN echo "on build executed" >> onbuild.txt
Basic Syntax of Dockerfile
- FROM:
It is used to specify the parent image (base image) from which you are building a new image. Except annotations, a Dockerfile must start with a FROM instruction. Subsequent instructions run in this parent image environment until the next FROM instruction appears. You can create multiple images in the same Dockerfile by adding multiple FROM instructions.
- MAINTAINER:
It is used to specify the information about the author who creates an image, including the username and email address. This parameter is optional.
- RUN:
It is used to modify an image. Generally, RUN commands are executed to install libraries, and install and configure programs. After a RUN command is executed, an image layer will be created on the current image. The next command will be executed on the new image. The RUN statement can be in one of the following formats:
- RUN yum update: Command that is executed in the /bin/sh directory.
- RUN ["yum", "update"]: Directly invoke exec.
- RUN yum update && yum install nginx: Use && to connect multiple commands to a RUN statement.
- EXPOSE:
It is used to specify one or more network ports that will be exposed on a container. If there are multiple ports, separate them by spaces.
When running a container, you can set -P (uppercase) to map the ports specified in EXPOSE to random ports on a host. Other containers or hosts can communicate with the container through the ports on the host.
You can also use -p (lowercase) to expose the ports that are not listed in EXPOSE.
- ADD:
It is used to add a file to a new image. The file can be a host file, a network file, or a folder.
- First parameter: source file (folder)
- If a relative path is used, this path must correspond to the directory where the Dockerfile is located.
- If a URL is used, the file needs to be downloaded first and then added to the image.
- Second parameter: target path
- If the source file is in the .zip or .tar file, the container engine decompresses the file and then adds it to the specified location of the image.
- If the source file is a compressed network file specified by a URL, the file will not be decompressed.
- First parameter: source file (folder)
- VOLUME:
It is used to create a mount point for a specified path (file or folder) in the image. Multiple containers can share data through the same mount point. Even if one of the containers is stopped, the mount point can still be accessed.
- WORKDIR:
It is used to specify a new work directory for the next command. The directory can be an absolute or a relative directory. WORKDIR can be specified multiple times as required. When a container is started, the directory specified by the last WORKDIR command is used as the current work directory of the container.
- ENV:
It is used to set an environment variable for running the container. When running the container, you can set -e to modify the environment variable or add other environment variables.
Example:
docker run -e WEBAPP_PORT=8000 -e WEBAPP_HOST=www.example.com ...
- CMD:
It is used to specify the default command for starting a container.
- ENTRYPOINT:
It is used to specify the default command for starting a container. Difference: For ENTRYPOINT, parameters added to the image during container running will be spliced. For CMD, these parameters will be overwritten.
- If the Dockerfile specifies that the default command for starting a container is ls -l, the default command ls -l will be run accordingly. For example:
- ENTRYPOINT [ "ls", "-l"]: The program and parameter for starting a container are set to be ls and -l respectively.
- docker run centos: The docker run centos ls -l command is run by default for starting a CentOS container.
- docker run centos -a: When the -a parameter is added for starting a CentOS container, the docker run centos ls -l -a command is run by default.
- If the Dockerfile specifies that the default command for starting a container is --entrypoint but you need to replace the default command, you can add --entrypoint to replace the configuration specified in Dockerfile. Example:
docker run gutianlangyu/test --entrypoint echo "hello world"
- If the Dockerfile specifies that the default command for starting a container is ls -l, the default command ls -l will be run accordingly. For example:
- USER:
It is used to specify the user or UID for running the container, and running the RUN, CMD, or ENTRYPOINT command.
- ONBUILD:
Trigger command. During image build, the image builder of the container engine saves all commands specified by the ONBUILD command to the image metadata. These commands will not be executed in the process of building the current image. These commands will be executed only when a new image uses the FROM instruction to specify the parent image as the current image.
Using the FROM instruction to build a child image based on the parent image created by the Dockerfile:
ONBUILD ADD. /app/src: The ADD. /app/src command is automatically executed.
Feedback
Was this page helpful?
Provide feedbackThank you very much for your feedback. We will continue working to improve the documentation.See the reply and handling status in My Cloud VOC.
For any further questions, feel free to contact us through the chatbot.
Chatbot


