
Creating a Function for Frontend Custom Authentication
Scenarios
API requests can be authenticated using a custom authorizer. You need to create a FunctionGraph function for frontend custom authentication and define the required authentication information in the function. The function then serves as a custom authentication backend to authenticate requests for the API.
This section describes how to encapsulate a function into a "custom authorizer" and the important operations that need to be noted.
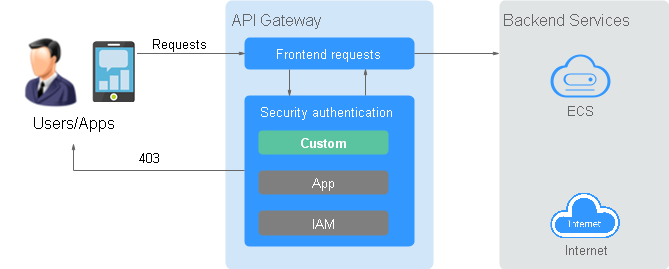
The following figure shows the process of calling APIs using custom authentication.

FunctionGraph is required for custom authorizers. If FunctionGraph is unavailable in the selected region, custom authorizers are not supported.
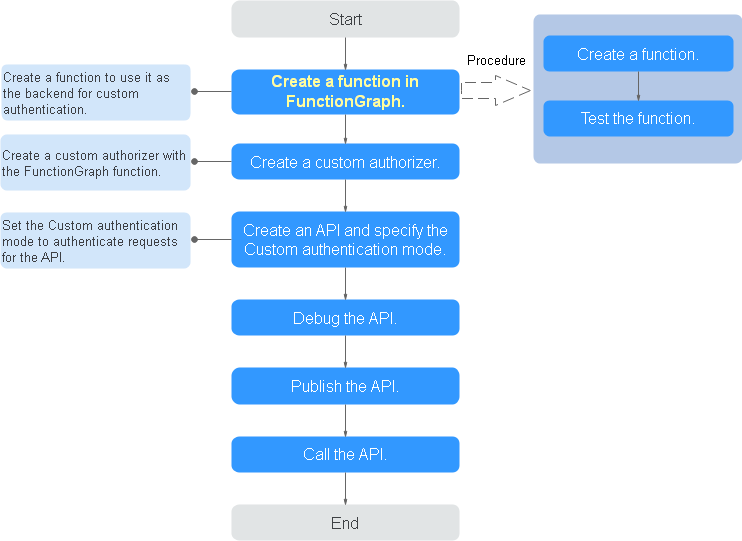
Procedure
- Create a function in FunctionGraph.
The function code must meet the following requirements (Python 2.7 is used as an example):
- The function code has defined three types of request parameters in the following formats:
- Header parameters: event["headers"]["Parameter name"]
- Query parameters: event["queryStringParameters"]["Parameter name"]
- Custom user data: event["user_data"]
- The three types of request parameters obtained by the function are mapped to the custom authentication parameters defined in APIG.
- Header parameter: Corresponds to the identity source specified in Header for custom authentication. The parameter value is transferred when the API that uses custom authentication is called.
- Query parameter: Corresponds to the identity source specified in Query for custom authentication. The parameter value is transferred when the API that uses custom authentication is called.
- Custom user data: Corresponds to the user data for custom authentication. The parameter value is specified when the custom authentication system is created.
- The response of the function cannot be greater than 1 MB and must be displayed in the following format:
{
    "statusCode":200,
    "body": "{\"status\": \"allow\", \"context\": {\"user\": \"abc\"}}"
}
The body field is a character string, which is JSON-decoded as follows:
{ "status": "allow/deny", "context": { "user": "abc" } }- The statusCode field is mandatory. If FunctionGraph is running properly and the code of the function complies with specifications, the value of statusCode is the response code of the function.
- If response code is not 200, APIG considers that the function is abnormal and returns error code 500 and error information Internal server error.
- When the relaxed mode of the custom authorizer is turned on and the function fails to connect or returns a 500 or 503 code, the authorizer does not check the status field in the body field. Instead, it will immediately return a message indicating that the API was successfully invoked. And the context field obtained from the function code will be empty.
- The status field is mandatory and is used to identify the authentication result. The authentication result can only be allow or deny. allow indicates that the authentication is successful, and deny indicates that the authentication fails.
- The context field is optional. It can be key-value pairs, but the key value cannot be a JSON object or an array.
The context field contains custom user data. After successful authentication, the user data is mapped to the backend parameters. The parameter name in context is case-sensitive and must be the same as the system parameter name. The parameter name must start with a letter and can contain 1 to 32 characters, including letters, digits, hyphens (-), and underscores (_).
After successful frontend authentication, the value abc of user in context is mapped to the test parameter in the Header location of backend requests.
- The statusCode field is mandatory. If FunctionGraph is running properly and the code of the function complies with specifications, the value of statusCode is the response code of the function.
Example header parameters:
# -*- coding:utf-8 -*-
import json
def handler(event, context):
    if event["headers"].get("test")=='abc':
        resp = {
            'statusCode': 200,
            'body': json.dumps({
                "status":"allow",
                "context":{
                    "user":"abcd"
                }
            })
        }
    else:
        resp = {
            'statusCode': 200,
            'body': json.dumps({
                "status":"deny",
            })
        }
    return json.dumps(resp)
Example query parameters:
# -*- coding:utf-8 -*-
import json
def handler(event, context):
    if event["queryStringParameters"].get("test")=='abc':
        resp = {
            'statusCode': 200,
            'body': json.dumps({
                "status":"allow",
                "context":{
                    "user":"abcd"
                }
            })
        }
    else:
        resp = {
            'statusCode': 200,
            'body': json.dumps({
                "status":"deny",
            })
        }
    return json.dumps(resp)
Example user data:
# -*- coding:utf-8 -*- import json def handler(event, context): if event.get("user_data")=='abc': resp = { 'statusCode': 200, 'body': json.dumps({ "status":"allow", "context":{ "user":"abcd" } }) } else: resp = { 'statusCode': 200, 'body': json.dumps({ "status":"deny", }) } return json.dumps(resp) - The function code has defined three types of request parameters in the following formats:
- Test the function. In the Configure Test Event dialog box, select apig-event-template, edit the test event, and click Save. Then click Test.
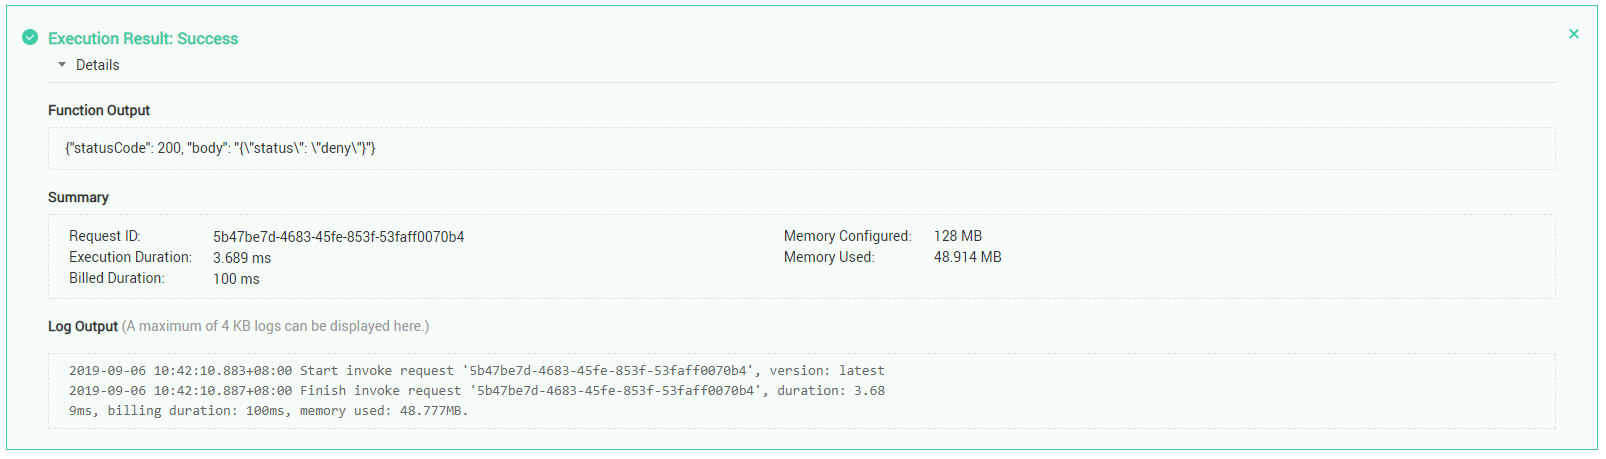
If the execution result is Success, the test is successful.
Next, you need to go to the APIG console to create a frontend custom authorizer.
Follow-Up Operations
Create a custom authorizer for frontend authentication on the APIG console. For details, see section "Create a custom authorizer" in the API Gateway User Guide.
Feedback
Was this page helpful?
Provide feedbackThank you very much for your feedback. We will continue working to improve the documentation.See the reply and handling status in My Cloud VOC.
For any further questions, feel free to contact us through the chatbot.
Chatbot


