Using Java Demo
Scenarios
In addition to the native Kafka client described in the preceding sections, MQS instances can also be accessed via HTTP RESTful connections, including sending messages to specified topics, consuming messages, and acknowledging message consumption.
This is used to adapt to the original service system architecture and facilitate unified access using the HTTP protocol.
Procedure
- You have obtained MQS connection information. For details, see Preparations.

- If both SASL_SSL and intra-VPC plaintext access are enabled for MQS of the ROMA Connect instance, the SASL mode cannot be used for connecting to MQS topics in the VPC.
- If the SASL mode is used for connecting to MQS topics, you are advised to configure the mapping between the host and IP address in the /etc/hosts file on the host where the client is located. Otherwise, network delay will occur.
Set the IP address to the connection address of MQS and set the host to the name of each instance host. Ensure that the name of each host is unique. Example:
10.10.10.11 host01
10.10.10.12 host02
10.10.10.13 host03
- Assemble an API request, including the signature of the API request, by referring to the sample code.
API request signature: The SASL username and password are used as a key pair to sign the request URL and message header timestamp for backend service verification. Learn about the signature process.
- For details about the structure of response messages returned when a demo project is used to create, retrieve, and confirm messages in a specified topic, see Message Production API, Message Consumption API, and Message Retrieval Confirmation API.
Prerequisites
This section provides an example of sending RESTful API requests in Java. A Maven project developed in IntelliJ IDEA is used as an example. If you want to use the project in the local environment, the following environments (Windows 10 as an example) should be installed and configured:
- You have obtained MQS connection information. For details, see Preparations.
- You have installed the development tool and Java development environment. For details, see Preparations.
- You have obtained the demo.
On the ROMA Connect console, choose Message Queue Service > Topic Management. In the upper right corner of the page, choose Download > Download RESTful API Java Demo Package to download the demo.
Importing a Project
- Start IntelliJ IDEA and choose Import Project.
The Select File or Directory to Import dialog box is displayed.
- Select the directory where the RESTful API Java demo is decompressed and click OK.

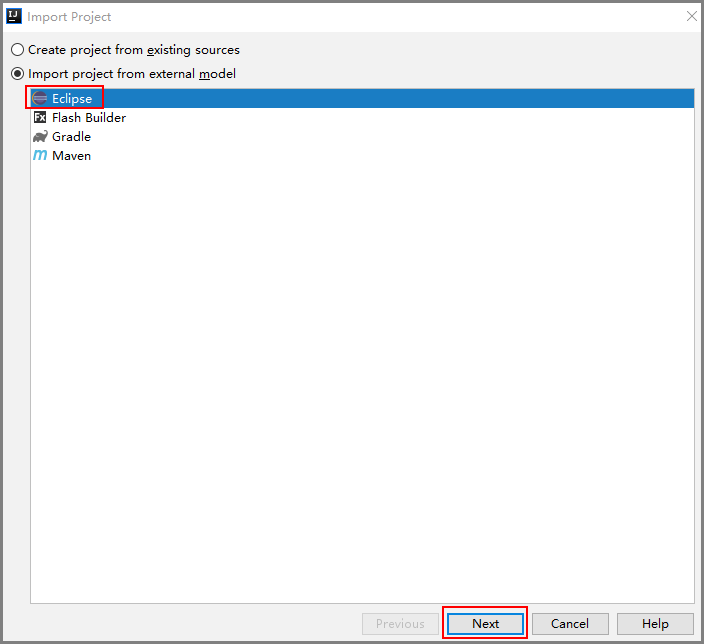
- Select Eclipse for Import project from external model and click Next. Retain the default settings and click Next until the Please select project SDK page is displayed.
Figure 1 Import Project dialog box

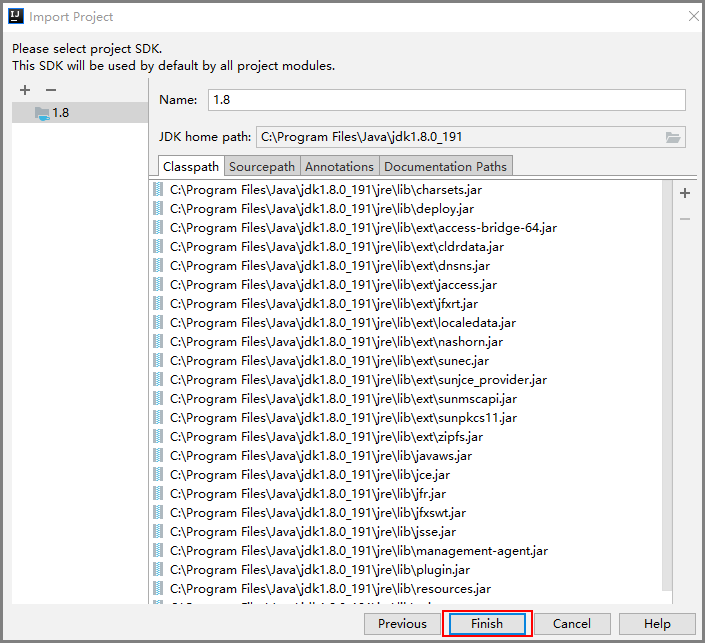
- Click Finish.
Figure 2 Finish

- Edit the rest-config.properties file.
The file is located in the src/main/resources directory. Enter the obtained Kafka instance connection address, topic name, and SASL information in the following configuration. kafka.rest.group indicates the consumer group ID, which can be specified on the client.
# Kafka rest endpoint. kafka.rest.endpoint=https://{MQS_Instance_IP_Addr}:9292 # Kafka topic name. kafka.rest.topic=topic_name_demo # Kafka consume group. kafka.rest.group=group_id_demo # Kafka sasl username. kafka.rest.username=sasl_username_demo # Kafka sasl password. kafka.rest.password=sasl_user_passwd_demo - Edit log4j.properties.
For example, modify the directory for storing logs.
log.directory=D://workspace/logs
- Run the sample project to view the message production and consumption examples.
The main method for producing and consuming messages is in the RestMain.java file. You can run the main method in Java Application mode.
Code of the Sample Project
- Project entry
The project entry is in the RestMain.java file.
public class RestMain { private static final Logger LOGGER = LoggerFactory.getLogger(RestMain.class); public static void main(String[] args) throws InterruptedException { //Initialize the request object. The RestServiceImpl class file also contains the RESTful APIs and request signature. IRestService restService = new RestServiceImpl(); Base64.Decoder decoder = Base64.getDecoder(); //The following are message production, message consumption, and consumption confirmation. // Produce message ProduceReq messages = new ProduceReq(); messages.addMessage("{[{'id': '00001', 'name': 'John'}, {'id': '00002', 'name': 'Mike'}]}").addMessage("Kafka rest client demo!"); LOGGER.debug("produce message: {}", JsonUtils.convertObject2Str(messages)); restService.produce(messages); // Consume message List<ConsumeResp> consumeResps = restService.consume(); CommitReq commitReq = new CommitReq(); consumeResps.forEach(resp -> { LOGGER.debug("handler: {}, content: {}", resp.getHandler(), new String(decoder.decode(resp.getMessage().getContent()))); commitReq.addCommit(resp.getHandler()); }); // Commit message if (commitReq.getMessages().size() != 0) { CommitResp resp = restService.commit(commitReq); LOGGER.info("Commit resp: success: {}, failed: {}", resp.getSuccess(), resp.getFail()); } else { LOGGER.warn("Commit is empty."); } } } - Message assembling and sending
The following uses message production as an example to describe how to assemble and sign a message. After the signature method is invoked, two message headers are returned: Authorization and X-Sdk-Date. Authorization contains signature information of the requested content. Another parameter Content-Type in the message header must be added to the code. For details, see the createRequest() method in the example.
 public List<ProduceResp> produce(ProduceReq messages)
    {
        List<ProduceResp> prodResp = null;
        try
        {
            Request request = createRequest();
            request.setUrl(produceURI);
            request.setMethod("POST");
            request.setBody(JsonUtils.convertObject2Str(messages));
            //After the request content is signed, two parameters are added to the request header: Authorization and X-Sdk-Date. Authorization contains signature information of the requested content.
            HttpRequestBase signedRequest = Client.sign(request);
            LOGGER.debug("Request uri: {}, headers: {}", signedRequest.getURI(), signedRequest.getAllHeaders());
            LOGGER.debug("Request body: {}", request.getBody());

            HttpResponse response = HttpUtils.execute(signedRequest);
            if (response.getStatusLine().getStatusCode() == HttpStatus.SC_CREATED)
            {
                String jsonStr = EntityUtils.toString(response.getEntity(), "UTF-8");
                prodResp = JsonUtils.convertStr2ListObject(jsonStr, new TypeReference<List<ProduceResp>>() { });
                LOGGER.info("Produce response: {}", jsonStr);
                return prodResp;
            }
            else
            {
                LOGGER.error("Produce message failed. statusCode: {}, error msg: {}",
                        response.getStatusLine().getStatusCode(),
                        EntityUtils.toString(response.getEntity(), "UTF-8"));
            }
        }
        catch (Exception e)
        {
            LOGGER.error("Produce message failed.");
        }
        return prodResp;
    }
Feedback
Was this page helpful?
Provide feedbackThank you very much for your feedback. We will continue working to improve the documentation.See the reply and handling status in My Cloud VOC.
For any further questions, feel free to contact us through the chatbot.
Chatbot


