
Defect Handling Process and Precautions
Product defect handling is not just about ticket submission by testers and defect fixing by developers. It requires clear, comprehensive, and traceable defect tickets, as well as a process that covers defect detection, reproduction, confirmation, rectification, self-verification, regression tests, and closure.
Collaboration Between Development and Testers
During product testing, the testers record defect tickets, transfer them to the developers for handling, and track the defect handling and closure. Defect tickets are an important information carrier for development and testers to communicate with each other. They may encounter the following problems:
- The developers complain that the defect description submitted by the testers is not detailed. For example, the reproduction procedure and the software version of the problem are not provided, which increases the communication cost.
- The developers do not reproduce the problem mentioned in the defect ticket in the local development environment and directly transfer the defect to the testers.
- After a defect is rectified, the developers do not notify the testers. As a result, the defect is not reviewed in time.
- After a defect is found during testing, the functions of related peripheral functions are not tested. Therefore, potential problems are ignored. Besides, the developers do not conduct related research.
- Developers disagree with the severity of defects marked by testers.
Defect Handling Process
The development and testers are the owners of the software product quality. They have the same goal and willingness in terms of product quality assurance. The only difference lies in the work activities they are engaged in. The development and implementation of the defect handling process should aim to achieve mutual trust and efficient collaboration, instead of being used as an excuse for inaction and a trigger for contradictions. The following describes a complete defect handling process, which can be used as a reference in operations.
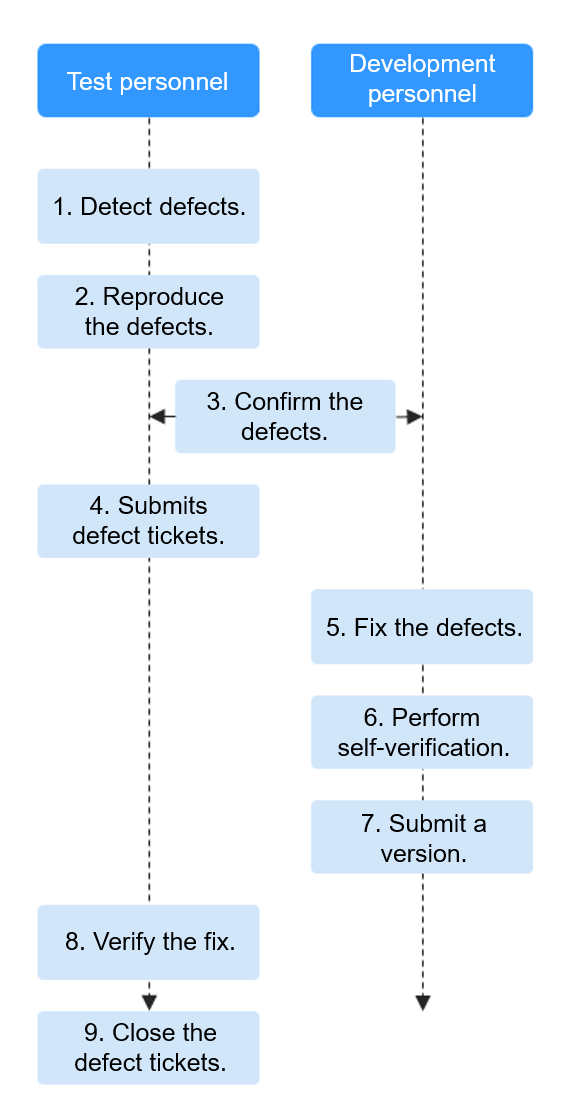
- Detect defects.
In software development and testing, as code and modules are overlaid and invoked layer by layer, an underlying defect may cause multiple problems. Testers should not jump to conclusions about the problem that is found at first and its causes. Instead, a logical and systematic analysis is required.
- First, exploratory analysis is required to check whether there are other problems in addition to the first problem, and whether these problems exist at the same time or have certain dependencies and sequence. Therefore, more test procedures are required.
For example, if an IT system cannot be logged in using a mobile number and verification code, the testers need to analyze other login modes such as using a mobile number and password; logging in to another system using a mobile number and verification code; logging in to the system using an app, a browser, or another device; using a mobile number of another carrier.
- Second, infer the causes of the problem and verify the causes. Do not regard test procedures as the causes. Instead, analyze the data changes caused by the test procedures as the causes to check whether similar problems may occur in other scenarios. If the problem occurs occasionally, analyze the cause and contact developers to locate and demarcate the problem.
- Finally, sort out the conditions, operation procedures, and symptoms of the problem.
- First, exploratory analysis is required to check whether there are other problems in addition to the first problem, and whether these problems exist at the same time or have certain dependencies and sequence. Therefore, more test procedures are required.
- Reproduce the defects.
If the defects do not recur, it is difficult for developers to locate them. Generally, the testers are responsible for ensuring that the defects can be reproduced. If the defects occur occasionally and are difficult to be reproduced, it indicates that the root causes of the defects are deep. In this case, contact the developers for help. To reproduce the defects, the testers must:
- First, the testers who have detected the defects should change the input data or combination, and also change the test environment to reproduce the defects according to defect occurrence conditions and operation procedures.
- Second, other personnel (such as developers) should reproduce the defects based on the text and screenshot descriptions.
- Confirm the defects.
Before submitting defect tickets, the testers should confirm with the developers, including whether the found problems are defects rather than optimization points or new requirements, whether the problems are repeated, whether the defects can be reproduced, whether the problem logs need to be supplemented, whether the defect severity is correct, whether the defects block testing, and when the defects will be resolved.
The time for development and testers to confirm defects is not limited. It is advised to confirm information as soon as possible from the time when a defect is found to the time when developers start to rectify the defect. The defect tickets can also be submitted to the module owner for unified confirmation and feedback.
- Submit defect tickets.
The submitted defect tickets must be clear, comprehensive, manageable, and traceable. A dedicated defect management system is required for defect tickets. It is recommended that the defect management system be the same as the requirement and development task management systems to facilitate unified management and planning. Generally, a defect ticket contains the severity, type, problem description, root cause analysis, handling suggestions, test suggestions, associated test cases, environment information description, logs required for fault locating by developers, and screenshots.
- Fix the defects.
After receiving defect tickets, the developers preliminarily analyze the workload and arrange the schedule. In addition to fixing the problems described in the defect ticket, the developers need to further test the scenarios that may be associated, perform in-depth tests, find possible in-depth problems, and solve the problems. After the defects are fixed, the developers need to describe the root causes, occurrence conditions, and solutions of the problems in the defect tickets. Some defect management systems can also associate defect tickets with code submission records to help track, collect, and trace defect tickets.
- Perform self-verification.
After problem rectification, the testers need to create an individual build and deploy it in the test environment in addition to verifying that the problems are rectified in the local development environment. Ensure that the test environment is the same as the environment used by the testers or the environment where the problems are found to eliminate environment differences. The self-verification is successful only after no problem is found in the further test in the test environment. In DevOps tools, individual-level pipelines can be used to automate the entire process of individual build packaging and environment deployment, improving self-verification efficiency.
- Submit a version.
After the code is fixed and reviewed, it should be released to the code branch of the target version.
- Verify the fix.
Testers deploy code branches that contain defect rectification in the test environment to check whether the problems are completely rectified. If the problems are not fixed or new problems are introduced during the fixing, record the problems in defect tickets and send them back to the developers for further analysis and fixing.
- Close the defect tickets.
The defect tickets can be closed only after the regression test verifies that the problems are resolved and no new problem is generated. Generally, a defect ticket can be closed only in three cases: normal closure of a problem, closure of a non-problem, and closure of a repeated problem. Some descriptions and pictures can be added to the defect tickets to record the version in which the problems have been resolved.
Customizing a Defect Handling Process in CodeArts TestPlan
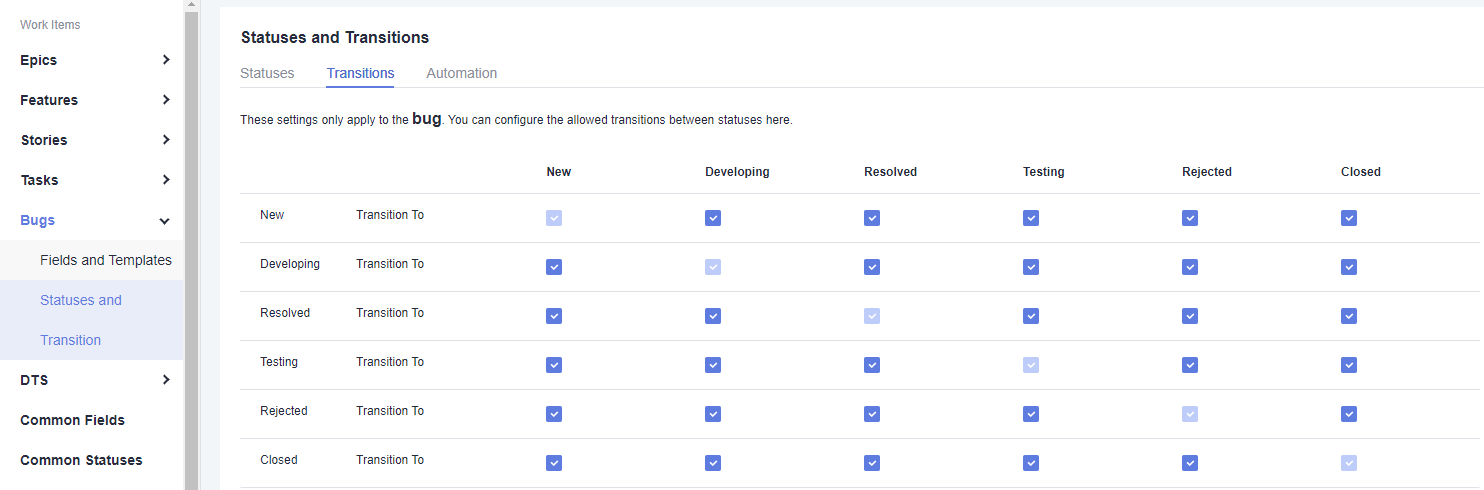
- Determine the defect status, for example, New, Developing, Resolved, Testing, Rejected, and Closed. These statuses have been preset in the CodeArts TestPlan bug template. You can also add new statuses.

- Set the transition direction of the defect status.
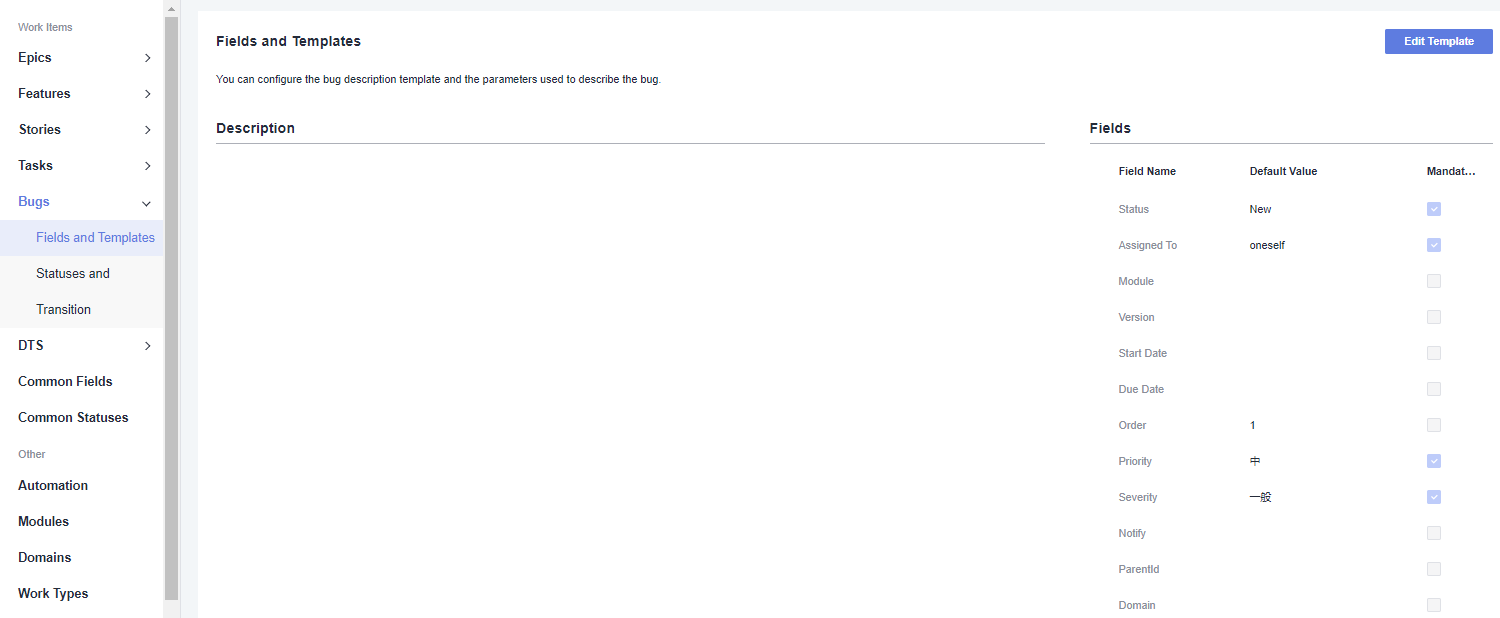
- Set defect fields and templates to instruct test and developers to fill in information.
Feedback
Was this page helpful?
Provide feedbackThank you very much for your feedback. We will continue working to improve the documentation.See the reply and handling status in My Cloud VOC.
For any further questions, feel free to contact us through the chatbot.
Chatbot


