
Connecting to the OBS File System with an MRS Hive Table
Application Scenarios
MRS allows you to store data in OBS and use an MRS cluster for data computing only. In this way, storage and compute are decoupled.
You can use the IAM service to perform simple configurations to access OBS.
Solution Architecture
Hive is a data warehouse built on Hadoop. It provides batch computing capability for the big data platform and is able to batch analyze and summarize structured and semi-structured data for data calculation. Hive operates structured data using Hive Query Language (HQL), a SQL-like language. HQL is automatically converted into MapReduce tasks for the query and analysis of massive data in the Hadoop cluster.
Hive is able to:
- Analyze massive structured data and summarizes analysis results.
- Allow complex MapReduce jobs to be compiled in SQL languages.
- Support flexible data storage formats, including JavaScript object notation (JSON), comma-separated values (CSV), TextFile, RCFile, SequenceFile, and ORC.
Hive functions as a data warehouse based on HDFS and MapReduce architecture and translates HQL statements into MapReduce jobs or HDFS operations.

- Metastore: reads, writes, and updates metadata such as tables, columns, and partitions. Its lower layer is relational databases.
- Driver: manages the lifecycle of HQL execution and participates in the entire Hive job execution.
- Compiler: translates HQL statements into a series of interdependent Map or Reduce jobs.
- Optimizer: is classified into logical optimizer and physical optimizer to optimize HQL execution plans and MapReduce jobs, respectively.
- Executor: runs Map or Reduce jobs based on job dependencies.
- ThriftServer: functions as the servers of JDBC, provides Thrift APIs, and integrates with Hive and other applications.
- Clients: include the web UI and JDBC APIs and provides APIs for user access.
Solution Advantages
With MRS, you can store data in OBS and dedicate MRS clusters solely to computing tasks, isolating storage and compute resources. This approach offers flexible, on-demand scaling at a lower cost, making it well-suited for big data processing.
Notes and Constraints
In big data storage-compute decoupling scenarios, make sure to use an OBS parallel file system. Using an object bucket will significantly impact the performance of the cluster.
Procedure
This section describes basic procedure for creating a Hive table to store data to OBS.
Creating an ECS Agency
- Log in to the Huawei Cloud management console.
- Choose Service List > Management & Governance > Identity and Access Management.
- Click Agencies. On the displayed page, click Create Agency.
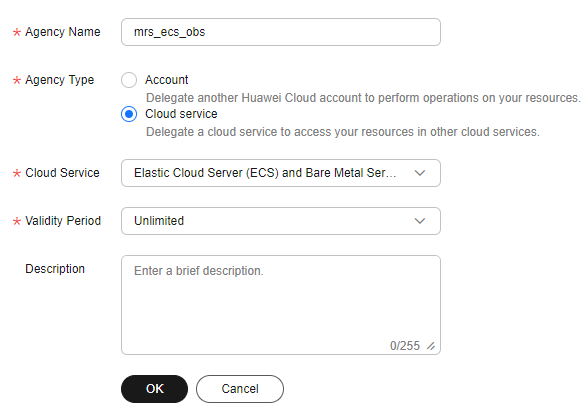
- Enter an agency name, for example, mrs_ecs_obs.
- Set Agency Type to Cloud service and select Elastic Cloud Server (ECS) and Bare Metal Server (BMS) to authorize ECS or BMS to invoke OBS.
- Set Validity Period to Unlimited and click OK.
Figure 2 Creating an agency
- Click Authorize in the Operation column of the agency, search for the OBS OperateAccess policy, and select the policy.
- Click Next. On the page that is displayed, select the desired scope for the permissions you selected. By default, All resources is selected. Click Show More, select Global resources, and click OK.
- In the dialog box that is displayed, click OK to start authorization. After the message "Authorization successful." is displayed, click Finish. The agency is created successfully.
Configuring an Agency for an MRS Cluster
You can configure an agency when creating a cluster or bind an agency to an existing cluster to decouple storage and compute. This section uses an existing cluster as an example to describe how to configure an agency.
- Log in to the MRS management console. In the left navigation pane, choose Active Clusters.
- Click the name of a cluster to go to the cluster details page.
- On the Dashboard page, click Synchronize on the right of IAM User Sync to synchronize IAM users.
- On the Dashboard page, click Manage Agency on the right side of Select Agency to select the agency created in Creating an ECS Agency, and click OK to bind it to the cluster. Alternatively, click Create New to go to the IAM console to create an agency and bind it to the cluster.
Figure 3 Binding an agency

Creating an OBS File System
- Log in to the OBS console.
- Choose Parallel File System > Create Parallel File System.
- Enter the file system name, for example, mrs-demo01.
Set other parameters as required.
- Click Create Now.
- In the parallel file system list on the OBS console, click a file system name to go to the details page.
- In the navigation pane, choose Files and create program and input folders.
- program: Upload the program package to this folder.
- input: Upload the input data to this folder.
Accessing the OBS File System Through Hive
- Log in to a master node as user root. For details, see Logging In to an ECS.
- Verify that Hive can access OBS.
- Log in to the master node of the cluster as user root and run the following commands:
cd /opt/Bigdata/client
source bigdata_env
source Hive/component_env
- View the list of files in file system mrs-demo01.
hadoop fs -ls obs://mrs-demo01/
- Check whether the file list is returned. If it is returned, access to OBS is successful.
Figure 4 Viewing the file list in mrs-demo01

- Run the following command to authenticate the user (skip this step for a normal cluster, that is, with Kerberos authentication disabled):
Enter the password of user hive. The default password is Hive@123. Change the password upon the first login.
- Run the Hive client command.
- Access the OBS directory in the Beeline. For example, run the following command to create a Hive table and specify that data is stored in the test_demo01 table of file system mrs-demo01:
create table test_demo01(name string) location "obs://mrs-demo01/test_demo01";
- Run the following command to query all tables. If the test_demo01 table is displayed in the command output, the access to OBS is successful.
show tables;
Figure 5 Checking whether the test_demo01 table exists
- Run the following command to check the table location.
show create table test_demo01;
Check whether the location of the table starts with obs://OBS bucket name/.
Figure 6 Checking the location of the test_demo01 table
- Run the following command to write data into the table.
insert into test_demo01 values('mm'),('ww'),('ww');
Run the select * from test_demo01; command to check whether the data is written successfully.
Figure 7 Viewing data in the test_demo01 table
- Run the !q command to exit the Beeline client.
- Log in to the OBS console again.
- Click Parallel File System and select the created file system.
- Click Files to check whether the data exists in the created table.
- Log in to the master node of the cluster as user root and run the following commands:
Feedback
Was this page helpful?
Provide feedbackThank you very much for your feedback. We will continue working to improve the documentation.See the reply and handling status in My Cloud VOC.
For any further questions, feel free to contact us through the chatbot.
Chatbot


