
Help Center/ DataArts Studio/ Best Practices/ Advanced Data Development Guidance/ Configuring a Daily Job That Depends on a Minute-Level Job
Updated on 2025-11-04 GMT+08:00
Configuring a Daily Job That Depends on a Minute-Level Job
Scenario
This section describes how to configure a job that is executed at 07:15 every day and depends on a job that is executed every minute. The daily job depends on all the instances of the minute-level job on a calendar day, and is executed after the last instance of the minute-level job is executed.
Procedure
- Create a job that starts at 00:00, ends at 23:59, and is executed at an interval of one minute.
- In the left navigation pane of DataArts Factory, choose .
- In the job directory, right-click a directory and select Create Job to create a batch processing pipeline job named job_3417_kk01.
- On the job canvas page, select the MRS Spark operator and configure parameters. For details, see MRS Spark.
- Set Scheduling Frequency to Minutes. Figure 1 Setting the scheduling frequency to minutes

- After configuring the job, save and submit the version.
- Click Execute to start job scheduling.
- Choose Job Monitoring in the navigation pane and view the job execution result. Figure 2 Viewing the job execution result

- Create a job that is executed at 07:15 every day.
- In the left navigation pane of DataArts Factory, choose .
- In the job directory, right-click a directory and select Create Job to create a batch processing pipeline job named job_3417_kk02.
- On the job canvas page, select the MRS Spark operator and configure parameters. For details, see MRS Spark.
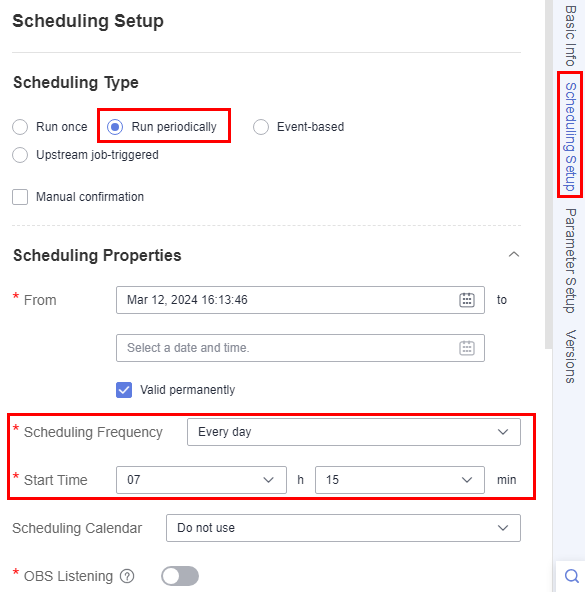
- Set Scheduling Frequency to Every day. Figure 3 Setting the scheduling frequency to every day
- Configure the dependency of the daily job on the minute-level job.

If you select Recent, the daily job depends only on the minute-level job's instance that is closest to its scheduled execution time.
Figure 4 Configuring dependency attributes
- After configuring the job, save and submit the version.
- Click Execute to start job scheduling.
- Choose Job Monitoring in the navigation pane and view the job execution result. Figure 5 Viewing the job execution result

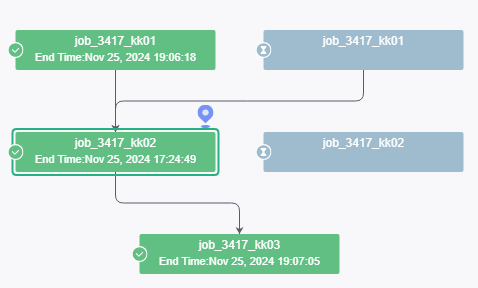
- Click More in the Operation column and select View Latest Instance DAG to view the job instance dependency. Figure 6 Job instance dependency
Parent topic: Advanced Data Development Guidance
Feedback
Was this page helpful?
Provide feedbackThank you very much for your feedback. We will continue working to improve the documentation.See the reply and handling status in My Cloud VOC.
The system is busy. Please try again later.
For any further questions, feel free to contact us through the chatbot.
Chatbot


