Managing Asset Connections
Scenario
This topic describes Viewing Asset Connections, Editing an Asset Connection, and Deleting an Asset Connection.
Viewing Asset Connections
- Log in to the management console.
- Click
 in the upper part of the page and choose Security > SecMaster.
 - In the navigation pane on the left, choose Workspaces > Management. In the workspace list, click the name of the target workspace.
Figure 1 Workspace management page

- In the navigation pane on the left, choose . On the displayed page, click the Asset Connections tab.
Figure 2 Asset connection tab page

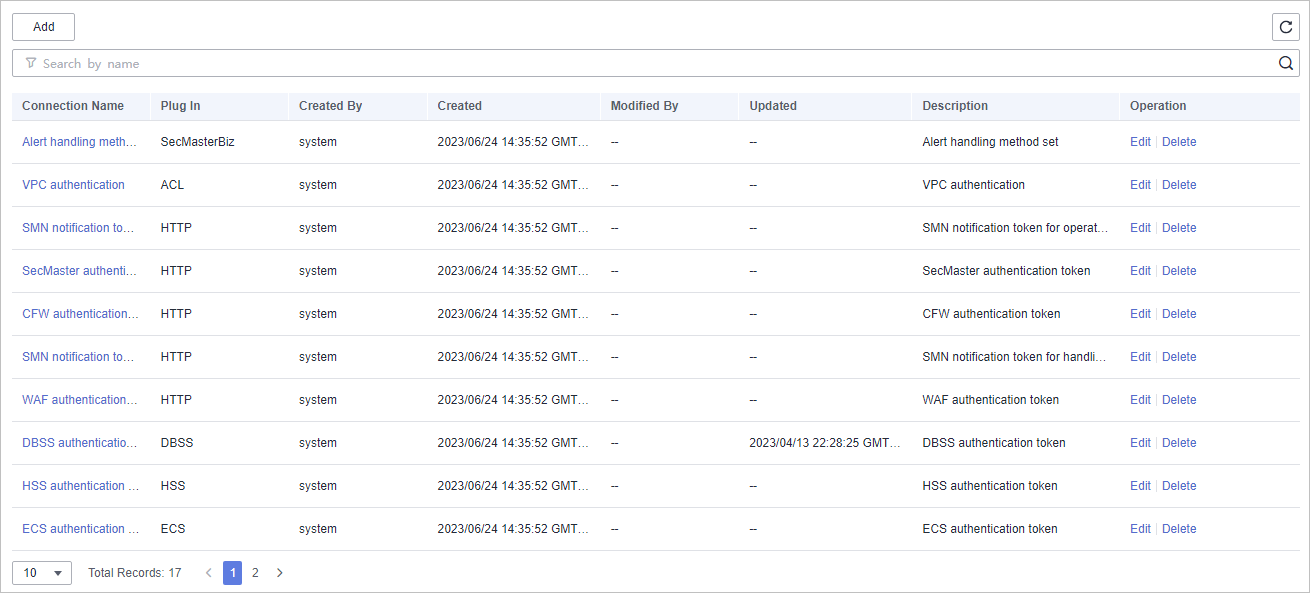
- On the Asset connection tab page, view information about existing asset connections.
If there are a large number of asset connections, you can use the search function to quickly search for a specified asset connection: Filter asset connections by connection name, plug-in, creator, creation time, person who modified the connection, update time, or description of an asset connection, enter a keyword in the search box, and click
 .Figure 3 Viewing asset connections
Table 1 Asset connection parameters Parameter
Description
Connection Name
Asset connection name
Plug In
Plug-in corresponding to the asset connection
Created By
User who creates an asset connection
Created
Time when an asset connection is created
User who last updated the information
User who modifies the asset connection last time
Updated
Time when the asset connection was last updated
Description
Description of the asset connection
Operation
You can perform operations such as editing and deleting in the Operation column.
- To view details about an asset connection, click the name of the asset connection. The slide-out panel Detail is displayed.
Editing an Asset Connection
- Log in to the management console.
- Click
 in the upper part of the page and choose Security > SecMaster.
 - In the navigation pane on the left, choose Workspaces > Management. In the workspace list, click the name of the target workspace.
Figure 4 Workspace management page

- In the navigation pane on the left, choose . On the displayed page, click the Asset Connections tab.
Figure 5 Asset connection tab page

- In the row containing a desired asset connection, click Edit in the Operation column. The slide-out panel Edit is displayed.
- On the Edit panel, edit asset connection parameters. For details about the parameters, see Table 2.
Table 2 Asset connection parameters Parameter
Description
Connection Name
Enter an asset connection name. The naming rules are as follows:
- Only uppercase letters (A to Z), lowercase letters (a to z), digits (0 to 9), and underscores (_) are allowed.
- A maximum of 64 characters are allowed.
Description
(Optional) Enter the asset connection description. The description can contain a maximum of 64 characters.
Plug In
Select the plug-in required for asset connection. For details about the plug-in, see Viewing Plug-in Details.
Created By
Creator of the asset connection. This parameter cannot be modified.
Created
Time when an asset connection is created. This parameter cannot be modified.
Modified By
User who last modifies the asset connection. This parameter cannot be modified.
Connection Type
Select the type of the asset connection.
Credential
Enter the credential information, such as AK and SK, based on the selected connection type.
- Click OK.
Deleting an Asset Connection
- Log in to the management console.
- Click
 in the upper part of the page and choose Security > SecMaster.
 - In the navigation pane on the left, choose Workspaces > Management. In the workspace list, click the name of the target workspace.
Figure 6 Workspace management page

- In the navigation pane on the left, choose . On the displayed page, click the Asset Connections tab.
Figure 7 Asset connection tab page

- Locate the row that contains a desired asset connection, click Delete in the Operation column.
- In the deletion confirmation dialog box that is displayed, click OK to confirm the deletion.

Deleted assets cannot be restored. Exercise caution when performing this operation.
Feedback
Was this page helpful?
Provide feedbackThank you very much for your feedback. We will continue working to improve the documentation.See the reply and handling status in My Cloud VOC.
For any further questions, feel free to contact us through the chatbot.
Chatbot


