Forwarding Policy
Scenarios
ELB allows you to add forwarding policies to forward requests based on domain names or URLs. This function is only supported for HTTP or HTTPS listeners.
A maximum of 500 forwarding policies can be added to a listener. With forwarding policies, requests for videos, images, audio, or text are forwarded to different backend server groups, making it easy to allocate resources.
When you add a forwarding policy, pay attention to the following:
- Each URL path can be found on the backend servers in the backend server group to which requests are forwarded. Otherwise, the backend servers will returns 404.
- The same path cannot be configured for two forwarding policies.
- In regular expression match, sequential matching is used, and matching ends when any rule is successfully matched. Therefore, matching rules cannot overlap with each other if you select Regular expression match for URL Matching Rule.
After a forwarding policy is added, the load balancer forwards requests based on the specified domain name or URL:
- If the domain name or URL in a request matches the forwarding policy, the request is forwarded to the backend server group you configured when adding the forwarding policy.
- If the domain name or URL in a request does not match the forwarding policy, the request is forwarded to the default backend server group associated with the listener.
Add a Forwarding Policy
- Log in to the management console.
- In the upper left corner of the page, click
 and select the desired region and project.
 - Click Service List. Under Network, click Elastic Load Balance.
- Locate the target load balancer and click its name.
- Click Listeners, locate the target listener, and click its name.
- Click Add on the right of Forwarding Policies.
- In the Add Forwarding Policy dialog box, specify the parameters by referring to Table 1.
- Click OK.
Alternatively, locate the target load balancer in the load balancer list and click the name of the target listener in the Listener column. In the Listeners area, click Add on the right of Forwarding Policies and then add a forwarding policy.
|
Item |
Parameter |
Description |
Example Value |
|---|---|---|---|
|
Configure Forwarding Policy |
Name |
Specifies the forwarding policy name. |
forwarding_policy-q582 |
|
Domain Name |
Specifies the domain name for triggering the forwarding policy. The specified domain name will be exactly matched. Note that either a domain name or URL must be specified. |
www.test.com |
|
|
URL |
Specifies the URL for triggering the forwarding policy. |
/login.php |
|
|
URL Matching Rule |
|
Exact match |
|
|
Description |
Provides supplementary information about the forwarding policy. |
N/A |
|
|
Add Backend Server Group |
Backend Server Group |
Specifies whether a new or existing backend server group will be used. Select Create new or Use existing. If you select Create new, set parameters by referring to Table 1 and Table 2.
NOTE:
The backend protocol can only be HTTP. |
Create new |
URL Matching Example
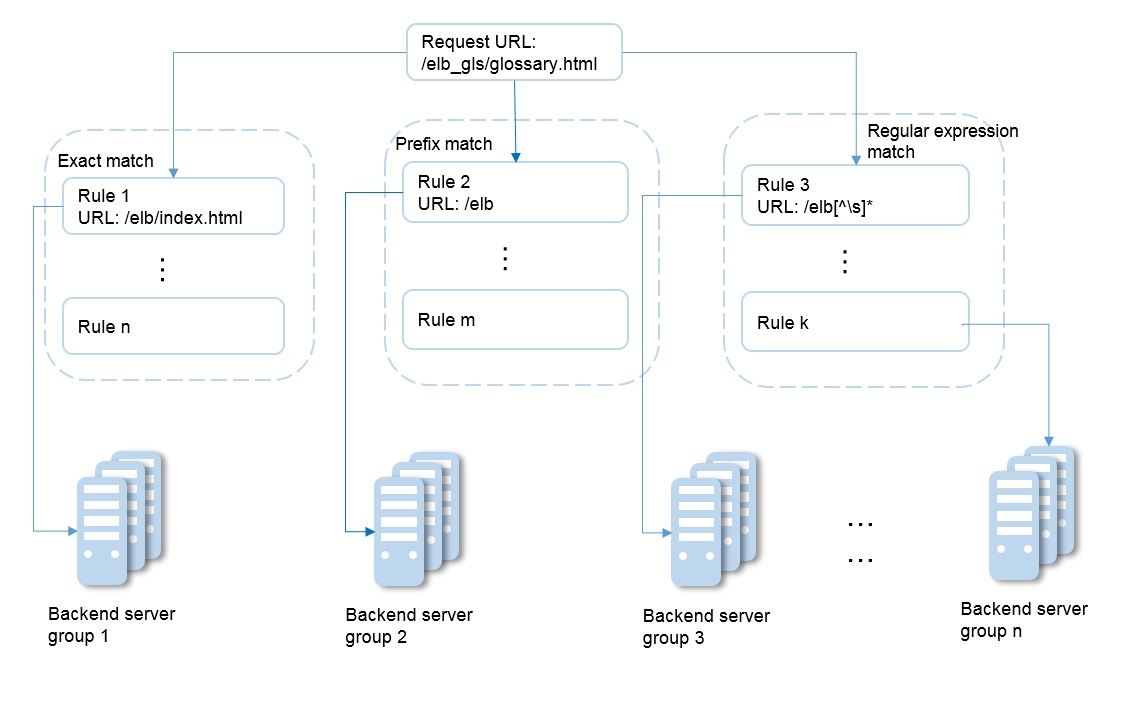
The following table lists how a URL is matched, and Figure 1 shows how a request is forwarded to a backend server group.
|
URL Matching Rule |
URL |
Preset URL |
|||
|---|---|---|---|---|---|
|
- |
- |
/elb/index.html |
/elb |
/elb[^\s]* |
/index.html |
|
Exact match |
/elb/index.html |
√ |
- |
- |
- |
|
Prefix match |
√ |
√ |
- |
- |
|
|
Regular expression match |
√ |
- |
√ |
- |
|
In this figure, the system first searches the requested URL (/elb_gls/glossary.html) using the Exact match rule. If no exactly matched URL is found, the Prefix match rule is used. If the start string of the requested URL matches that of specified URL, the request is forwarded to backend server group 2. Even if the requested URL also matches rule 3 (Regular expression match), the request is forwarded to backend server group 2 because Prefix match takes effect in priority.
Modify a Forwarding Policy
- Log in to the management console.
- In the upper left corner of the page, click
 and select the desired region and project.
 - Click Service List. Under Network, click Elastic Load Balance.
- Locate the target load balancer and click its name.
- Click Listeners, locate the target listener, and click its name.
- Click Forwarding Policies.
- Locate the target forwarding policy and click
 on the right of its name.
 - In the Modify Forwarding Policy dialog box, modify the parameters and click OK.
Delete a Forwarding Policy
- Log in to the management console.
- In the upper left corner of the page, click
 and select the desired region and project.
 - Click Service List. Under Network, click Elastic Load Balance.
- Locate the target load balancer and click its name.
- Click Listeners, locate the target listener, and click its name.
- Click Forwarding Policies.
- Locate the target forwarding policy and click
 on the right of its name.
 - Click Yes.
Feedback
Was this page helpful?
Provide feedbackThank you very much for your feedback. We will continue working to improve the documentation.See the reply and handling status in My Cloud VOC.
For any further questions, feel free to contact us through the chatbot.
Chatbot


