
Pushing an Image Artifact to an Image Repository
Scenarios
SWR allows you to push (or upload) local image artifacts to an SWR image repository through a container engine client for easier image artifact management.

You can push image artifacts over a private network or the public network. For details, see Configuring Network Access.
Prerequisites
Before using an image repository, ensure that:
- You have purchased the repository by following the instructions in Purchasing a Repository and have permissions to access the repository. For details about the permissions, see Access Control Overview.
- You have created an access credential by following the instructions in Access Credentials.
- You have created a namespace by following the instructions in Creating a Namespace.
- You have prepared a container engine client, which can be used within the network access range defined in Access Control.
Constraints
- If a Docker container engine client is used to push images, the Docker version is 18.06 or later.
- If a containerd container engine client is used to push images, the containerd version is 1.5.0 or later.
- The size of each image layer cannot exceed 10 GB.
- A maximum of 160 images can be pushed to a repository of the Enterprise Edition concurrently.
Pushing an Image Using a Container Engine Client
You can refer to the following operations to push an image using a Docker or containerd container engine client.
Docker
- Log in to the server where the container engine client is installed as user root.
- Obtain the temporary or long-term access credential by referring to Access Credentials and log in to the container engine client to access the image repository.
The message Login Succeeded will be displayed upon a successful login.

Temporary access credentials are valid for 24 hours after they are generated. Long-term credentials do not expire and can be used permanently.
- Tag the image.
docker tag[image-name-1:tag-1] [repository-address]/[namespace-name]/[image-name-2:tag-2]

In this command:
- [image-name-1:tag-1]: name and tag of the image to be pushed.
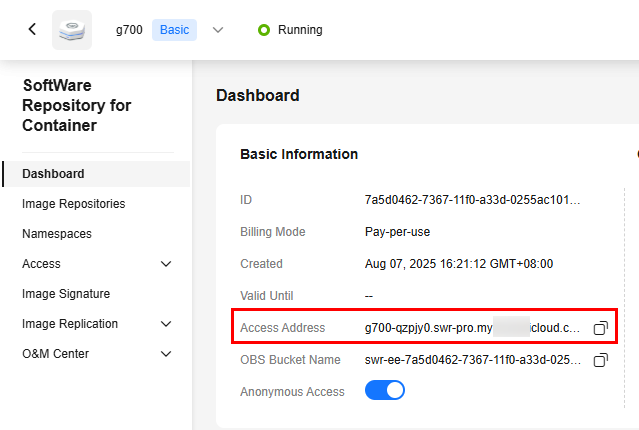
- [repository-address]: address for accessing the repository where the image is stored. To obtain the address, perform the following operations:
Log in to the SWR Enterprise Edition console and switch to the target region in the upper left corner of the page. On the displayed page, click the name of the target repository to go to the repository details page. In the Basic Information area of the Dashboard page, obtain the access address.
- [namespace-name]: namespace you created in Creating a Namespace.
- [image-name-2:tag-2]: new name and tag for the image.
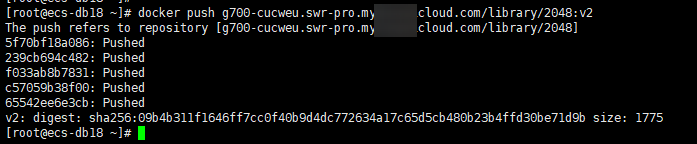
- Push the image to a repository.
docker push [repository-address]/[namespace-name]/[image-name:tag-name]
- View the image artifact information in the image artifact list.
After an image is pushed, you can use it to create a workload on the CCE console.

containerd
- Log in to the SWR Enterprise Edition console.
- On the Repositories page, click the name of the target repository to go to the repository details page.
- In the navigation pane, choose Image Repositories. Locate the target image and click View Pull/Push Commands in the Operation column.
- On the containerd tab, click the copy button next to ctr -n k8s.io image tag to copy the tagging command.
- Log in to the server where the containerd engine is installed as user root and run the command copied in 4 to tag the image. Replace the parameters in the command with the actual values before running the command.
ctr -n k8s.io image tag[image-name-1:tag-1] [repository-address]/[namespace-name]/[image-name-2:tag-2]
In this command:
- [image-name-1:tag-1]: name and tag of the image to be pushed.
- [repository-address]: address for accessing the repository where the image is stored. To obtain the address, perform the following operations:
Log in to the SWR Enterprise Edition console and switch to the target region in the upper left corner of the page. On the displayed page, click the name of the target repository to go to the repository details page. In the Basic Information area of the Dashboard page, obtain the access address.

- [namespace-name]: namespace you created in Creating a Namespace.
- [image-name-2:tag-2]: new name and tag for the image.

- On the containerd tab, click the copy button next to ctr -n k8s.io image push to copy the push command and change the tag to that in 5.

The command is only valid for 24 hours after it is generated. To obtain a push command that will remain valid for a long term, see Access Credentials.

Feedback
Was this page helpful?
Provide feedbackThank you very much for your feedback. We will continue working to improve the documentation.See the reply and handling status in My Cloud VOC.
For any further questions, feel free to contact us through the chatbot.
Chatbot


