
Creating a Scan Job
This section describes how to create a scan job.
Prerequisites
An account and its password have been obtained for logging in to the management console.
Procedure
- Log in to the management console.
- Choose Security > Vulnerability Scan Service > Task List.
- Click Create Job. Figure 1 Creating a job

- Perform scan settings according to Table 1. Figure 2 shows the result after setting.
Table 1 Parameter description Parameter
Description
Job Name
The value is specified by the user.
Target Network Address
Enter the website or IP address to be scanned.
Select an authenticated domain name from the drop-down list.
receive notifications
After this function is enabled, the user will receive an SMS notification when the scan job is complete.
 : disabled
 : enabled
- (Optional) Expand Advanced Settings. Set parameters by referring to Table 2. Figure 3 Advanced settings
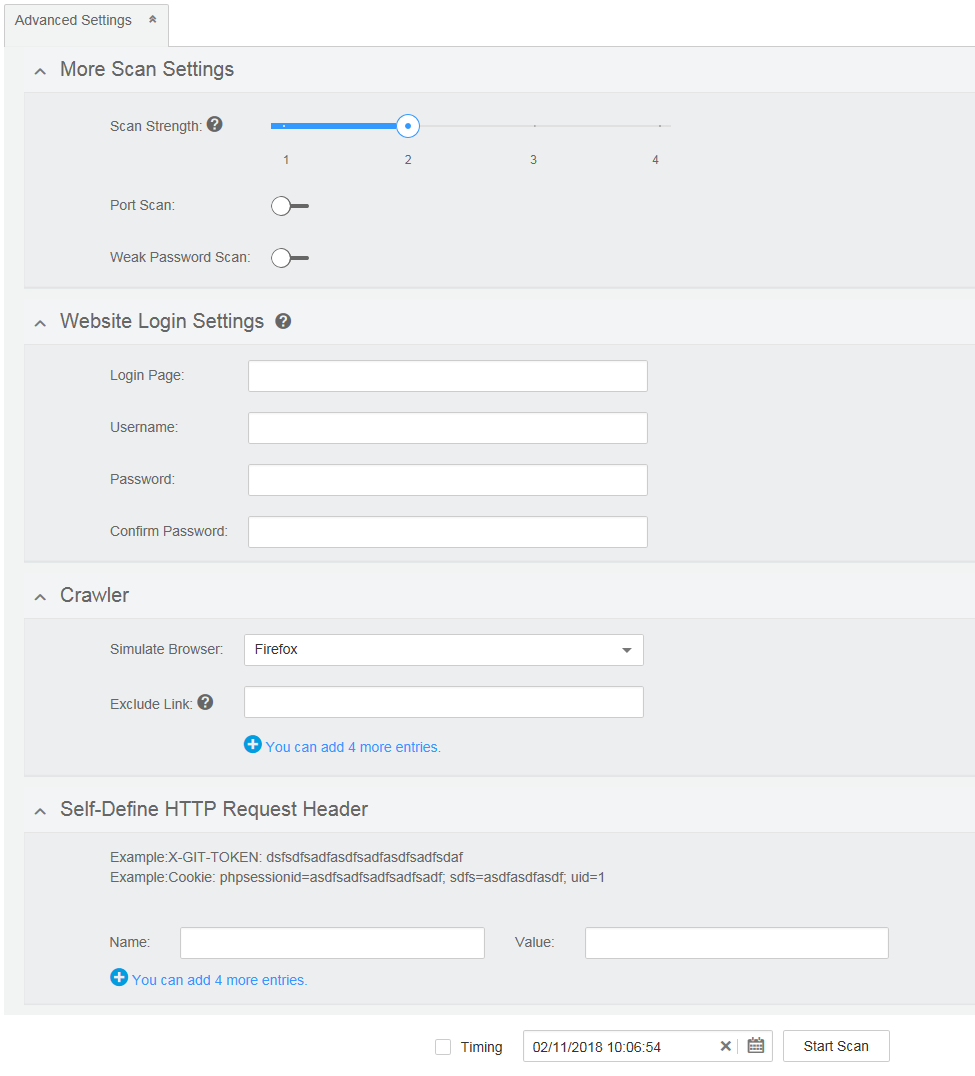
Table 2 Parameter description of advanced settings Parameter
Description
Configuration
More Scan Settings
Scan Strength
The higher the scan strength, the stronger the detection capability, but the longer the time required.
N/A
Port Scan
You can enable or disable port scan.
 : enabled
 : disabled
Weak Password Scan
You can enable or disable weak password scan.
Website Login Settings
NOTE:
Some pages cannot be accessed unless you have logged in. If you want to scan these pages, provide the following information.
Login Page
Address of the website login page
N/A
Username
Username for logging in to the website
N/A
Password
Password of a user
N/A
Confirm Password
Crawler
Simulate Browser
Web browser used by crawlers
Select a browser from the drop-down list box. Currently, only Firefox and Chrome are supported.
Exclude Link
Links to pages that you do not want to include in the scan
You can add a maximum of five links. Click
 to add links and
  to remove them.
Self-Define HTTP Request Header
NOTE:
Some pages have further authentication requirements (such as requiring the user to enter a verification code). If you want to scan these pages, enter HTTP request headers.
A maximum of five request headers can be added. Click
 to add HTTP request headers and click
  to remove them.
Name
Name of an HTTP request header
Example: Cookie
Value
Value of an HTTP request header
Example: phpsessionid=asdfsadfsadfsadfsadf; sdfs=asdfasdfasdf; uid=1
- After the settings are complete, select Timing for a scheduled scan or click Start Scan to immediately start a scan.
- Scheduled scan
Select Timing and set the scan time. Then, click Start Scan.
The system starts the job at the scheduled time.
- Immediate scan
Click Start Scan.
After the job is successfully created, a page displaying the job details is displayed.
 NOTE:
NOTE: If the server is not fully occupied, the newly created job can be performed immediately and the job status is In progress.
If the server is fully occupied, the job waits in the queue and its status is Waiting.
- Scheduled scan

Feedback
Was this page helpful?
Provide feedbackThank you very much for your feedback. We will continue working to improve the documentation.See the reply and handling status in My Cloud VOC.
For any further questions, feel free to contact us through the chatbot.
Chatbot


