Installation and Verification
After an on-premises cluster is registered with UCS, its status is Pending installation and connection. This means UCS does not install Kubernetes for the cluster, and there is no network connection established between the cluster and UCS. In this case, you need to configure a network agent in the cluster for network connectivity and cluster installation.

Connect the cluster to UCS within 24 hours after the cluster is registered. You can click  in the upper right corner to view the detailed network connection process. If the cluster is not connected to UCS within 24 hours, it will fail to be registered. In this case, click
  in the upper right corner to register it again. If the cluster is connected to UCS but its status is not updated, wait for 2 minutes and refresh the cluster.
Uploading the Configuration File
- Log in to the UCS console and click Click to connect in the card view of the cluster.
- Select an access mode and download the agent configuration file.
If you select Public access, click Download to download agent-{Cluster name}.yaml.
If you select Private access, select a project and then the VPC endpoint created in Preparing for Installation (Private Network Access) and click Download to download agent-{Cluster name}.yaml.
The agent configuration file contains private keys and can be downloaded only once for each cluster. Keep the file secure.
When you connect the on-premises cluster and download the cluster configuration file, you do not need to enter the password. During cluster installation, you need to manually enter the password.
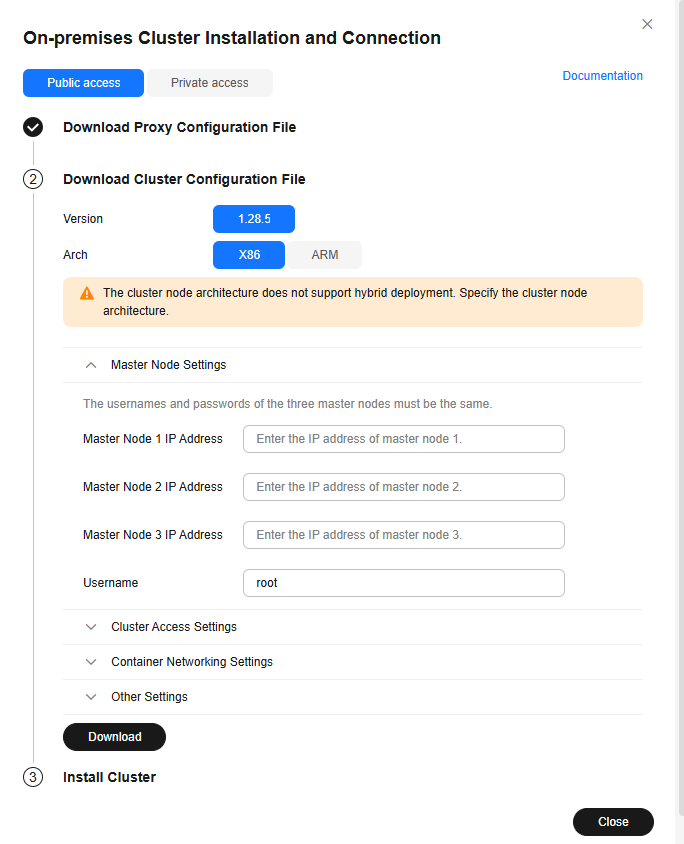
- Set the parameters required for cluster installation and download the cluster configuration file cluster-{Cluster name}.yaml.
If the cluster version is 1.28.5 or later, set the cluster architecture to x86 or Arm.
Figure 1 On-premises cluster installation and connection
- Use the remote file transfer tool to upload the agent-{Cluster name}.yaml and cluster-{Cluster name}.yaml files to the /root/ directory on the executor as root.

- If the SSH connection times out on the executor, rectify the fault by referring to How Do I Do If VM SSH Connection Times Out?
- After selecting the cluster architecture, ensure that the executor of ucs-ctl uses the same architecture as the cluster.
(Optional) Verifying the Integrity of ucs-ctl
ucs-ctl is a command-line tool for managing UCS on-premises clusters. Before installing an on-premises cluster and using ucs-ctl, verify the integrity of ucs-ctl to prevent it from being tampered with. For details about ucs-ctl, see Using ucs-ctl to Manage On-Premises Clusters.
In an on-premises cluster, you can use the SHA256 verification file to verify the integrity of the ucsctl file.
- Click Install Cluster, copy the installation address of ucs-ctl shown in Figure 2.
- Replace the download address in the following command with the address recorded in 1 and run the command to download the SHA256 verification file:
curl {download_address}.sha256 -o ucs-ctl.sha256 # - Save the verification file to the ucs-ctl directory and run the following command to verify the integrity of ucs-ctl:
sha256sum -c <(grep ucs-ctl ucs-ctl.sha256)
- If "OK" is displayed in the command output, the verification is successful. If "FAILED" is displayed in the command output, the verification fails. In this case, submit a service ticket and contact technical support personnel.
Installing an On-Premises Cluster
- Click Install Cluster, copy the installation command, and run the command in the /root directory (or another available directory).
Figure 3 Installing an on-premises cluster

- Enter the node password as prompted.
- Go to the UCS console and refresh the cluster status. The cluster is in the Running state.
- Click the name of the on-premises cluster to access its console. Perform operations on resources such as cluster nodes and workloads. If the operations can be performed without errors, the on-premises cluster has been successfully connected.
Feedback
Was this page helpful?
Provide feedbackThank you very much for your feedback. We will continue working to improve the documentation.See the reply and handling status in My Cloud VOC.
For any further questions, feel free to contact us through the chatbot.
Chatbot


