Kubernetes Resource Permissions in a Cluster (Kubernetes RBAC-based)
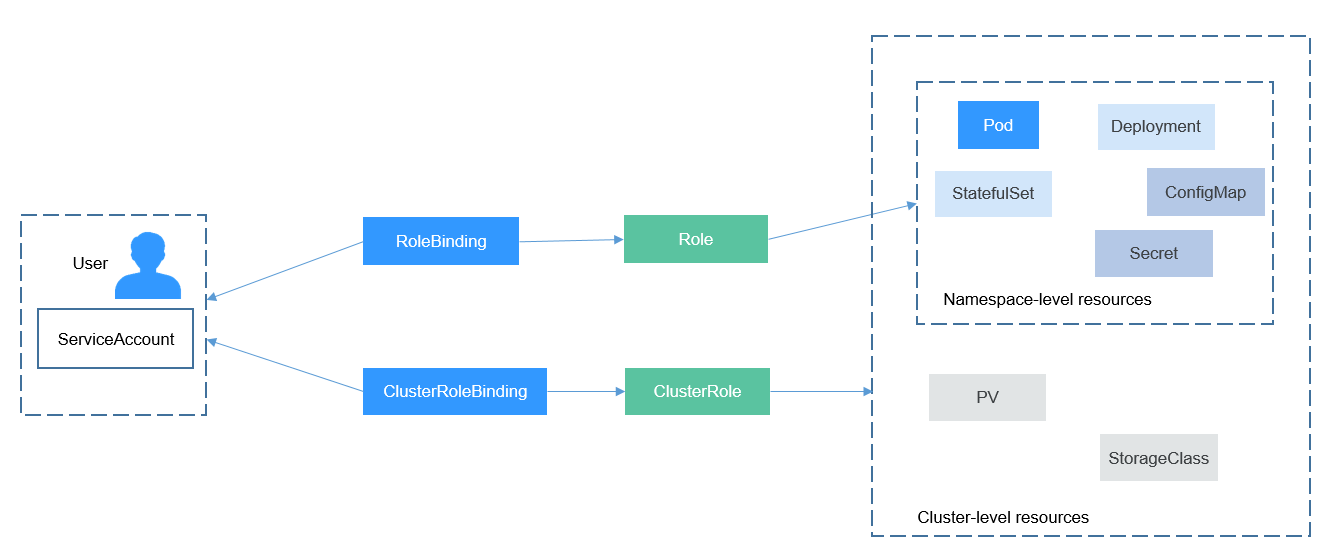
You can regulate users' or user groups' access to Kubernetes resources based on their Kubernetes RBAC roles. The RBAC API declares four kinds of Kubernetes objects: Role, ClusterRole, RoleBinding, and ClusterRoleBinding, which are described as follows:
- Role: defines a set of rules for accessing Kubernetes resources in a namespace.
- RoleBinding: defines the relationship between users and roles.
- ClusterRole: defines a set of rules for accessing Kubernetes resources in a cluster (including all namespaces).
- ClusterRoleBinding: defines the relationship between users and cluster roles.
Role and ClusterRole specify actions that can be performed on specific resources. RoleBinding and ClusterRoleBinding bind roles to specific users, user groups, or ServiceAccounts, as shown in the following figure.
- view (viewer): RBAC read-only permissions on most Kubernetes resources in all or selected namespaces.
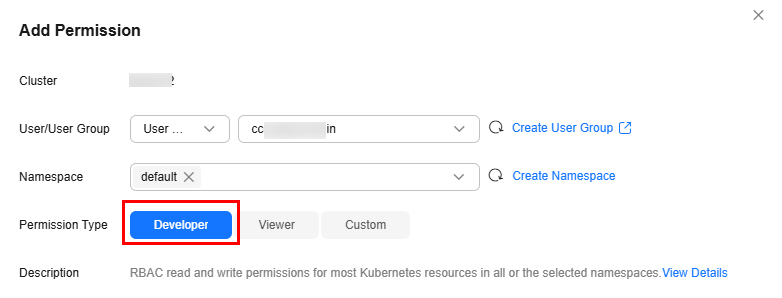
- edit (developer): RBAC read and write permissions on most Kubernetes resources in all or selected namespaces.
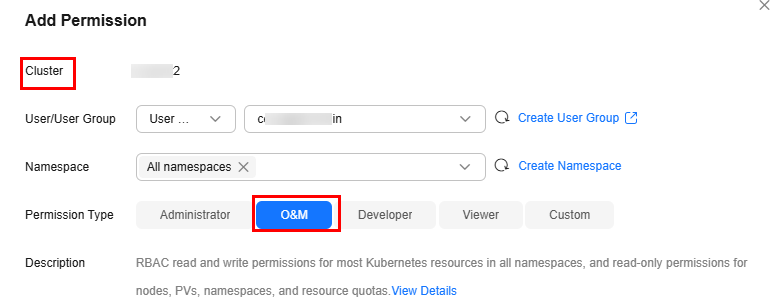
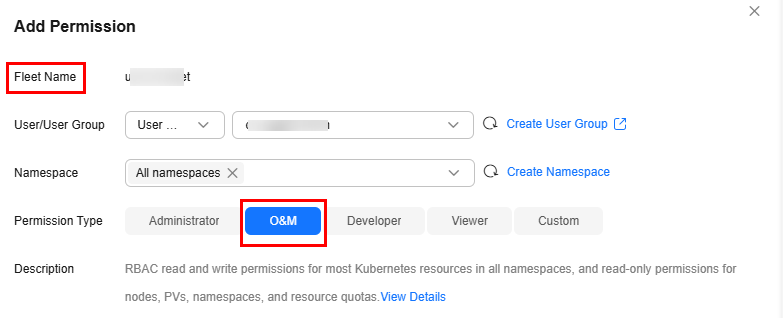
- admin (O&M): RBAC read and write permissions on most Kubernetes resources in all namespaces, and read-only permissions on nodes, PVs, namespaces, and resource quotas.
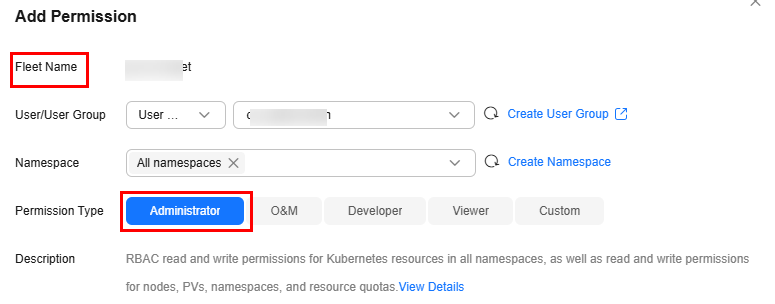
- cluster-admin (administrator): RBAC read and write permissions on Kubernetes resources in all namespaces, as well as read and write permissions on nodes, PVs, namespaces, and resource quotas.
In addition to the preceding typical ClusterRoles, you can define Role and RoleBinding to grant the permissions to add, delete, modify, and obtain global resources (such as nodes, PVs, and CustomResourceDefinitions) and different resources (such as pods, Deployments, and Services) in namespaces for refined permission control.
Precautions
- After you create a cluster or fleet, UCS automatically assigns the cluster-admin permissions to you, which means you have full control on all resources and all namespaces in this cluster or fleet. The ID of a federated user changes upon each login and logout. Therefore, the user with the permissions is displayed as deleted. In this case, do not delete the permissions. Otherwise, the authentication fails. You are advised to grant the cluster-admin permissions to a user group on UCS and add federated users to the user group.
- Users with the Security Administrator role have all IAM permissions except role switching. For example, an account in the admin user group has this role by default. Only these users can grant permissions on the Permissions page on the UCS console.
Adding Resource Permissions (on the Console)

The cluster for which the permissions will be added must be in the running state, and the cluster federation must be enabled for the fleet.
You can regulate users' or user groups' access to Kubernetes resources based on their Kubernetes RBAC roles.
- Log in to the UCS console. In the navigation pane, choose Permissions.
- Select a cluster or fleet for which you want to add permissions from the drop-down list on the right.
- In the upper right corner, click Add Permission.
- In the window that slides from the right, confirm the cluster or fleet name, set Namespace (for example, select All namespaces), select the target user or user group, and set Permission Type.

If you do not have IAM permissions, you cannot select users or user groups when configuring permissions for other users or user groups. In this case, you can enter a user ID or user group ID.
Figure 2 Configuring namespace permissions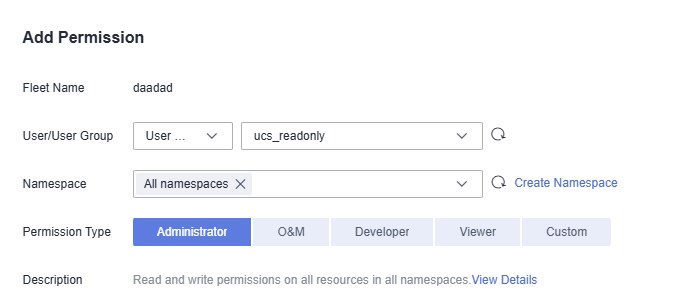
Table 1 Permission types Permission Type
Permissions
Administrator
RBAC read and write permissions on Kubernetes resources in all namespaces, as well as read and write permissions on nodes, PVs, namespaces, and resource quotas.
NOTICE:UCS FullAccess does not have the RBAC permissions of CCE clusters. You need to go to the Permissions page to grant permissions for CCE clusters.
O&M
RBAC read and write permissions on most Kubernetes resources in all namespaces, and read-only permissions on nodes, PVs, namespaces, and resource quotas.
Developer
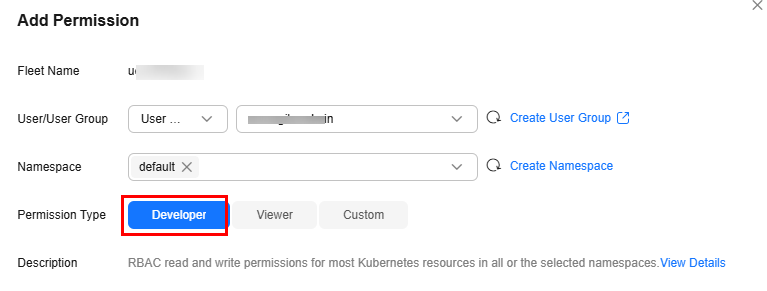
RBAC read and write permissions on most Kubernetes resources in all or selected namespaces.
Viewer
RBAC read-only permissions on most Kubernetes resources in all or selected namespaces.
Custom
The permissions are determined by the selected ClusterRole or Role. Before granting these permissions, ensure that the selected ClusterRole or Role has the required permissions on the resources.
You can create custom permissions as required. After selecting Custom for Permission Type, click Add Custom Role on the right of the Custom parameter. In the window that slides from the right, enter a name and select a rule. After the custom rule is created, you can select a value from the Custom drop-down list.
Custom permissions are classified into ClusterRoles and Roles. Each ClusterRole or Role contains a group of rules that represent related permissions. For details, see Using RBAC Authorization.
- ClusterRole: a cluster-level resource that can be used to configure cluster access permissions.
- Role: used to configure access permissions in a namespace. When creating a Role, specify the namespace that the Role belongs to.
Figure 3 Custom permissions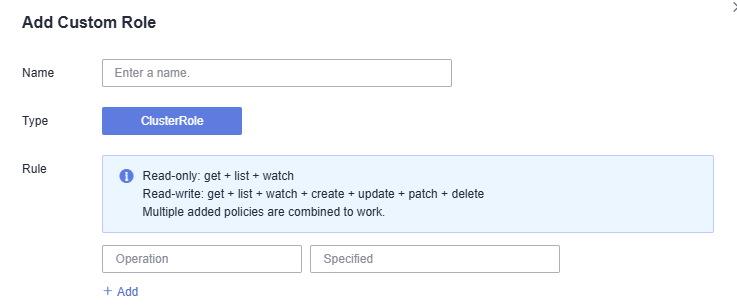
- Click OK.
Configuring Kubernetes Resource Permissions in a Cluster (Using kubectl)

When you access a cluster using kubectl, UCS uses the kubeconfig.json file generated on the cluster for authentication. This file contains user information, based on which UCS determines which Kubernetes resources can be accessed via kubectl. The permissions recorded in a kubeconfig.json file vary from user to user. The permissions that a user has are listed in UCS Resource Permissions (IAM-based) and Kubernetes Resource Permissions in a Cluster (Kubernetes RBAC-based).
In addition to cluster-admin, admin, edit, and view, you can define Roles and RoleBindings to configure the permissions to add, delete, modify, and obtain resources, such as pods, Deployments, and Services, in the namespace.
The definition of a Role is simple. You just specify a namespace and some rules. For example, the following rules allow you to perform GET and LIST operations on pods in the default namespace.
kind: Role
apiVersion: rbac.authorization.k8s.io/v1
metadata:
  namespace: default                          # Namespace
  name: role-example
rules:
- apiGroups: [""]
  resources: ["pods"]                         # The pod can be accessed.
  verbs: ["get", "list"]                      # The GET and LIST operations can be performed.
- apiGroups indicates the API group that the resource belongs to.
- resources indicates the resources that can be operated. Pods, Deployments, ConfigMaps, and other Kubernetes resources are supported.
- verbs indicates the operations that can be performed. get indicates querying a specific object, and list indicates listing all objects of a certain type. You can also select other value options such as create, update, and delete.
For details, see Using RBAC Authorization.
After creating a Role, you can bind the Role to a specific user. This is called RoleBinding. The following shows an example:
kind: RoleBinding
apiVersion: rbac.authorization.k8s.io/v1
metadata:
  name: RoleBinding-example
  namespace: default
  annotations:
    CCE.com/IAM: 'true'    # This annotation is required only for CCE clusters.
roleRef:
  kind: Role
  name: role-example
  apiGroup: rbac.authorization.k8s.io
subjects:
- kind: User
  name: 0c97ac3cb280f4d91fa7c0096739e1f8    # User ID of user-example
  apiGroup: rbac.authorization.k8s.io
The subjects section binds a Role with an IAM user so that the IAM user can obtain the permissions defined in the Role, like in the following figure.

You can also specify a user group in the subjects section. In this case, all users in the user group obtain the permissions defined in the Role.
subjects:
- kind: Group
  name: 0c96fad22880f32a3f84c009862af6f7    # User group ID
  apiGroup: rbac.authorization.k8s.io
Use the IAM user user-example to connect to the cluster and obtain the pod information. The following is an example of the returned pod information.
# kubectl get pod
NAME                                   READY   STATUS    RESTARTS   AGE
deployment-389584-2-6f6bd4c574-2n9rk   1/1     Running   0          4d7h
deployment-389584-2-6f6bd4c574-7s5qw   1/1     Running   0          4d7h
deployment-3895841-746b97b455-86g77    1/1     Running   0          4d7h
deployment-3895841-746b97b455-twvpn    1/1     Running   0          4d7h
nginx-658dff48ff-7rkph                 1/1     Running   0          4d9h
nginx-658dff48ff-njdhj                 1/1     Running   0          4d9h
# kubectl get pod nginx-658dff48ff-7rkph
NAME                     READY   STATUS    RESTARTS   AGE
nginx-658dff48ff-7rkph   1/1     Running   0          4d9h
Try querying Deployments and Services in the namespace. The output shows that user-example does not have the required permissions. Try querying the pods in the kube-system namespace. The output shows that user-example does not have the required permissions. This indicates that the IAM user user-example has only the GET and LIST Pod permissions in the default namespace, which is the same as expected.
# kubectl get deploy
Error from server (Forbidden): deployments.apps is forbidden: User "0c97ac3cb280f4d91fa7c0096739e1f8" cannot list resource "deployments" in API group "apps" in the namespace "default"
# kubectl get svc
Error from server (Forbidden): services is forbidden: User "0c97ac3cb280f4d91fa7c0096739e1f8" cannot list resource "services" in API group "" in the namespace "default"
# kubectl get pod --namespace=kube-system
Error from server (Forbidden): pods is forbidden: User "0c97ac3cb280f4d91fa7c0096739e1f8" cannot list resource "pods" in API group "" in the namespace "kube-system"
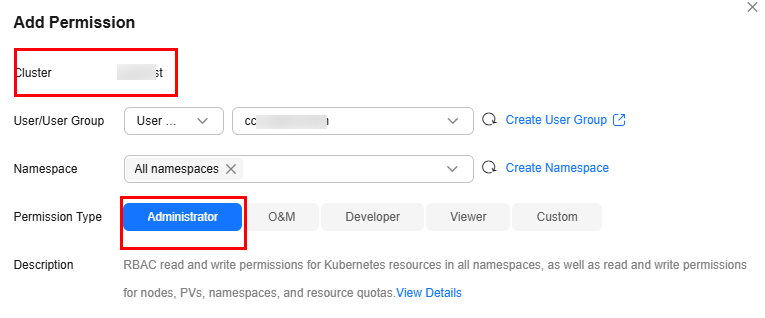
Example: Granting Service Resource Administrator Permissions (cluster-admin)
The cluster-admin role has read and write permissions on all resources in all namespaces.
Example: Granting Namespace O&M Permissions (admin)
The admin role has the read and write permissions on most namespace resources. You can grant the admin permissions on all namespaces to a user or user group.
Example: Granting Namespace Developer Permissions (edit)
The edit role has the read and write permissions on most namespace resources. You can grant the edit permissions on all namespaces to a user or user group.
Example: Granting Read-Only Namespace Permissions (view)
The view role has the read-only namespace permissions. You can grant permissions to users to view one, multiple, or all namespaces.
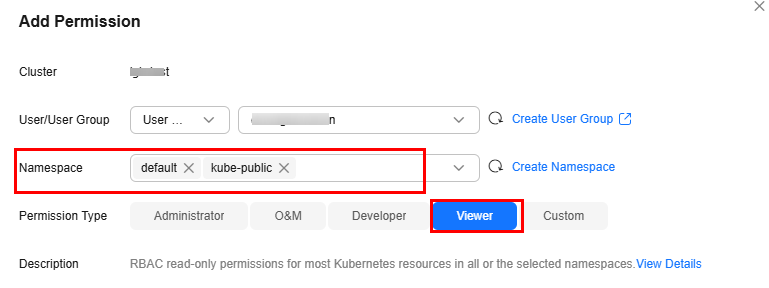
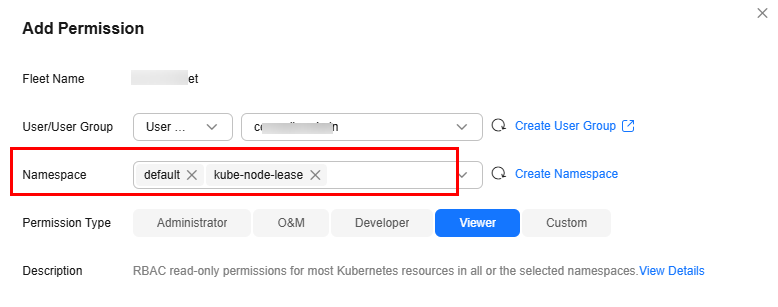

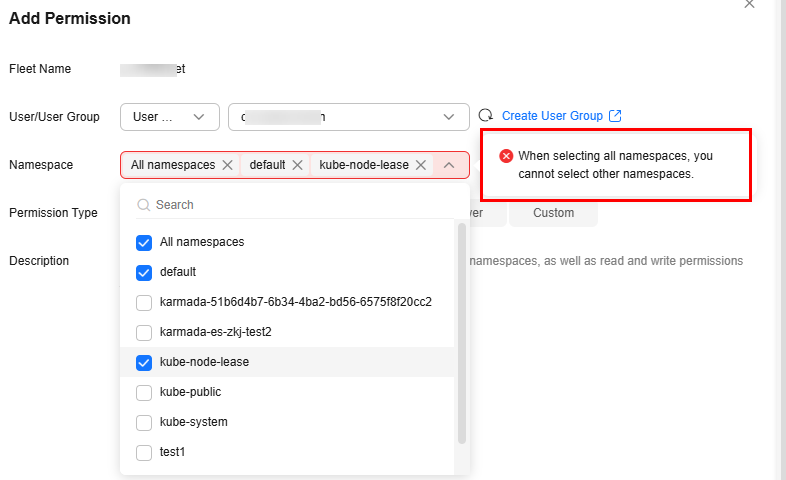
When adding permissions, you can select multiple namespaces. However, if you select all namespaces, you cannot select other namespaces.
Example: Granting Permissions on a Specific Kubernetes Resource Object
You can grant permissions on a specific Kubernetes resource object such as pod, Deployment, and Service. For details, see Configuring Kubernetes Resource Permissions in a Cluster (Using kubectl).
Feedback
Was this page helpful?
Provide feedbackThank you very much for your feedback. We will continue working to improve the documentation.See the reply and handling status in My Cloud VOC.
For any further questions, feel free to contact us through the chatbot.
Chatbot


