
Help Center/
SecMaster/
User Guide/
Settings/
Data Collection/
Component Management/
Viewing Component Details
Updated on 2024-11-21 GMT+08:00
Viewing Component Details
Scenarios
This topic describes how to view component details.
Procedure
- Log in to the management console.
- Click
 in the upper left corner of the management console and select a region or project.
 - Click
 in the upper left corner of the page and choose Security & Compliance > SecMaster.
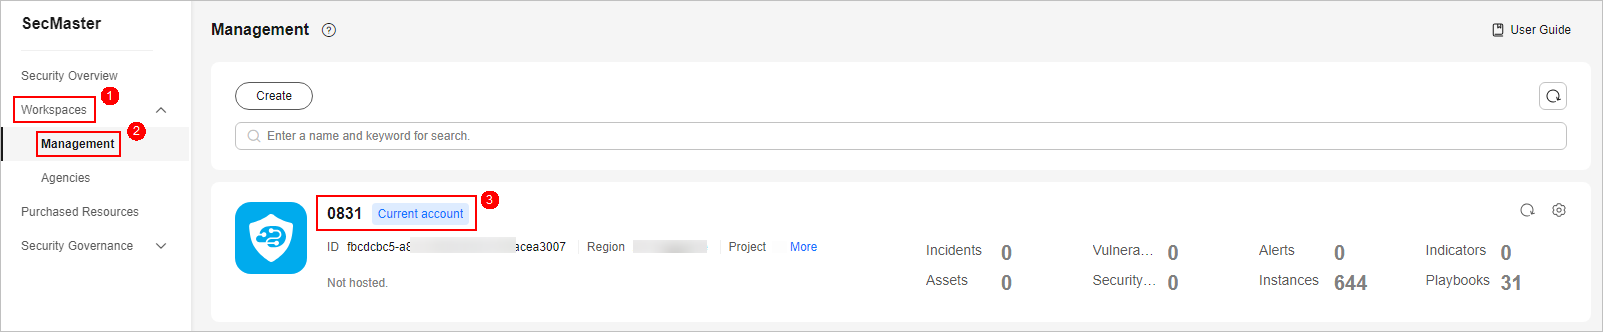
 - In the navigation pane on the left, choose Workspaces > Management. In the workspace list, click the name of the target workspace.
Figure 1 Workspace management page
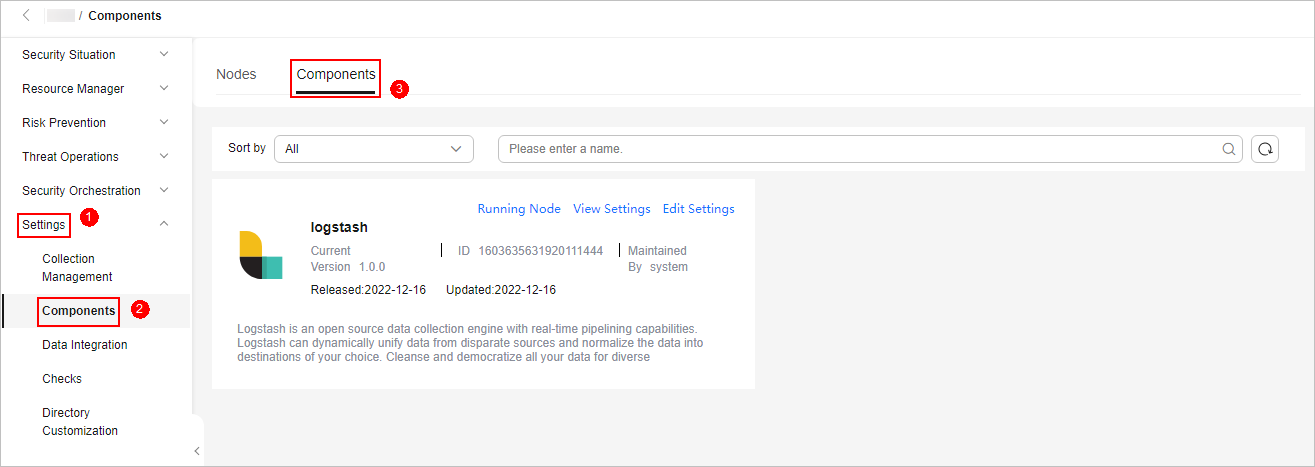
- In the navigation pane on the left, choose . Then, select the Components tab.
Figure 2 Accessing the Components tab
- On the Components page, view the component details.
- Running Node
Click the Running Node in the upper right corner of a component. The running node information of the component is displayed on the right.
- View Settings
Click View Settings in the upper right corner of the component to be viewed. The configuration details about the component are displayed on the right.
- Edit Settings
- Click Edit Settings in the upper right corner of the component to be viewed. The Configuration Management panel of the component is displayed on the right.
- In the Node Configuration area, edit the node configuration information.
- Adding a node: Click Add in the upper left corner of the node list. In the Add Node dialog box displayed, select a node and click OK.
- Editing node parameters: Click
 next to the node name to expand the node configuration information and edit the node parameters.
 - Running parameters: Locate the row that contains the target node, click Run Parameter in the Operation column.
- Removing a node: Locate the row that contains the target node and click Removed in the Operation column.
- Batch deletion: Select the nodes you want to remove and click Batch Remove in the upper left corner of the list.
- Viewing historical versions: Click Historical Version in the lower right corner of the panel.
- Click Save and Apply in the lower right corner of the page.
- Running Node
Parent topic: Component Management
Feedback
Was this page helpful?
Provide feedbackThank you very much for your feedback. We will continue working to improve the documentation.See the reply and handling status in My Cloud VOC.
The system is busy. Please try again later.
For any further questions, feel free to contact us through the chatbot.
Chatbot


