
Updated on 2023-05-12 GMT+08:00
Message Center
Prerequisites
You have logged in to the Huawei Qiankun console.
Context
Huawei Qiankun provides a message center to help you centrally manage messages.

Currently, only the admin user can configure message types, including the message type name and whether to support emails, SMS messages, and system messages.
Procedure
- Click your account in the upper right corner of the console, and click Message Center.
- View system messages.
On the Message Center page, choose My Messages.
- On the My Messages page, you can view all messages or unread messages.
- On the My Messages page, you can filter messages by message type or by entering a message name in the search box.
- Select a message, and click Operation to mark the message as read or delete the message.
- Configure message receiving.
Choose Message Receiving Management > SMS & Email Settings from the navigation tree.
- Set the message receiving mode. Currently, messages can be received via system message, email, and SMS. You can select or deselect the check box of a message receiving mode to configure it.
- Preview the message template. Click Preview in the Operation column to view the current message template.
- Modify a recipient. Click Modify Recipient in the Operation column to add a recipient for the current message or modify the recipient information.
If there is no recipient, you can click Add Recipient to add one.
Figure 1 Modifying a recipient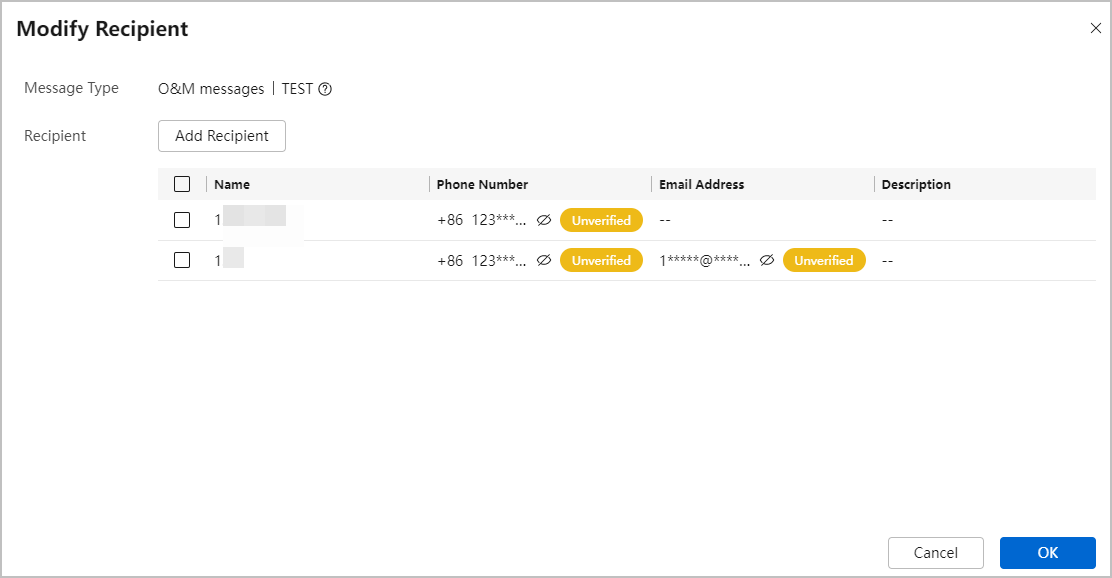
- If the admin user has uploaded a message sample during message type configuration, the Preview button is displayed in the Operation column of the message list.
- If the admin user has configured that messages of a certain type will be sent via email or SMS, the Modify Receiver button is displayed in the Operation column of the message type list.
- Manage recipients.
- Choose Message Receiving Management > Recipient Management. On the Recipient Management page, click Create.
- Enter the name, phone number, and email address of a recipient, and click OK.
Figure 2 Creating a recipient
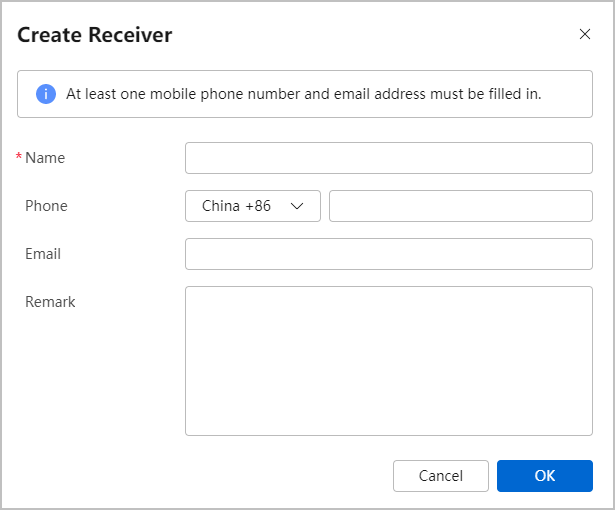
Enter a phone number, email address, or both.
- After the recipient is created, hover the mouse pointer over Unverified next to the phone number or email address, and click Send Verification Link. Only after being verified, the phone or email address can receive notifications.
- Ensure that SMS or Email is selected for a recipient so that the recipient can receive SMS or email notifications.
- A login account can create a maximum of 20 recipients.
Follow-up Procedure
Manage recipients.
- Search: Enter a recipient name in the search box, and click
 on the left or press Enter to search for the recipient.
 - Configure message receiving: Click Configure Message Receiving in the Operation column to set the type of messages that the current recipient can receive.
- Modify recipient information: Click Modify in the recipient list to modify recipient information, including the name, phone number, and email address.
- Delete a recipient.
- To delete a single recipient, click Delete in the Operation column of the recipient to delete.
- To delete recipients in batches, select the recipients and click Delete in the upper right corner of the recipient list.
Feedback
Was this page helpful?
Provide feedbackThank you very much for your feedback. We will continue working to improve the documentation.See the reply and handling status in My Cloud VOC.
The system is busy. Please try again later.
For any further questions, feel free to contact us through the chatbot.
Chatbot


