Checking a Staking Node
Procedure
- Log in to the NES console.
- Choose Dedicated > Network Management.
- Click a node ID.
Figure 1 Checking a staking node

- Check the node details, including the data of Basic Settings, Monitoring, Node Status, and Alarms.
Figure 2 Node details

Node Information
Here shows the node ID, public blockchain name, node status, mainnet and testnet types, node type, gRPC endpoint, node TLS certificate, blockchain instance flavor, creation time, AZ, APIs for full nodes, WebSocket endpoint, HTTP endpoint (for validators), gRPC endpoint (for validators), execution client, execution client version, consensus client, and consensus client version. If Display APIs for Full Node is enabled, HTTP and WebSocket endpoints are displayed. If VPC Endpoint (VPCEP) is enabled, the VPC endpoint is displayed.


- Connect to MEV-Boost Relays is displayed only if you enabled this function when creating staking nodes.
- An AZ is a physical region where resources use independent power supplies and networks. Your public blockchain nodes are automatically allocated to different AZs. To ensure application availability when deleting nodes, it is recommended to avoid leaving the remaining nodes in the same AZ. Currently, AZ1 and AZ3 are supported.
Staking Performance
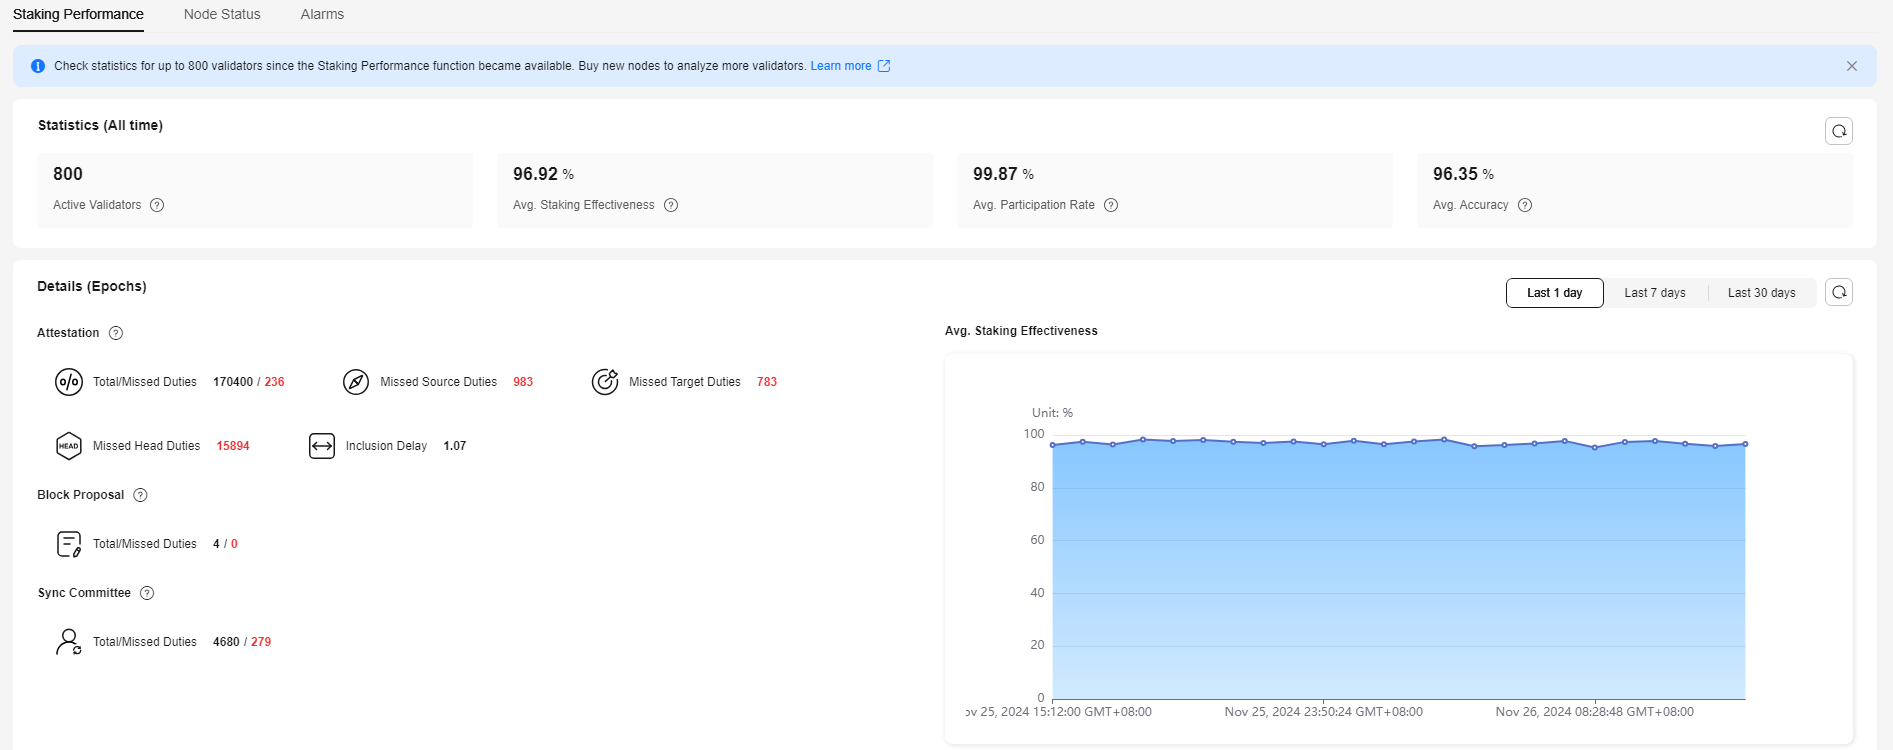
You can check statistics for up to 800 validators since the Staking Performance function became available. Buy new nodes to analyze more validators. This function helps you analyze the validator performance, including their online status, effectiveness, participation, and accuracy.

Statistics (All Time) shows the overall staking performance and Details (by Epoch) shows details.
- Statistics (All Time)
The following data is displayed:
- Active Validators
The number of active validators in the current network.
- Avg. Staking Effectiveness
Validators performance in their attestation, block proposal, and sync committee duties.
- 84.4% of validators' rewards come from attestations (attestation_effectiveness), greatly affecting the staking performance. Formula: attestation_effectiveness = actual_reward/ideal_reward
- 12.5% of validators' rewards come from block proposals (proposer_effectiveness). If the validator did not propose any block, the effectiveness is 1. Formula:
- 3.1% of validators' rewards come from sync committee duties (sync_effectiveness). Formula:
sync_effectiveness = executed_sync/(scheduled_sync – missed_blocks)
Avg. Staking Effectiveness is the weighted average of attestation_effectiveness, proposer_effectiveness, and sync_effectiveness. Formula: effectiveness = 54/64 x attestation_effectiveness x 8/64 x proposer_effectiveness + 2/64 x sync_effectiveness
Effectiveness calculation excludes tasks in which the validators did not participate. The following lists the calculation for such scenarios:- Participating only in attestation duties:
- Participating in attestation and proposal duties:
effectiveness = 56/64 x attestation_effectiveness + 8/64 x proposer_effectiveness
- Participating in attestation and sync committee duties:
effectiveness = 62/64 x attestation_effectiveness + 2/64 x sync_effectiveness
- Avg. Participation Rate
How often is a validator's attestation included on the blockchain. Formula:
participation_rate = included_attestations/active_epochs
- Avg. Accuracy
This measures the correctness of attestations submitted by validators, including source votes, target votes, and head votes. Formula:
correctness_rate = (source_vote_correctness + target_vote_correctness + head_vote_correctness)/3
- Active Validators
- Details (by Epoch)
You can filter data by specifying the time range, for example, last day, last 7 days, or last 30 days. Detailed data of attestation, block proposal, and sync committee duties are shown in graphs and tables to help you evaluate the validator performance by day, week, or month.
- Attestations: An active validator is expected to create, sign, and broadcast an attestation every epoch.
Figure 5 Attestations

- Total: the total attestations submitted by validators
- Missed Duties: the total attestations that failed or were incorrectly submitted
- Missed Source Duties
- Missed Target Duties
- Missed Head Duties
- Inclusion Delay: the difference between the time when the validator's attestation is actually included in the blockchain and the expected time. The lower the inclusion delay, the greater the validator's contributions to the network's consensus and stability. The optimal inclusion delay is 1.
- Block Proposal: New blocks are proposed, created, and broadcast by random validators in their respective slots.
Figure 6 Block proposal

- Sync Committee: A group of validators (randomly chosen every 27 hours) that sign valid block headers. This group enables light clients to trace the blockchain status and keep the blockchain synchronized without accessing the entire set of validators.
Figure 7 Sync committee

- Avg. Staking Effectiveness: Trends in the last day, 7 days, and 30 days are displayed to help you evaluate the validator performance.
Figure 8 Avg. staking effectiveness

- Attestations: An active validator is expected to create, sign, and broadcast an attestation every epoch.
Feedback
Was this page helpful?
Provide feedbackThank you very much for your feedback. We will continue working to improve the documentation.See the reply and handling status in My Cloud VOC.
For any further questions, feel free to contact us through the chatbot.
Chatbot


