Modifying RocketMQ Specifications
After creating a RocketMQ instance, you can increase or decrease its specifications. Table 1 lists available modification options. Only one configuration type can be changed at a time.
|
Instance Version |
Modified Object |
Increase |
Decrease |
|---|---|---|---|
|
4.8.0 |
Broker quantity |
√ |
× |
|
Storage space |
√ |
× |
|
|
Broker flavor |
√ |
× |
|
|
5.x |
Storage space (single-node) |
√ |
× |
|
Instance flavor (single-node) |
× |
× |
|
|
Storage space (cluster) |
√ |
× |
|
|
Instance flavor (cluster) |
√ |
√ |
Notes and Constraints
- You can expand the storage space 20 times.
- rocketmq.4u8g.cluster.small does not support broker flavor increase.
- Configuration fees will change after instance specifications are changed. See the console.
Impact
|
Instance Version |
Modified Object |
Impact |
|---|---|---|
|
4.8.0, 5.x |
Storage |
Storage space expansion does not affect services. |
|
4.8.0 |
Brokers |
Adding brokers does not affect the original brokers or services. |
|
4.8.0 |
Broker Flavor |
Increasing the broker flavor will interrupt the instance for about one minute. If the production TPS is high during the change, the change may fail. To prevent this from happening, add brokers first. |
|
5.x |
Flavor |
Increasing an instance flavor does not affect services. |
Prerequisites
- The RocketMQ instance is in the Running state.
- The user to modify instance specifications must have the DMS FullAccess permission.
Procedure
The following describes how to modify the specifications of a RocketMQ instance.
- Log in to the console.
- Click
 in the upper left corner to select a region.
DMS for RocketMQ instances in different regions cannot communicate with each other over an intranet. Select a nearest location for low latency and fast access.
- Click
 and choose Middleware > Distributed Message Service for RocketMQ to open the console of DMS for RocketMQ.
 - Modify the instance specifications in either of the following ways:
- Locate the row containing the desired instance, choose Modify Specifications.
- Click a RocketMQ instance to go to the instance details page. In the upper right corner, click Modify Specifications.
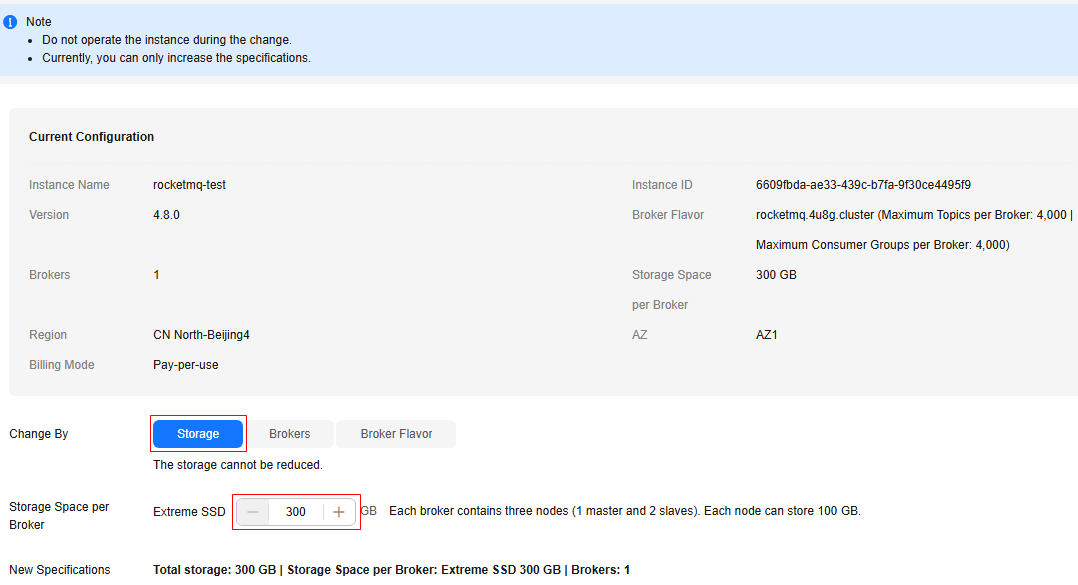
- Select Storage for Change By and enter a storage size.
Figure 1 Increasing a storage space (v5.x)
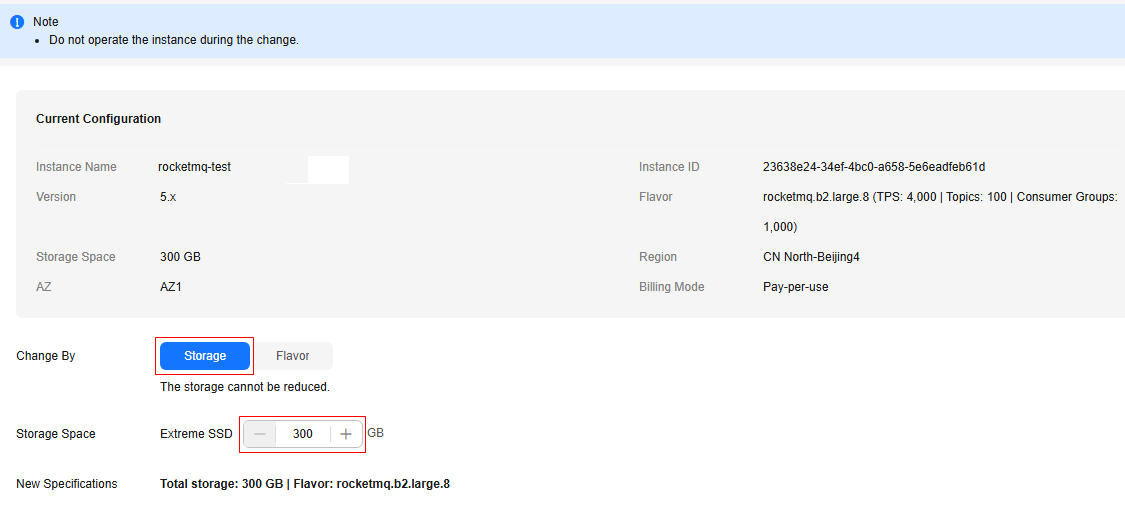 Figure 2 Increasing a storage space (v4.8.0)
- Click Next.
- Confirm the configurations and click Submit.
- Click Back to DMS (for RocketMQ) List. The instance is in the Changing state.
When the instance is in the Running state, the expanded available storage space can be viewed in Used/Available Storage Space.
Figure 3 Viewing the new storage space

Available storage space = Actual storage space – Storage space for storing logs – Disk formatting loss
For example, if the storage space is expanded to 700 GB, the storage space for storing logs is 100 GB, and the disk formatting loss is 7 GB, then the available storage space after capacity expansion will be 593 GB.
This operation is involved only for v4.8.0.

Before increasing the broker quantity, view security group details in Overview > Network > Security Group. Check whether the allowed network segment and port meet the following requirements:
- Allowed network segment: network segment of the instance's subnet.
- Port range: 10100–(10100 + 3 × n - 1). n is the number of brokers.
If the configuration is incorrect, a client may fail to connect to the new service node. As a result, message production fails.
- Log in to the console.
- Click
 in the upper left corner to select a region.
DMS for RocketMQ instances in different regions cannot communicate with each other over an intranet. Select a nearest location for low latency and fast access.
- Click
 and choose Middleware > Distributed Message Service for RocketMQ to open the console of DMS for RocketMQ.
 - Modify the instance specifications in either of the following ways:
- Locate the row containing the desired instance, choose Modify Specifications.
- Click a RocketMQ instance to go to the instance details page. In the upper right corner, click Modify Specifications.
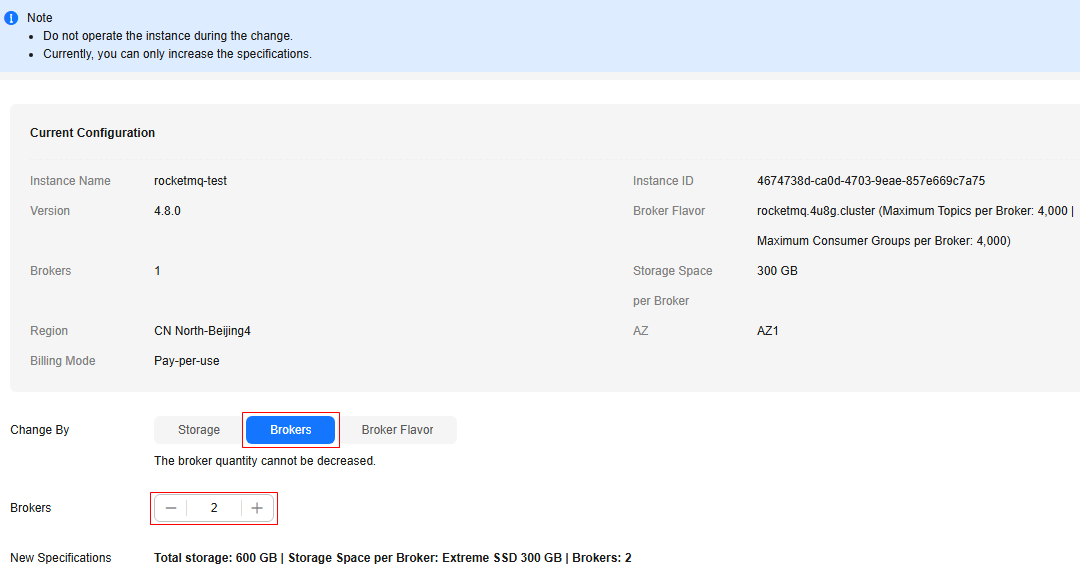
- Select Brokers for Change By and enter the number of brokers.
Figure 4 Increasing brokers
- Click Next.
- Confirm the configurations and click Submit.
- Click Back to DMS (for RocketMQ) List. The instance is in the Changing state.
When the instance is in the Running state, view the expansion result in either of the following ways:
- In Flavor, view the new number of brokers.
- In Used/Available Storage Space, the total storage space is recalculated (New broker quantity × Storage space per broker) and displayed.
The system performs the expansion by proportion in the current disk configuration. For example, assume that the original number of brokers of an instance is 1 and the disk size of each broker is 300 GB. If the broker quantity changes to 2 and the disk size per broker is still 300 GB, the total disk size becomes 600 GB.
If public access is enabled and EIPs are configured for the instance, configure EIPs for the new brokers.
Figure 5 Viewing the new broker quantity and storage space
This operation is involved only for v4.8.0.
- Log in to the console.
- Click
 in the upper left corner to select a region.
DMS for RocketMQ instances in different regions cannot communicate with each other over an intranet. Select a nearest location for low latency and fast access.
- Click
 and choose Middleware > Distributed Message Service for RocketMQ to open the console of DMS for RocketMQ.
 - Modify the instance specifications in either of the following ways:
- Locate the row containing the desired instance, choose Modify Specifications.
- Click a RocketMQ instance to go to the instance details page. In the upper right corner, click Modify Specifications.
- Select Broker Flavor for Change By and select a new broker flavor.
Figure 6 Increasing a broker flavor
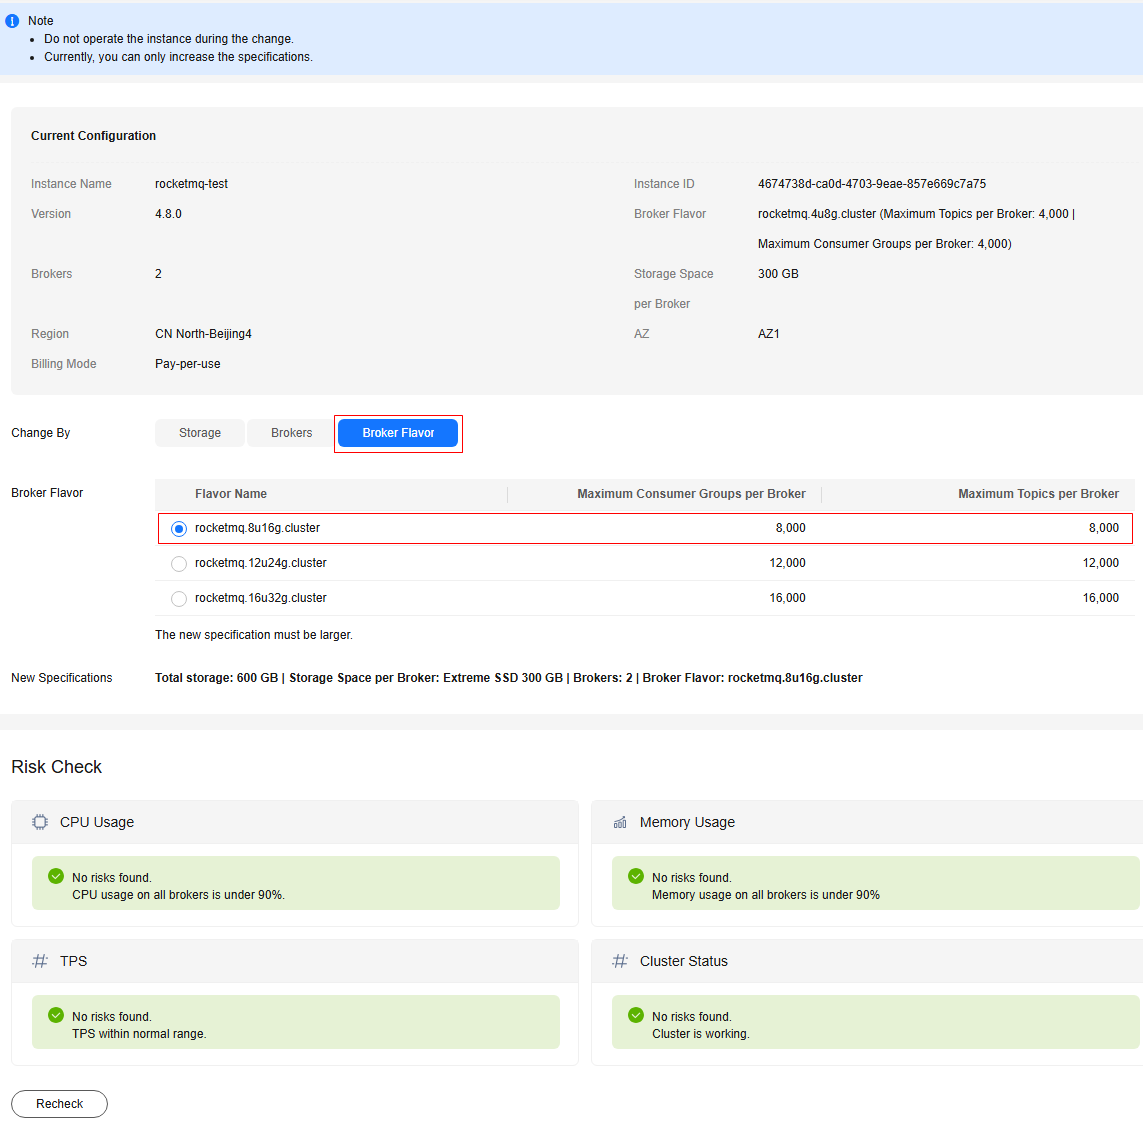

If there are exceptions in the Risk Check area, handle them as prompted and click Recheck until all check items are normal. Otherwise, the expansion may fail.
- Click Next.
- Confirm the configurations and click Submit.
- Click Back to DMS (for RocketMQ) List. The instance is in the Changing state.
When the instance is in the Running state, view the new broker flavor in Flavor.
Figure 7 Viewing the new broker flavor
This operation is involved only for v5.x.
Before scaling the instance, ensure that the subnet segments are allowed in the security group.
- Log in to the console.
- Click
 in the upper left corner to select a region.
DMS for RocketMQ instances in different regions cannot communicate with each other over an intranet. Select a nearest location for low latency and fast access.
- Click
 and choose Middleware > Distributed Message Service for RocketMQ to open the console of DMS for RocketMQ.
 - Modify the instance specifications in either of the following ways:
- Locate the row containing the desired instance, choose Modify Specifications.
- Click a RocketMQ instance to go to the instance details page. In the upper right corner, click Modify Specifications.
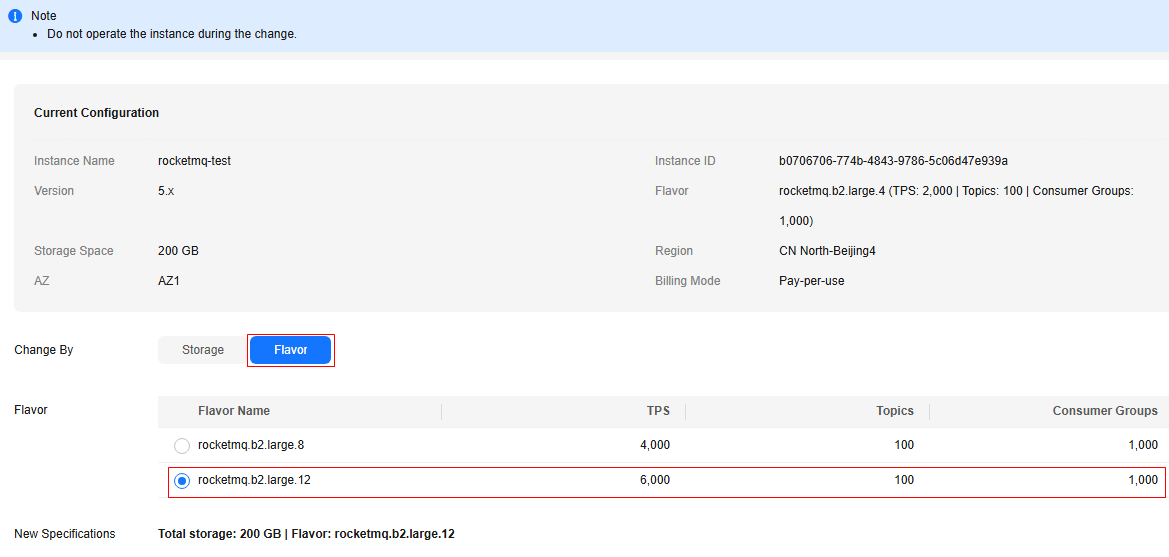
- Select Flavor for Change By and select a new instance flavor.
Figure 8 Increasing an instance flavor
- Click Next.
- Confirm the configurations and click Submit.
- Click Back to DMS (for RocketMQ) List. The instance is in the Changing state.
When the instance is in the Running state, view the new instance flavor in Flavor.
Figure 9 Viewing the new instance flavor
Related Document
To change the specifications of a pay-per-use instance by calling an API, see Modifying Instance Specifications.
Feedback
Was this page helpful?
Provide feedbackThank you very much for your feedback. We will continue working to improve the documentation.See the reply and handling status in My Cloud VOC.
For any further questions, feel free to contact us through the chatbot.
Chatbot


