DMS for RabbitMQ
Create a DMS for RabbitMQ event source.
DMS for RabbitMQ is supported in these regions: CN East-Shanghai1, CN East-Shanghai2, CN North-Beijing4, CN North-Ulanqab1, and CN South-Guangzhou.
Prerequisites
- (Optional) You have created an event channel.
- You have purchased a DMS for RabbitMQ instance. The instance contains queues and is in the Running state. For details, see Buying an Instance.
- You have created a private endpoint with the same VPC and subnet as the RabbitMQ instance.
- You have configured the default security group with rules for the RabbitMQ instance. For details, see How Do I Configure a Security Group When Creating an Event Source?
Creating a RabbitMQ Event Source
- Log in to the EG console.
- In the navigation pane, choose Event Bus > Event Sources.
- Click Create Event Source.
- Set event source information by referring to Table 1.
Table 1 RabbitMQ event source parameters Parameter
Description
Provider
The default value is Custom.
Type
Select DMS for RabbitMQ.NOTE:You will be prompted to create an agency when creating your first DMS for RabbitMQ event source. For details, see Authorization.
Name
Event source name.
The name cannot be modified once the event source is created.
Description
Describe the event source.
Channel
Select an existing custom event channel or click Create Event Channel to create one.
The channel cannot be modified once the event source is created.
Instance
Select a RabbitMQ instance.
Username
Username of the RabbitMQ instance.
Password
Password of the RabbitMQ instance.
Vhost
Virtual host of the RabbitMQ instance.
Queue
Queue in the RabbitMQ instance.
- Click OK.
View this event source on the Custom tab.

- Only the event source description can be modified. To modify it, click Edit in the row that contains the desired event source.
- To view details about a custom event source, click its name in the custom event source list.
Viewing the Event Format
Prerequisites
- A RabbitMQ instance has been created.
- You have created an endpoint in the same VPC and subnet as the RabbitMQ instance.
- Create an event channel.
- Create a RabbitMQ event source.
- Create an event subscription whose source is RabbitMQ and target is FunctionGraph.
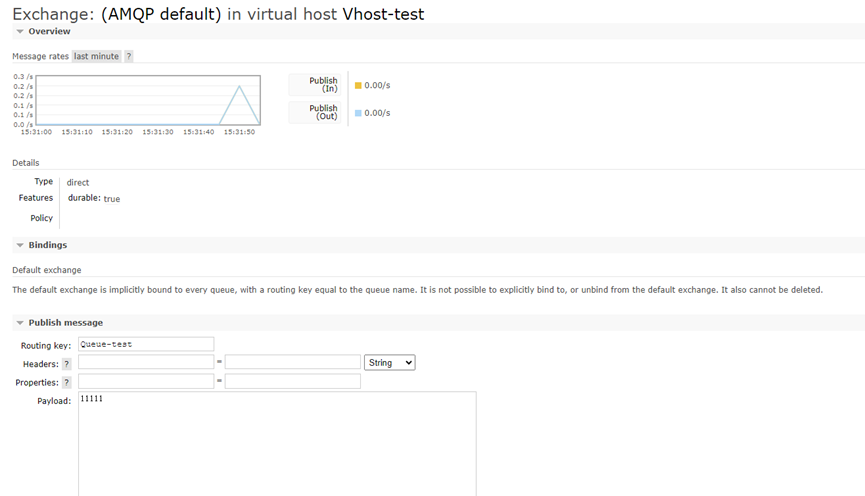
- Send an event.
Obtain RabbitMQ information, allow port 15671 in the security group, and access the RabbitMQ web UI by entering the public access URL in your browser.
Figure 1 Logging in to RabbitMQ and sending events

- View the event message format.
- View event trace details.
- In the navigation pane on the left, choose Event Bus > Event Channels. Click View Events or choose More > View Events on the right of the channel name.
- On the displayed page, click an event name in the Event ID column to view the event details.
The event format within the message body is as follows:
{
"datacontenttype": "application/json",
"data": {
"context": "11111"
},
"subject": "RABBITMQ:cn-north-4:f003dc69-2fc3-4c44-9062-0b9a2c6cb8cc/0ef1e7a03280f3ed2f69c00c652a5744:RABBITMQ:source-rabbitmq",
"specversion": "1.0",
"id": "cd845ec7-0314-400d-9293-d39d7b258d9b",
"source": "source-rabbitmq",
"time": "2024-02-05T15:31:51Z",
"type": "RABBITMQ:CloudTrace:RabbitmqCall"
}
- View the logs of the target function.
- Log in to the FunctionGraph console, choose Functions > Function List in the navigation pane, and click the name of the target function to go to the function details page.
- Choose Monitoring > Logs > Request List and click a request ID to view the log details.
- View event trace details.
Feedback
Was this page helpful?
Provide feedbackThank you very much for your feedback. We will continue working to improve the documentation.See the reply and handling status in My Cloud VOC.
For any further questions, feel free to contact us through the chatbot.
Chatbot


