Creating an Agent Pool
Scenario
You can use built-in or custom executors to perform check, build, deployment, pipeline, and API test tasks in CodeArts.
Agent pools are used to connect custom executors. You can add your own execution resources to an agent pool so that you can use them to execute tasks. Agent pools help improve efficiency and remove dependency on public execution resources.
Creating an Agent Pool
- Go to the CodeArts homepage.
- Log in to the CodeArts console, click
 , and select a region where you have enabled CodeArts.
 - Click Go to Workspace.
If your account uses the old billing mode (see Old Billing Modes), click Access Service.
- Log in to the CodeArts console, click
- Click the username
 on the top navigation bar and choose All Account Settings.
 - Choose Agent Management > Agent Pool.
- Click Create Pool, configure the agent pool, and click Save.
Table 1 Creating an agent pool Parameter
Description
Pool Name
The name of the agent pool. Enter a maximum of 50 characters. Digits, letters, periods (.), underscores (_), and hyphens (-) are supported.
Pool Type
Supported pool types:
- LINUX: Tasks are executed on a Linux VM.
- LINUX_DOCKER: A Linux Docker container is started and tasks are executed in the container.
- WINDOWS: Tasks are executed on a Windows VM.
- MAC: Tasks are executed on a macOS VM.
Description
Describe the agent pool. Enter a maximum of 1,024 characters.
This parameter is optional. Configure it as needed.
This pool can be used by all users of the current account.
This parameter is optional. Enable it as needed. If this parameter is selected, all users of the current account can use the pool.
A new record is displayed in the list.
Figure 1 Agent pool list
Managing an Agent Pool
- Go to the CodeArts homepage.
- Log in to the CodeArts console, click
 , and select a region where you have enabled CodeArts.
 - Click Go to Workspace.
If your account uses the old billing mode (see Old Billing Modes), click Access Service.
- Log in to the CodeArts console, click
- Click the username
 on the top navigation bar and choose All Account Settings.
 - Choose Agent Management > Agent Pool.
- Locate the agent pool you want to manage, and perform the operations listed in the table below as needed.
Table 2 Managing an agent pool Operation
Description
Modifying agent pool basic information
Click
 in the Operation column. In the displayed dialog box, modify the pool name and description, and click Save.
The modified agent pool information is displayed in the list.
Setting pool administrators
- Click
 in the Operation column. The Permissions tab is displayed.
 - Set administrators as needed.
- Click Add next to Administrators, select users from the drop-down list, and click
 .
. - To remove the administrator role of a user, click
 next to the username.
The modified administrators are displayed.
Figure 2 Setting administrators
- Click Add next to Administrators, select users from the drop-down list, and click
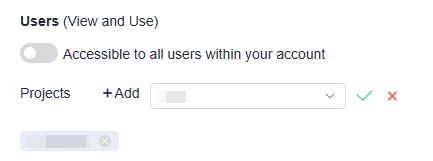
Setting pool users
- Click
 in the Operation column. The Permissions tab is displayed.
 - Set users as needed.
- Click the switch
 to set all users in your account as users of the agent pool.
 - Click Add next to Projects, select a project name from the drop-down list box, and click
 to set all members in the selected project as agent pool users.
 - To cancel the authorization for members in a project, click
 next to the project name.
The modified information is displayed.
Figure 3 Setting pool users
- Click the switch
Deleting the agent pool
WARNING:The deletion cannot be undone. Exercise caution when performing this operation.
Click
 in the Operation column. In the displayed dialog box, click Yes.
The deleted agent pool is no longer displayed in the list.
Setting notification rules
- In the agent pool list, click the name of the target pool to go to the agent list page.
- Click the Notifications tab. Enable or disable notifications for the following event types:
- Create agent
- Delete agent
- Disable agent
- Enable agent
- Bring agent offline
- Bring agent online
The modified notification rules are displayed.
- Click
Feedback
Was this page helpful?
Provide feedbackThank you very much for your feedback. We will continue working to improve the documentation.See the reply and handling status in My Cloud VOC.
For any further questions, feel free to contact us through the chatbot.
Chatbot


