Tag Management
You can manage DataArts Insight users and user groups by tags. This method allows data permissions to be managed according to these tags for both users and groups. This section describes how to manage tags.
Notes and Constraints
- To use this function, you must have the administrator permissions.
Step 1: Add a Tag
- Log in to the DataArts Insight console.
- Click
 in the upper left corner of the management console to select a region. Then, select an enterprise project in the upper right corner.
 - In the top menu of the console, click System Settings.
- Choose Organization Management > Tag Management. On the displayed User Tags tab, click Add Tag. In the dialog box that appears, set the parameters based on Table 1.
- Click Confirm.
- For how to add tags in batches, see Setting Tag Values in Batches.
- To edit or delete a tag, click
 next to the tag name.
Table 1 Parameters for adding a tag Parameter
Description
Tag Name
Tag name. The name can contain up to 128 characters. Only letters, numbers, hyphens (-), and underscores (_) are allowed.
Default Tag Value Type
If the tag value of a user or user group is not changed, the preset value is used by default.
- Enumeration: After selecting Enumeration, you need to enter the default tag value. A user/user group can view the entered tag value by default.
- All: All values. By default, a user or user group can view all values.
- Null: Null value. By default, a user or user group can view data whose value is Null (IS NULL).
- Ignore: By default, a user or user group ignores the current tag, meaning they do not have the tag by default.
Description
Add a description to the tag. You can enter information such as the usage and use cases of the tag, making it easier for future management. Enter a maximum of 512 characters.
Step 2: Set Tags for a User or User Group
- Choose Organization Management > Tag Management.
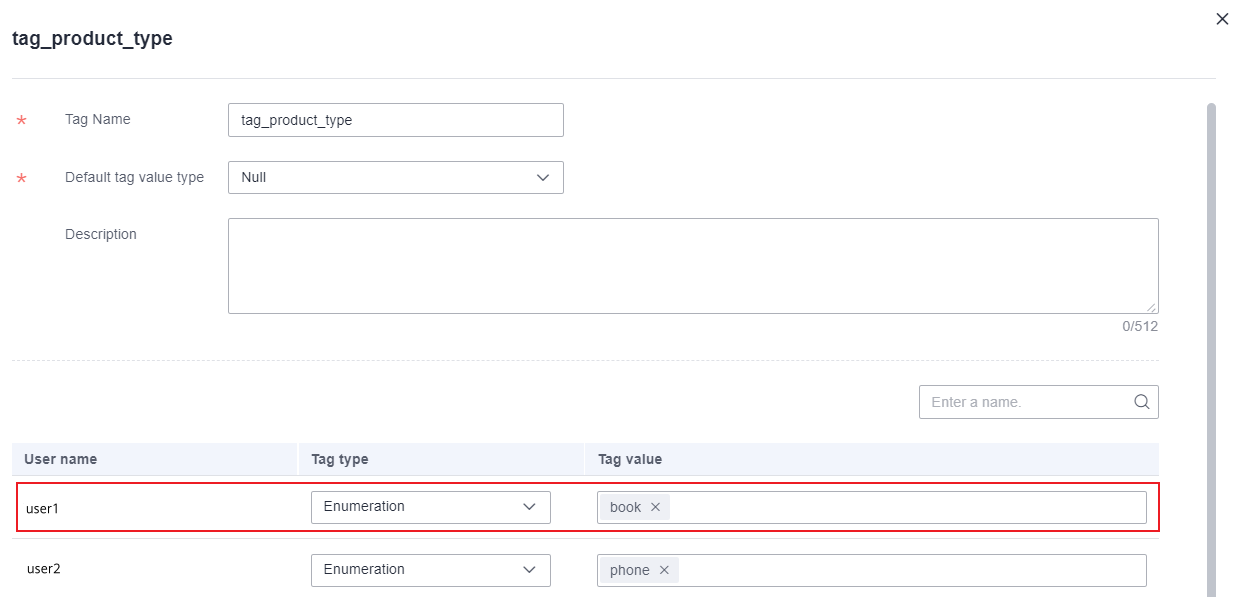
- Click Edit in the Operation column. In the displayed slide-out panel, set the tag type and value. For example, add the user tag tag_product_type and assign a tag value to user1, as shown in Figure 1.
- Set tag values in batches: You can set tag values and add tags based on exported data.
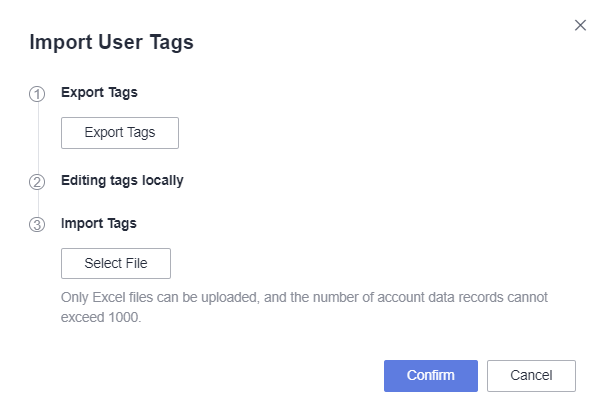
- Click Import Tags.
- In the displayed Import User Tags dialog box, click Export Tags to export all users and their tags as a spreadsheet file. In the file, set tag values and add tags for all users.
- Click Select File, select the edited spreadsheet file, and click Confirm.
Figure 2 Importing user tags


- When editing an spreadsheet file, you can only set tag values and add tags. Deleting and editing tags, as well as adding and modifying users/user groups, are not supported. Additionally, you are not allowed to edit the values in the account_id column; otherwise, the file upload will fail.
- You can import a maximum of 200 tags and 1,000 users or user groups at a time using a spreadsheet file.
- The tag name can contain up to 64 characters. Only letters, numbers, hyphens (-), and underscores (_) are allowed.
Helpful Links
Once you have finished editing the user tags, you can use them to grant user tag permissions to the data in the dataset. For details, see Authorization Based on User Tags.
Feedback
Was this page helpful?
Provide feedbackThank you very much for your feedback. We will continue working to improve the documentation.See the reply and handling status in My Cloud VOC.
For any further questions, feel free to contact us through the chatbot.
Chatbot


