

Browser
CodeArts Agent IDE has a built-in browser that lets you preview how your web application runs and perform the following operations:
- Instant external URL preview: Enter an external URL in the browser address bar to instantly preview the website.
- One-click selection import to chat: Select one or multiple elements from the browser and add them to the chat box.
- Direct element-to-agent interaction: Select any element and send it to a chat with one click to interact directly with the agent.
- Real-time console log viewing and reuse: Open the console, check the browser's printed logs, then paste them into the chat box.
- Drag-and-drop element movement: Select an element and intuitively adjust its position using the mouse.
- Two-way editing: Modify element properties directly in either the design panel or the CSS code.
- Element-level commenting: Add comments to precisely bind style optimization requirements to specific elements.
Browser Usage
Launch the built-in browser to open HTML files in your project or visit external web pages.
Opening an HTML File in Your Project
- In your project folder, locate the target .html file.
- Right-click the file and choose Preview in Browser. Figure 1 Previewing a local HTML file

Opening an External Web Page
- On the top menu bar, choose Help > Show All Commands.
- Enter browser and click Browser: Open Integrated Browser. Figure 2 Opening the browser

- Enter the URL of the external web page you want to open and press Enter.
Visualized Element Editing
After you open a local HTML file in the browser, edit the page elements.
Adding an Element to the Chat Box for Optimization
- Click the element selector
 , select the target element, and click
 to add the element to the chat box. Figure 3 Adding an element to the chat box

- Send your request to the AI, for example, "Change the font color of the selected element to blue."
After the processing is complete, refresh the page. The font of the element you selected turns blue.
Figure 4 Element color changed to blue

Editing an Element with a Quick Prompt
- Click the element selector
 , select the target element, and click the chat box icon
 .
- Enter optimization keywords, and click
 . The agent will optimize the element accordingly. Figure 5 Sending optimization instructions through a chat box

Optimizing an Element Through Style Settings
- Click the element selector
 , select the target element, and click the style setting icon
 .
- In the displayed style setting area, modify the element style as required. Figure 6 Style settings

Optimizing an Element Through the CSS Inspector
- In the opened browser, click the CSS inspector icon
 .
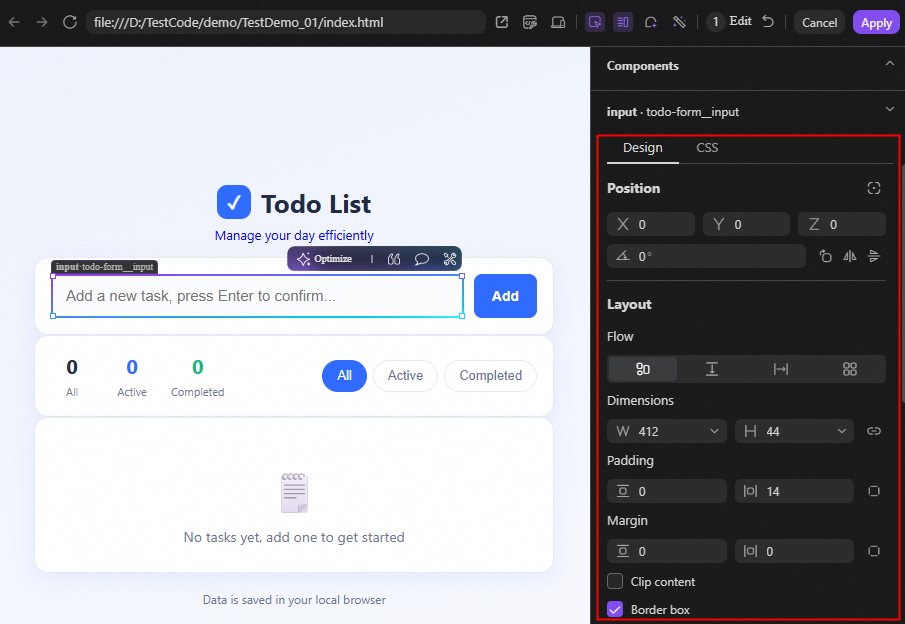
- Select the target element and modify it in the component tree and on the design panel.
- In the component tree, right-click the target element, and you can copy, cut, paste, or delete the element. You can also drag an element to another component tree node. Figure 7 Modifying an element in the component tree

- On the design panel, you can edit an element in a visualized manner, such as adjusting its position, layout, text, background, and border. You can also view or edit style rules in the CSS. Figure 8 Modifying an element on the design panel or in CSS
- In the component tree, right-click the target element, and you can copy, cut, paste, or delete the element. You can also drag an element to another component tree node.
Optimizing Element Card Layout
- In the opened browser, click the element selector
 .
- Move the mouse pointer to the target element and click Optimize to optimize its layout. Figure 9 One-click element optimization

Batch Optimizing Pages and Commenting on Elements
In addition to editing an individual element, you can batch adjust elements in the HTML.
Optimizing Pages/Projects with One Click
- In the opened browser, click the one-click optimization icon
 .
- Choose Optimize Page or Optimize Project to automatically optimize the visual appearance of the current page or of all pages in the project. Figure 10 One-click optimization of all pages in the project or the current page

Optimizing a Page by Adding Comments
Add comments to precisely bind style optimization requirements to specific elements. The agent performs partial optimization based on the comments to achieve precise modifications, significantly reducing communication costs and rework rates.
- In the opened browser, click the comment icon
 .
- Select the content to which you want to add a comment, enter an optimization prompt, and click Add Comment.
The system temporarily stores your comments in a bubble. You can hover the mouse pointer over the bubble to view the comment target and content. You can also click Submit. The agent will optimize the page based on your comments.
- To add multiple comments, select the content you want to comment on again, enter an optimization prompt, and click Add Comment.

A maximum of five comments can be added.
- After adding a comment, click Submit. The agent will optimize the page accordingly.
- To cancel saving your comments in a batch, click Cancel in the upper right corner. To undo the last operation, click
 . Figure 11 Optimizing a page through comments

Previewing Pages on Multiple Devices
After you finish developing a page, you can preview how it looks on multiple devices.
- In the opened browser, click
 to open the device toolbar.
- Select a device type and view the page. Figure 12 Selecting a device type to preview the effect

Quick Analysis of Console Logs
Click the developer tool icon  near the address bar in your browser. The tool shows live updates for info, warning, or error logs in your project. (You can click Custom Levels on the Console tab to view the log type.) Copy and paste these logs into CodeArts Agent to get quick analysis and solutions.
What is your overall rating for this page?
Thank you very much for your feedback. We will continue working to improve the documentation.See the reply and handling status in My Cloud VOC.
For any further questions, feel free to contact us through the chatbot.
Chatbot


