
Using CDM to Migrate Data to CloudTable HBase Clusters
CloudTable uses CDM to migrate data from multiple data sources on the cloud and on-premises or third-party cloud to an HBase table of a CloudTable cluster. For details about the supported data sources, see Supported Data Sources in the Cloud Data Migration Service Overview.
The procedure of using CDM to migrate data to CloudTable is as follows:
- Creating a CloudTable Cluster
- Using CDM to Migrate Data to CloudTable
- Viewing the Imported Data on CloudTable
Creating a CloudTable Cluster
- Log in to the CloudTable console.
- Select a region in the upper left corner.
- Create a CloudTable HBase cluster. If there is one available, you can skip this step.
For example, create a CloudTable cluster named CloudTable-demo.
Using CDM to Migrate Data to CloudTable
- Log in to the CDM console and create a CDM cluster.
The CDM cluster you create must have the same region, AZ, VPC, subnet, and security group as the CloudTable cluster.
For details, see Creating a Cluster in the Cloud Data Migration User Guide.
- Create a source link in the new CDM cluster.
CDM enables you to migrate data from multiple data sources to CloudTable. Create a link as the source link based on the actual data source. The link is used for CDM to connect to the data source and read data from the data source.
For details about how to create a link, see Creating a CDM Link.
- Create a destination link in the new CDM cluster.
In the CDM cluster, create a link for which Data Source Type is set to CloudTable as a destination link. The link is used for CDM to connect to the CloudTable cluster, read data from the data source, and import data to the HBase table of the CloudTable cluster.
For details about how to create a link, see Creating a CDM Link in Cloud Data Migration User Guide.
The following is an example of destination link settings.
- On the Cluster Management page, locate the newly created CDM cluster and click Job Management in the row of the CDM cluster. The job management page is displayed.
- Click the Link Management tab and then click Create Link. On the Select connector type page that is displayed, select CloudTable Service and click Next. Figure 1 Selecting a connector type

- Configure link parameters.
- Name: Enter a link name. You can create a link name based on the data source type for easy memorization. For example, enter cloudtable_connect.
- ZK Link: Set this parameter to the access address (Intranet) of the CloudTable cluster. Choose Cluster Management in the navigation pane. In the cluster list, locate the required cluster and obtain the address in the Access Address (Intranet) column.
- IAM Authentication: Set this parameter to No.
- IAM Authentication: CloudTable does not use IAM authentication. Therefore, set this parameter to No.
- Run Mode: Retain the default value.
Figure 2 Link parameter configuration
- Click Save.
- In the CDM cluster, create a job on the Table/File Migration page.
For details about how to create a table/file migration job, see Table/File Migration Jobs in the Cloud Data Migration User Guide.

When you create a table/file migration job, if the table or file of the source end does not have the corresponding HBase table in the destination CloudTable cluster, set a table name and field mapping in the job for the destination end (the field name can be copied from the source end). Therefore, when a job is running, the corresponding HBase table is automatically created at the destination end.
The following uses the SFTP data source on an ECS as an example to describe how to create a job.
- On the Cluster Management page, locate the newly created CDM cluster and click Job Management in the row of the CDM cluster. The job management page is displayed.
- Choose Table/File Migration > Create Job.
- Configure basic information as follows. Figure 3 Configuring basic information

- Configure field mapping as follows. Figure 4 Field mapping

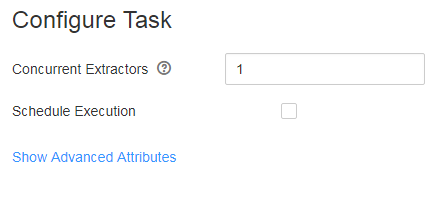
- Configure a task as follows. Figure 5 Configuring a task
- Click Save and Run.
Viewing the Imported Data on CloudTable
- Prepare a Linux ECS.
Assume that the ECS name is ecs_20170916. For details, see Preparing an ECS.
- Install the client and start the shell to access the CloudTable cluster.
For details about how to use the HBase shell to access the cluster, see Connecting to an HBase Normal Cluster Using HBase Shell.
- On the CloudTable client, run a command to query the data migrated to CloudTable using CDM.
The following is an example of the command. Replace table_name with the name of the table specified when a job is created in the CDM cluster.
scan 'table_name'
Feedback
Was this page helpful?
Provide feedbackThank you very much for your feedback. We will continue working to improve the documentation.See the reply and handling status in My Cloud VOC.
For any further questions, feel free to contact us through the chatbot.
Chatbot


