Creating a Masking Rule
You can create a masking rule to mask alarm notifications once alarms are triggered. After the masking rule is applied, only alarm records will be generated, and alarm notifications will no longer be sent. This section describes how to create a masking rule.

- If you set Masked By to Resource, all alarm notifications will be masked for the selected resource. Exercise caution.
- If Masked By is set to Policy, changing or deleting the policy of the alarm rule will invalidate it within the masking rule. If all policies in a masking rule become invalid, the alarm masking rule will be automatically deleted. If needed, you can reconfigure the alarm masking rule after modifying the alarm rule.
Prerequisites
Ensure that an alarm rule has been created before creating a policy-specific masking rule. For details, see Creating an Alarm Rule.
Procedure
- Log in to the Cloud Eye console.
- In the navigation pane, choose Alarm Management > Alarm Masking.
- In the upper right corner of the page, click Create Masking Rule.
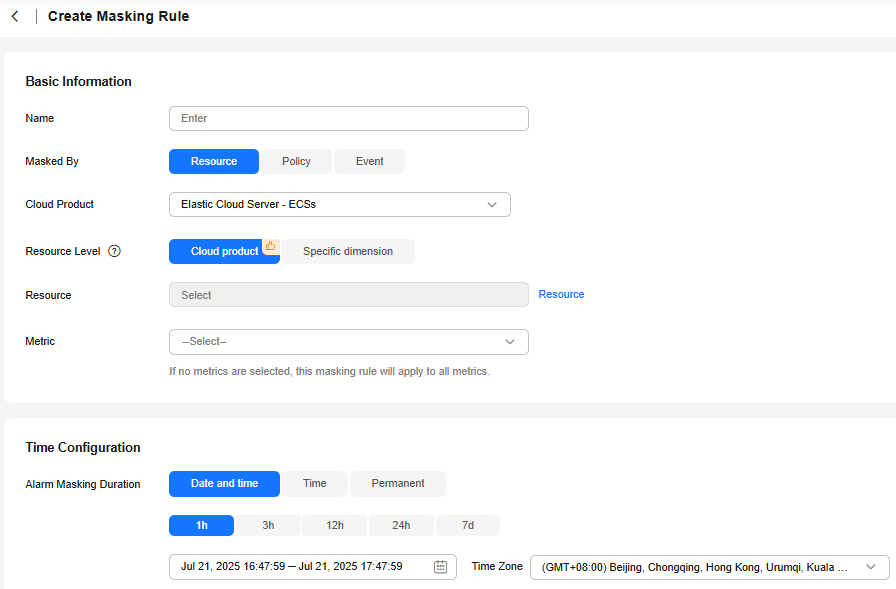
- On the displayed Create Masking Rule page, configure parameters.
Figure 1 Creating an alarm masking rule

Table 1 Parameters for configuring a masking rule Parameter
Description
Name
Name of the alarm masking rule. The name allows 1 to 64 characters and can only contain letters, digits, hyphens (-), and underscores (_).
Masked By
Masking method of the alarm masking rule. Set this parameter to Resource, Policy, or Event.
Cloud product
Cloud product that the alarm masking rule applies to. This parameter is mandatory when Masked By is set to Resource or Policy.
Resource Level
When Masked By is set to Resource or Policy, you need to select a resource level, either Cloud product or Specific dimension.
Take ECS as an example. ECS is the cloud product. Specific dimensions are disks, mount points, processes, and more.
If Cloud product is selected, metrics across sub-dimensions are supported. If Specific dimension is selected and a sub-dimension is specified, only metrics of the specified dimension can be selected.
Select Rule
If Masked By is set to Policy, select an alarm rule.
Select Policies
If Masked By is set to Policy, select alarm policies in an alarm rule. You can associate the selected alarm policies with the selected alarm rule.
You can select one or more alarm policies to mask alarms.
NOTE:If an alarm policy has been configured in an alarm rule in which an alarm will be generated only when all alarm policies are met, the alarm policy cannot be selected.
Resource
Resource for which alarm notifications need to be masked. You can add up to 100 resources at a time.
- If Masked By is set to Resource, select specific resources.
- If Masked By is set to Policy, select an alarm rule, and specify policies as well as resources. You can select All resources or Specific resources.
- If Masked By is set to Event and Monitoring Scope is set to Specific resources, select specific resources.
Metric
If Masked By is set to Resource, select specific metrics. You can select up to 50 metrics at a time.
CAUTION:If you do not select any metrics, this masking rule will apply to all metrics.
Event Source
Name of the cloud service that triggers the event. This parameter is only available if Masked By is set to Event.
Monitoring Scope
Resources for which the event masking rule is applied. If Masked By is set to Event, you need to set the monitoring scope. The value can be All resources or Specific resources based on the event source.
Select Event
Name of the event to be masked. You need to select an event only if Masked By is set to Event. If no event is selected, this making rule will apply to all events.
Alarm Masking Duration
Time or duration when the masking rule is applied.- Date and time: The masking rule is applied within a specified time range. After specifying a time range, you need to select the effective time. The options are 1 hour, 3 hours, 12 hours, 24 hours, and 7 days.
- Time: The masking rule takes effect in a fixed time range every day. You can also configure the effective date range when the masking rule takes effect. For example, if the effective date is 2022-12-01 to 2022-12-31 and the effective time is 08:00 to 20:00, the masking rule will apply during this time window every day from December 1, 2022 to December 31, 2022.
- Permanent: The masking rule will always take effect.
Time Zone
Time zone of the alarm notification window in the masking rule. The default value is the time zone where the client browser is located. The value can be configured.
- Click Create.
Feedback
Was this page helpful?
Provide feedbackThank you very much for your feedback. We will continue working to improve the documentation.See the reply and handling status in My Cloud VOC.
For any further questions, feel free to contact us through the chatbot.
Chatbot


