
Filtering Requests from Specific User Agents
You can configure a User-Agent ACL for your domain name to identify and filter visitors and enhance domain name security.
Background
You can filter requests to your domain name based on the User-Agent field.
- Blacklist: Requests including fields in the blacklist cannot access the content and 403 will be returned.
- Whitelist: Only requests including fields in the whitelist can access the content. Other requests will fail and 403 will be returned.
Precautions
- This function is disabled by default.
- Either a User-Agent blacklist or whitelist can be configured.
- When a client request hits the blacklist and is blocked, PoP resources are consumed, generating a small amount of traffic or bandwidth fees. If the service type of the domain name is whole site acceleration, the client request is also charged for the request fees.
Procedure
- Log in to the CDN console.
- In the navigation pane, choose .
- In the domain list, click the target domain name or click Configure in the Operation column.
- Click the Access Control tab.
- In the User-Agent ACL area, click Edit.
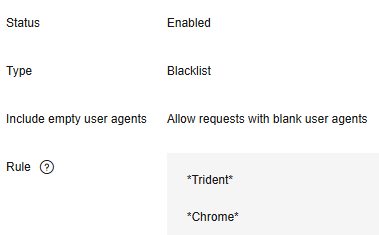
Figure 1 Configuring a User-Agent ACL

- Switch on Status to enable this configuration item.
- Select a type and enter rules.
Parameter
Description
Type
Blacklist: Requests including fields in the blacklist cannot access the content. 403 is returned.
Whitelist: Only requests including fields in the whitelist can access the content. Other requests will fail and 403 will be returned.
Include empty user agents
An empty user agent indicates that the User-Agent field is left blank or is not included in an HTTP request.
If you select Block requests with blank user agents when configuring a blacklist, CDN will block requests with blank user agents.
If you select Allow requests with blank user agents when configuring the whitelist, CDN will allow requests with blank user agents.
NOTE:The User-Agent field with value null is not an empty user agent.
Rule
- Enter letters, digits, spaces, and the following special characters: *.-_();,/'#!@$^&+=~?"[]{}\:%
NOTE:
For domain names with special configurations, (), {}, or [] must be both entered.
- Only wildcard characters (*) can be used for regular expression matching. If no wildcard character is included, exact matching will be used.
- Enter up to 100 characters for a rule.
- Enter up to 50 rules, one per row.
- Enter letters, digits, spaces, and the following special characters: *.-_();,/'#!@$^&+=~?"[]{}\:%
- Click OK.
- (Optional) Disable the User-Agent ACL.
- Switch off Status to disable the User-Agent ACL and clear all settings of the blacklist or whitelist. You need to set related parameters when enabling this function again.
Examples
Assume that you have configured the following User-Agent blacklist for domain name www.example.com.
If User-Agent in the header of an HTTP request is one of the following:
User-Agent: Mozilla/5.0 (Windows NT 10.0; WOW64; Trident/7.0; Touch; rv:11.0) like Gecko
User-Agent: Mozilla/5.0 (Windows NT 10.0; Win64; x64) AppleWebKit/537.36 (KHTML, like Gecko) Chrome/95.0.4638.54 Safari/537.36
Trident or Chrome is included in the blacklist, so 403 is returned.
Feedback
Was this page helpful?
Provide feedbackThank you very much for your feedback. We will continue working to improve the documentation.See the reply and handling status in My Cloud VOC.
For any further questions, feel free to contact us through the chatbot.
Chatbot


