
Node Pool Overview
Introduction
CCE introduces node pools to help you better manage nodes in Kubernetes clusters. A node pool contains one node or a group of nodes with identical configuration in a cluster.
You can create custom node pools on the CCE console. With node pools, you can quickly create, manage, and destroy nodes without affecting the cluster. All nodes in a custom node pool have identical parameters and node type. You cannot configure a single node in a node pool; any configuration changes affect all nodes in the node pool.
You can also use node pools for auto scaling (supported only by pay-per-use node pools).
- When a pod in a cluster cannot be scheduled due to insufficient resources, scale-out can be automatically triggered.
- When there is an idle node or a monitoring metric threshold is met, scale-in can be automatically triggered.
This section describes how node pools work in CCE and how to create and manage node pools.
Node Pool Architecture
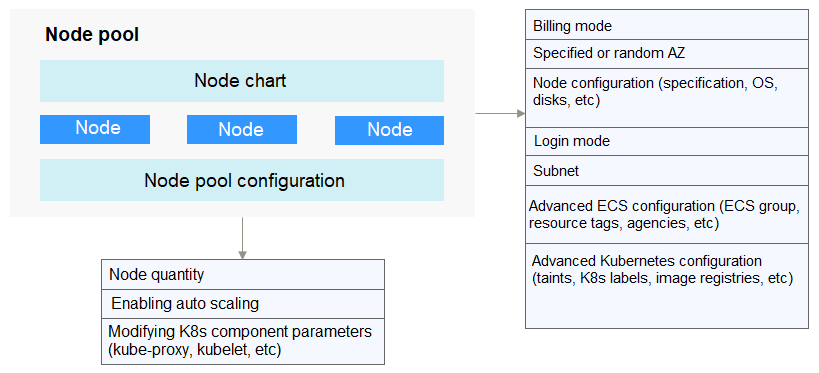
Generally, all nodes in a node pool have the following same attributes:
- Node OS
- Node flavor
- Node login mode
- Node container runtime
- Startup parameters of Kubernetes components on a node
- User-defined startup script of a node
- Kubernetes Labels and Taints
CCE provides the following extended attributes for node pools:
- Node pool OS
- Maximum number of pods on each node in a node pool
Description of DefaultPool
DefaultPool is not a real node pool. It only classifies nodes that are not in the user-created node pools. These nodes are directly created on the console or by calling APIs. DefaultPool does not support any user-created node pool functions, including scaling and parameter configuration. DefaultPool cannot be edited, deleted, expanded, or auto scaled, and nodes in it cannot be migrated.
Applicable Scenarios
When a large-scale cluster is required, you are advised to use node pools to manage nodes.
The following table describes multiple scenarios of large-scale cluster management and the functions of node pools in each scenario.
Scenario |
Function |
|---|---|
Multiple heterogeneous nodes (with different models and configurations) in the cluster |
Nodes can be grouped into different pools for management. |
Frequent node scaling required in a cluster |
Node pools support auto scaling to dynamically add or reduce nodes. |
Complex application scheduling rules in a cluster |
Node pool tags can be used to quickly specify service scheduling rules. |
Functions and Precautions
Function |
Description |
Precaution |
|---|---|---|
Creating a node pool |
Add a node pool. |
It is recommended that a cluster contains no more than 100 node pools. |
Deleting a node pool |
When a node pool is deleted, the nodes in the node pool are deleted first. When a yearly/monthly node pool is deleted, the nodes are migrated to the default node pool first. Workloads on the original nodes are automatically migrated to available nodes in other node pools. |
If pods in the node pool have a specific node selector and none of the other nodes in the cluster satisfies the node selector, the pods will become unschedulable. |
Enabling auto scaling for a node pool |
After auto scaling is enabled, nodes will be automatically created or deleted in the node pool based on the cluster loads. |
Do not store important data on nodes in a node pool because the nodes may be deleted after scale-in. Data on the deleted nodes cannot be restored. |
Enabling auto scaling for a node pool |
After auto scaling is disabled, the number of nodes in a node pool will not automatically change with the cluster loads. |
None |
Adjusting the size of a node pool |
The number of nodes in a node pool can be directly adjusted. If the number of nodes is reduced, nodes are randomly removed from the current node pool. |
After auto scaling is enabled, you are not advised to manually adjust the node pool size. |
Changing node pool configurations |
You can modify the node pool name, node quantity, Kubernetes labels (and their quantity), resource tags, and taints. |
The deleted or added Kubernetes labels and taints (as well as their quantity) will apply to all nodes in the node pool, which may cause pod re-scheduling. Therefore, exercise caution when performing this operation. |
Removing a node from a node pool |
Nodes in a node pool can be migrated to the default node pool of the same cluster. |
Nodes in the default node pool cannot be migrated to other node pools, and nodes in a user-created node pool cannot be migrated to other user-created node pools. |
Copying a node pool |
You can copy the configuration of an existing node pool to create a new node pool. |
None |
Setting Kubernetes parameters |
You can configure core components with fine granularity. |
|
Deploying a Workload in a Specified Node Pool
When creating a workload, you can constrain pods to run in a specified node pool.
For example, on the CCE console, you can set the affinity between the workload and the node on the Scheduling Policies tab page on the workload details page to forcibly deploy the workload to a specific node pool. In this way, the workload runs only on nodes in the node pool. To better control where the workload is to be scheduled, you can use affinity or anti-affinity policies between workloads and nodes described in Scheduling Policies (Affinity/Anti-affinity).
For example, you can use container's resource request as a nodeSelector so that workloads will run only on the nodes that meet the resource request.
If the workload definition file defines a container that requires four CPUs, the scheduler will not choose the nodes with two CPUs to run workloads.
Related Operations
You can log in to the CCE console and refer to the following sections to perform operations on node pools:
Feedback
Was this page helpful?
Provide feedbackThank you very much for your feedback. We will continue working to improve the documentation.See the reply and handling status in My Cloud VOC.
For any further questions, feel free to contact us through the chatbot.
Chatbot


