
Adding Libraries to Extend Standard Page Functions
To incorporate a third-party JS/CSS library not present in the system, upload the library file. Once uploaded, you can design and use it on the page to import the library.
What Is a Library?
A library refers to the library on which a page depends. If the corresponding library is missing, the pages cannot provide certain functions. For example, if the map selection function is required on the page, the system needs to load the Baidu Maps library. In the platform, libraries are classified into preset libraries and custom libraries.
Preset Library
Preset libraries can be directly loaded and used on pages. For details about how to view the preset libraries, see Managing Libraries.
Versions of the preset libraries are assigned by the platform when resources are uploaded or updated. They do not correspond to the actual versions on the official website.

Custom Library
You can upload custom libraries and load it to pages.
This section outlines the steps to upload a third-party library and its subsequent management and application in widgets. Additionally, it illustrates an example of how to capture and display request parameters on a standard page by clicking a button, employing the fetch library as an external resource.
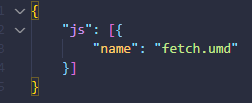
- Create a third-party library file package. Click fetch.zip to download the sample library file package. The sample file contains the JavaScript file and a metadata description file to be imported, as shown in Figure 2.The packageinfo.json file is the metadata description file, which must be contained in the uploaded third-party library files. See Figure 3.
- Upload a third-party library at the account level.
- On the Huawei Cloud Astro Zero console, click Access Homepage to go to the application development page.
- In the upper left corner of the page, click
 and choose Environments > Environment Configuration.
 - Choose Maintenance from the main menu.
- In the navigation pane, choose Global Elements > Page Assets > Libraries. On the displayed page, click Submit New Library.
- Select the created ZIP package, set basic library information, and click Submit.
Table 1 Parameters for uploading a library Parameter
Description
Name
Name of a custom library.
Upload Icon
Display icon of a library.
Upload Source File (.zip)
Click the upload button and select the library file package in 1.
Library ID
Only letters and digits are allowed. Start with a letter.
Classification
Library classification.
Library Type
Type of the library to be uploaded.
Release Notes
Enter the library description as required.
Return to the library page. On the Tenant tab page, you can view the uploaded library file. The Global tab displays the preset libraries, which cannot be edited or deactivated and can only be downloaded.
- Reference the library in a standard page widget.
- Create a standard page whose label and name are page01, for example, Figure 4.
- Choose Basic > Common, drag the button widget to the canvas, and modify the button properties, as shown in Figure 5.
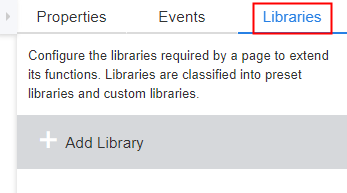
- Click Libraries in the right pane to add a library, as shown in Figure 6.
- On the page that is displayed, search for the uploaded library file fetch, select the library file, and click Add.
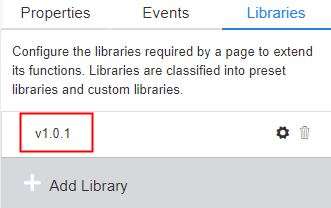
- In the right pane, you can view the added library file, as shown in Figure 7.
- Load and use the library on the standard page.
- Select the Button widget. On the Events tab page, click the plus sign (+) next to on-click. The page for adding an action is displayed.
- Enter the custom JavaScript code, call the method in the library to obtain the address of the Git repository, and click Create. For details about how to use fetch, see Fetch API.
fetch('https://api.github.com/users/chriscoyier/repos') .then(function(response){ return response.json(); }) .then(function(data){ //data is the requested repos //console.log(data); for(var key in data){ console.log(data[key].archive_url) } }); - Return to the standard page development page and click
 in the upper part of the page to save the page.
 - Click
 to preview the standard page.
 - Click the button for obtaining parameters and press F12 to open the debugging page of the browser.
- On the Console tab page, you can view the printed parameters, that is, the request result, as shown in Figure 8.


Feedback
Was this page helpful?
Provide feedbackThank you very much for your feedback. We will continue working to improve the documentation.See the reply and handling status in My Cloud VOC.
For any further questions, feel free to contact us through the chatbot.
Chatbot


