
Using ROMA Connect for Device Integration
Overview
ROMA Connect uses the standard Message Queue Telemetry Transport (MQTT) protocol to connect devices and implement quick and easy device management on the cloud.
This chapter provides a configuration example to help you get familiar with the device integration process.
The steps for integrating devices with ROMA Connect are as follows:
- An EIP has been bound to the ROMA Connect instance, and the network where the local PC is located can communicate with the EIP network.
- The MQTTX client has been downloaded and installed locally.
- A topic has been created for message integration in the ROMA Connect instance. For details, see Creating a Message Topic.
Step 1: Define a Product
A product is a device model. You can define a product to determine the function properties of a device. Each device belongs to a product.
- Create an integration application.
- Log in to the ROMA Connect console. On the Instances page, click View Console of an instance.
- In the navigation pane on the left, choose Integration Applications. In the upper right corner of the page, click Create Integration Application.
- In the dialog box displayed, set Name and Description, and click OK.
- Create a product.
- In the navigation pane on the left, choose LINK > Product Management. On the page displayed, click Create Product in the upper right corner.
- In the Create Product dialog box, set product parameters and click OK.
Table 1 Parameters for creating a product Parameter
Description
Product Type
Select Common as the product type.
Protocol Type
Select MQTT as the protocol type.
Integration Application
Select the integration application created in 1.
Product Template
You do not need to set this parameter.
Product Name
Enter a product name, which can be user-defined.
Manufacturer Name
Enter a manufacturer name of the device, which can be user-defined.
Manufacturer ID
Enter a manufacturer ID of the device, which can be user-defined.
Product Model
Enter a product model of the device, which can be user-defined.
Device Type
Select Default Type as the type of the access device.
Model Version
Enter a device model version, which can be user-defined.
Description
Enter a brief description of the product.
- Add a thing model service for the product.
- On the Product Management page, click the Products tab and click the name of the product created in 2 to access the product details page.
- On the Thing Model tab page, click Create.
- In the Create Thing Model Service dialog box, set thing model service parameters and click OK.
Assume that the device is a temperature sensor. Create a temperature service Temperature for the product.
Table 2 Parameters for creating a thing model service Parameter
Description
Name
Enter Temperature as the name of the thing model service.
Status
This parameter specifies whether to enable the thing model service. Retain the default value, that is, the thing model service is enabled.
Description
Enter a brief description of the thing model service.
- Add a property for the thing model service.
- In the left pane of the Thing Model tab page, select the thing model service added in 3.
- On the Attributes tab page, click Create.
- In the Create Attribute dialog box, set property parameters and click OK.
Assume that the device reports only the property temperature whose data type is String.
Table 3 Parameters for creating a property Parameter
Description
Name
Enter temperature as the property name.
Data Type
Select String as the data type of the property parameter reported by the device.
Mandatory
This parameter specifies whether the property must be reported by a device. Retain the default value, that is, the property must be reported by a device.
Description
Enter a brief description of the property.
Max. Data Length
Enter 32 as the maximum length of the property value.
Enumerated Value
You do not need to set this parameter.
- Add a command for the thing model service.
- On the Commands tab page, click Create.
- In the Create Command dialog box, set command parameters and click OK.
Assume that a device has the SET_STATUS command for setting the status, the command field is status, the data type is String, and the enumerated values are on and off.
Table 4 Parameters for creating a command Parameter
Description
Name
Enter SET_STATUS as the command name.
Description
Enter a brief description of the command.
- Locate the created command in the command list and click
 on the left of the command name to expand the command fields.
 - Click Create Field.
- In the Create Delivery Command Field dialog box, set field parameters and click OK.
Table 5 Parameters for creating a command field Parameter
Description
Name
Enter status as the command field name.
Data Type
Select String as the data type of the command field.
Mandatory
This parameter specifies whether the field must be carried in a delivered command. Retain the default value.
Description
Enter a brief description of the command field.
Max. Data Length
Enter 32 as the maximum length of the command field value.
Enumerated Value
Set this parameter to on,off, indicating that the device can be enabled or disabled.
Step 2: Register a Device
After a device is registered with ROMA Connect, a unique ID and key are allocated to the device to access ROMA Connect.
- In the navigation pane on the left, choose LINK > Device Management. On the page displayed, click Create Device in the upper right corner.
- In the Create Device dialog box, set device parameters and click OK.
Table 6 Parameters for creating a device Parameter
Description
Integration Application
Select the integration application created in 1.
Associated Product
Select the product created in Step 1: Define a Product.
Device ID
Enter a device ID, which is the unique identifier of the device and can be user-defined.
Device Name
Enter a device name, which can be user-defined.
Password
Enter the access password of the device. If you do not specify this parameter, the system automatically generates a value.
Confirm Password
Enter the confirm password of the device. If you do not specify this parameter, the system automatically generates a value.
Status
This parameter specifies whether to enable the device. The device can connect to ROMA Connect only after being enabled. Retain the default value, that is, the device is enabled.
Device Tag
You do not need to set this parameter.
Description
Enter a brief description of the device.
- On the Device Management page, click the name of the created device to access the device details page. On the Topics tab page, view the topic information about the device.
Step 3: Configure Data Forwarding Rules
ROMA Connect does not directly store data reported by devices. You need to configure data forwarding rules to forward device data to other services for storage. The following section uses ROMA Connect MQS as an example to describe how to forward data to the destination.
- In the navigation pane on the left, choose LINK > Rule Engine. On the page displayed, click Create Rule in the upper right corner.
- In the Create Rule dialog box, set rule parameters and click OK.
Figure 1 Creating a rule

Table 7 Rule parameters Parameter
Description
Name
Enter a rule name, which can be user-defined.
Integration Application
Select the integration application created in 1.
Description
Enter a brief description of the rule.
Status
This parameter specifies whether to enable the rule. Retain the default value, that is, the rule is enabled.
- In the rule list, click the name of the rule created in 2 to access the rule details page.
- In the Source area, click Create Source, set related parameters and click Save.
Figure 2 Creating a source

Table 8 Source parameters Parameter
Description
Product Name
Select the product created in Step 1: Define a Product.
Device Name
Select the device created in Step 2: Register a Device.
Topic Name
Select the topic to which the device sends messages. The topic name is in the format of {Product ID}/out/{Device ID}.
Topic Level
Select a topic level. The value is automatically adapted based on the value of Device Name. If you do not specify Device Name, Topic Level is Product. If you select a specific device from the Device Name drop-down list box, Topic Level is Device.
Base64 Encoding
Specifies whether Base64 encoding is performed on the forwarded device data. You do not need to enable this option.
Include Device Data
Specifies whether the forwarded data includes device data. To facilitate subsequent identification of the device to which the forwarded data belongs, enable this option.
- In the Destination area, click Create Destination, set related parameters and click Save.
Figure 3 Creating a destination

Table 9 Destination parameters Parameter
Description
Destination
Select ROMA MQS to integrate messages forwarded to ROMA Connect MQS.
Connection Address
Select the MQS intranet address of the current ROMA Connect instance. You can view the address on the Instance Information page of the ROMA Connect console.
Topic Name
Select the topic created for message integration in Prerequisites.
Username
This parameter is available only if MQS SASL_SSL is enabled for the ROMA Connect instance.
Enter the key of the integration application to which the topic defined in Topic Name belongs.
Password
This parameter is available only if MQS SASL_SSL is enabled for the ROMA Connect instance.
Enter the secret of the integration application to which the topic defined in Topic Name belongs.
Step 4: Debug the Device
A device can access ROMA Connect by integrating the MQTTX client or SDK. Use the MQTTX client to simulate a device to connect and send messages to ROMA Connect.
- Obtain device access information.
In the device list on the Device Management page, view and record the values of MQTT Connection Address, Client ID, Username, and Password of the device created in Step 2: Register a Device.
Figure 4 Device access information
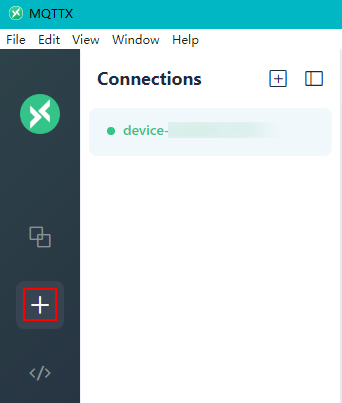
- Open the MQTTX client installed on your local PC and click the icon for adding new connections on the client.
Figure 5 MQTTX client
- On the page for editing connection properties, enter the connection property configuration information and click Connect.
Figure 6 Configuring connection properties

Table 10 Connection property configuration Parameter
Description
Name
Enter a name for the connection configuration.
Client ID
Enter the client ID obtained in 1.
Host
Select mqtt://, and enter the IP address in MQTT Connection Address obtained in 1.
Port
Enter the port number in MQTT Connection Address obtained in 1.
Username
Enter the username obtained in 1.
Password
Enter the password obtained in 1.
- Click Connect to connect to ROMA Connect.
If the connection is successful, the connection status in the upper left corner of the MQTTX client will be displayed in green. On the ROMA Connect console, choose LINK > Device Management. On the page displayed, Status of the device will be displayed as Online.
Figure 7 Device online
- Enable the device to send data to ROMA Connect.
- On the MQTTX client, click the connection created in 3, enter the device topic and message content, and click
 to send a message to ROMA Connect.
- Enter the topic of the message sent by the device in the text box in the format of {Product ID}/out/{Device ID}. You can log in to the ROMA Connect instance console, choose LINK > Device Management, click a device name to go to the details page, and view topics of the device on the Topics tab.
- Enter the message content in JSON format in the message text box.
Figure 8 Enabling a device to send a message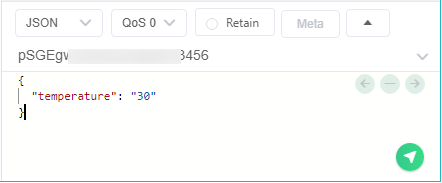
- On the ROMA Connect console, choose Message Queue Service > Message Query.
- Click Advanced Search to expand advanced search options.
- Enter search criteria and click Search to query the messages sent by the client.
- Select the message topic created in Step 3: Configure Data Forwarding Rules for Topic Name.
- Select Creation time for Search By and select the time segment for the device to send messages to ROMA Connect.
- Click Message Body and check whether the value of the data field in the message reported by the device is the same as that sent by the MQTTX client.
Figure 9 Viewing the message body

- On the MQTTX client, click the connection created in 3, enter the device topic and message content, and click
- Enable the device to receive a command from ROMA Connect.
- On the MQTTX client, click the connection created in 3, and click New Subscription, enter the topic (in the format of /v1/devices/{Device ID}/command) of the command delivery request, and click Confirm to subscribe to the device command delivery message.
You can log in to the ROMA Connect instance console, choose LINK > Device Management, click a device name to go to the details page, and view topics of the device on the Topics tab.
Figure 10 Subscribing to device messages
- On the ROMA Connect instance console, choose LINK > Device Management. In the Operation column of the device, choose More > Deliver Command.
- In the Deliver Command dialog box, set the command to be delivered and click OK.
Figure 11 Delivering a command

Table 11 Parameters for delivering a command Parameter
Description
Service
Select the thing model service added in 3. In this example, select Temperature.
Synchronous Communication
Retain the default value Disable.
Command
Select the command added in 5. In this example, select SET_STATUS.
status
This parameter varies according to the command field added in 5. In this example, the status field is displayed and set to on, indicating that the device is enabled.
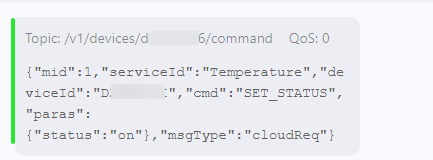
- On the Received tab page of the MQTTX client, you can view the command delivered by ROMA Connect to the device. Check whether the values of cmd and paras in the command are the same as those set on the ROMA Connect console.
Figure 12 Command received by the device
- On the MQTTX client, click the connection created in 3, and click New Subscription, enter the topic (in the format of /v1/devices/{Device ID}/command) of the command delivery request, and click Confirm to subscribe to the device command delivery message.
Feedback
Was this page helpful?
Provide feedbackThank you very much for your feedback. We will continue working to improve the documentation.See the reply and handling status in My Cloud VOC.
For any further questions, feel free to contact us through the chatbot.
Chatbot


