
Using the Pangu NLP Model to Create a Python Coding Assistant Application
Scenarios
This example demonstrates how to use the Pangu NLP model to create a Python coding assistant agent or application. The preconfigured Python interpreter plug-in on the Agent development platform is used.
The Python interpreter plug-in can execute the Python code entered by users and obtain the result. This plug-in provides powerful computing, data processing, and analysis functions for applications. You only need to add the plug-in to your agent to extend its functions.
Preparations
You have deployed a preset NLP model. For details, see "Developing a Pangu NLP Model" > "Deploying an NLP Model" > "Creating an NLP Model Deployment Task" in User Guide.
Procedure
Table 1 describes the process of creating a Python coding assistant application using the Pangu NLP model.
|
Step |
Description |
|---|---|
|
Describes how to create an agent or application. |
|
|
Describes how to configure prompts in an agent. |
|
|
Describes how to configure plug-ins for an agent. |
|
|
Describes how to configure the dialog experience of an agent. |
|
|
Describes how to debug an agent. |
Step 1: Creating an Agent
To create an agent, perform the following steps:
- Log in to ModelArts Studio and access a workspace.
- In the navigation pane, choose Agent App Dev.
- On the Agent development platform, choose Workstation in the navigation pane. On the Application tab page, click Create App in the upper right corner.
- Enter an application name (e.g., Python Coding Assistant), enter the application description, and click OK.
Figure 1 Creating an agent

Step 2: Configuring Prompts
After an agent is created, you need to configure prompts and set the persona, capabilities, skills, and execution steps for the agent.
The agent calls the Pangu NLP model to respond to user questions based on the understanding of the prompts. Therefore, a good prompt enables the model to better understand and execute a task, and the effectiveness of an application is closely related to prompts.
To configure a prompt, perform the following steps:
- In the prompt area of the agent development page, click
 . The role and instruction template is automatically filled in the text box.
 - Configure the prompt based on the template, as shown in Figure 2.
- After the input is complete, click the Intelligent optimization prompt words icon. In the Prompt optimization dialog box, wait until the optimized prompt is generated, and click OK.

Step 3: Adding a Preset Plug-in
Plug-in skills can be added to agents. Preset plug-ins and personal plug-ins can be added. Adding plug-ins can enhance agents with additional skills. You are advised to add a maximum of five plug-ins to an agent.
This section describes how to add a preset plug-in named python_interpreter.
To add a plug-in, perform the following steps:
- In the Plugin area of the skill pane, click the Add icon.
- In the Add plugins dialog box, select the preset plugin python_interpreter, click
 , and click OK.
Figure 3 Adding the python_interpreter plug-in
, and click OK.
Figure 3 Adding the python_interpreter plug-in
- After adding the plug-in, view it in the skill > Plugin area.
Figure 4 Added plug-in

Step 4: Configuring Dialog Experience
You can configure dialog experience for your agent to enhance the interaction quality and provide a more personalized user experience. This includes setting greeting text and recommended questions.
- Prologue: Prologue is a piece of content that an agent proactively displays to a user when the user interacts with the agent for the first time.
- Recommended questions: Recommended questions are questions or topics that an agent proactively displays to a user when the user interacts with the agent for the first time.
To configure dialog experience, perform the following steps:
- In the Dialogue Experience > prologue area, enter a prologue or click Intelligent Add to automatically add a prologue.
For example, "Hello! Welcome to the Python Coding assistant. Please tell me what problem you need help with today?"
- In the Dialogue Experience > Recommended Questions area, enter recommended questions or click Intelligent Add to automatically add recommended questions. You are advised to configure a maximum of three recommended questions.
For example, "Write the Python code for outputting prime numbers less than 10."
- After the dialog experience is configured, view the configured prologue and recommended questions in the Preview Debugging area on the right.
Step 5: Debugging the Agent
You can debug the execution process of a created agent on the platform.
To debug an agent, perform the following steps:
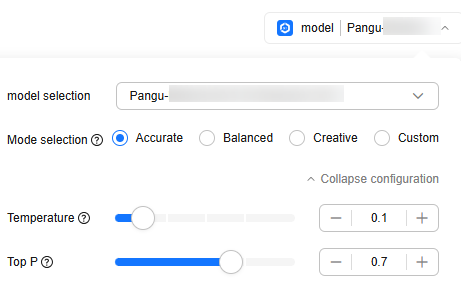
- Click
 in the upper right corner of the page and set the model parameters by referring to Figure 5.
- In the lower left corner of Preview Debugging, enable Code Interpreter.
- Enter a question in the text box in Preview Debugging, for example, "Please write Python code to output prime numbers less than 10." The agent will generate an answer.
- Click debugging in the upper right corner to view the agent running results and call details.
Feedback
Was this page helpful?
Provide feedbackThank you very much for your feedback. We will continue working to improve the documentation.See the reply and handling status in My Cloud VOC.
For any further questions, feel free to contact us through the chatbot.
Chatbot


