(Example) Developing a Custom Data Source for a Scheduled Task
Scenarios
FDI supports MySQL, which is a common database type. This section uses MySQL as an example to describe how to develop a custom connector in Java. Refer to MysqlConnctor.rar for demo code.
Prerequisites
- A Linux server that runs JDK 1.8 or later is available.
- IntelliJ IDEA: 2018.3.5 or later; Eclipse: 3.6.0 or later
- Obtain MysqlConnctor.rar from the demo (sha256:34c9bc8d99eba4ed193603019ce2b69afa3ed760a452231ece3c89fd7dd74da1) package.
- A custom connector must support idempotent write.
- Processing a RESTful API request cannot take more than 60 seconds.
- FDI cyclically calls the RESTful API address until all data is read.
Procedure
- Create a Spring Boot template project.
@SpringBootApplication public class MysqlConnectorApplication { public static void main(String[] args) { SpringApplication.run(MysqlConnectorApplication.class, args); } } - Define the controller layer of the RESTful APIs.
@RequestMapping(value = "mysql/reader", method = RequestMethod.POST) public ReaderResponseBody send(@RequestBody ReaderRequestBody readerRequestBody) throws Exception { if (readerRequestBody == null) { throw new RuntimeException("The reader request body is empty"); } LOGGER.info("Accept a reader request, request={}", JSONObject.toJSONString(readerRequestBody)); MysqlConfig mysqlConfig = getAndCheckMysqlConfig(readerRequestBody.getDatasource()); String jdbcUrl = buildMysqlUrl(mysqlConfig); JSONArray dataList = mysqlReaderService.queryData(jdbcUrl, mysqlConfig, readerRequestBody.getParams()); ReaderResponseBody readerResponseBody = new ReaderResponseBody(); readerResponseBody.setDatas(dataList); return readerResponseBody; } - Implement the service layer of the read/write APIs.
@Service public class MysqlReaderService { public JSONArray queryData(String jdbcUrl, MysqlConfig mysqlConfig, ReaderParams readerParams) throws Exception { Connection conn = DBUtils.getConn(jdbcUrl, mysqlConfig); //Obtain pagination parameters. int limit = 0; int offset = 0; if (readerParams.getPagination() != null) { Pagination pagination = readerParams.getPagination(); limit = pagination.getLimit() == 0 ? 10 : pagination.getLimit(); offset = pagination.getOffset() == 0 ? 1 : pagination.getOffset(); } //Obtain the name of the table to read. String tableName = readerParams.getExtend().getString("table_name"); //Build SQL statements. StringBuilder sqlBuilder = new StringBuilder(); sqlBuilder.append("select * from ").append(tableName); sqlBuilder.append(" limit ?,? "); PreparedStatement preparedStatement = conn.prepareStatement(sqlBuilder.toString()); preparedStatement.setInt(1, (offset - 1) * limit); preparedStatement.setInt(2, limit); ResultSet resultSet = preparedStatement.executeQuery(); //Obtain the column name. List<String> columnList = getColumnInfo(resultSet); //Read the queried data. JSONArray dataArray = new JSONArray(); while (resultSet.next()) { JSONObject data = new JSONObject(); for (int i = 1; i <= columnList.size(); i++) { data.put(columnList.get(i - 1), resultSet.getString(i)); } dataArray.add(data); } return dataArray; } } - Define the input and output parameters of the read and write APIs.
public class ReaderRequestBody { private String job_name; private JSONObject datasource; private ReaderParams params; } - Run the following command in the root directory to generate an executable JAR package, for example, MysqlConnector-1.0-SNAPSHOT.jar, in MysqlConnector\target.
# mvn package
- Use Linux or Windows to upload the MysqlConnector-1.0-SNAPSHOT.jar package to the user server that runs JDK, and run the following command:
# java -jar MysqlConnector-1.0-SNAPSHOT.jar &

During development and debugging, start the MysqlConnectorApplication.java class through IntelliJ IDEA or Eclipse.
- Create a custom connector model.
- Log in to the ROMA Connect console and choose Assets in the navigation pane on the left.
- Click Create Connector in the upper right corner of the page and set connector information by referring to Creating a Connector.
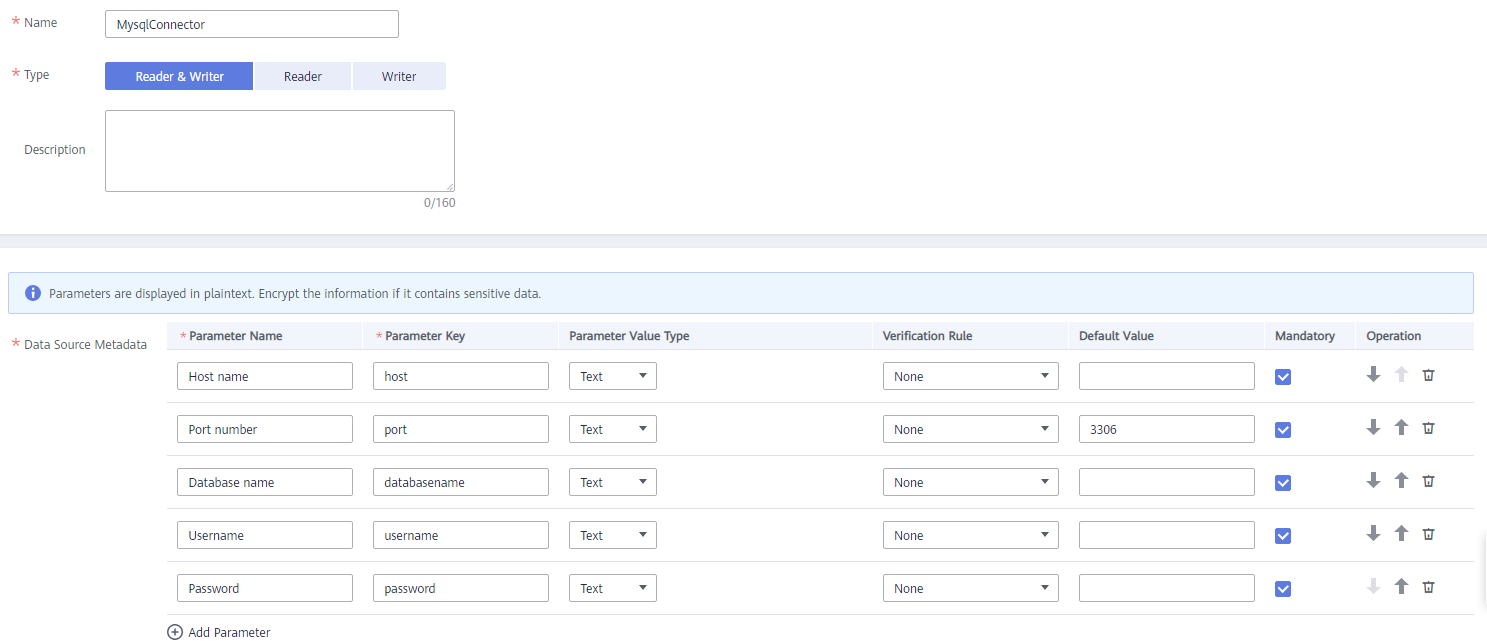
Take MySQL as an example. Enter the host name, port number, database name, username, and password in the data source definition.
Figure 1 Connector configuration 1
In the read/write parameter definitions, enter the additional information required when the custom plug-in reads or writes, such as the name of the table to read/write and the name of the timestamp field for incremental read.
Figure 2 Connector configuration 2
- Publish the connector.
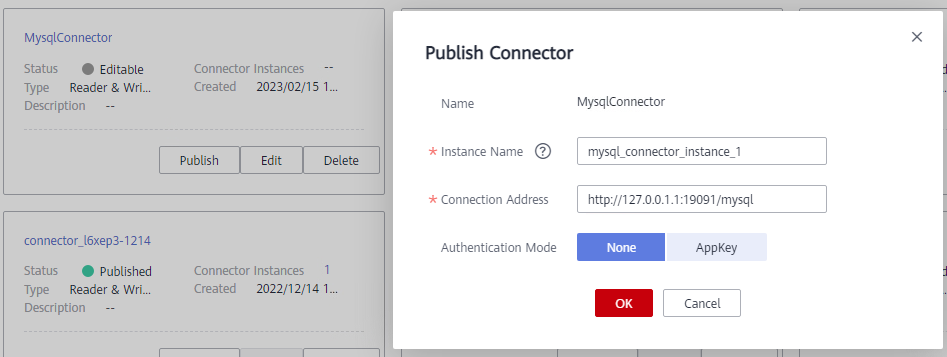
After the connector is created, click Publish to publish its instance.

The relationship between a connector and a connector instance is similar to that between a class and a class object.
A connector defines specifications for a data source, while a connector instance corresponds to a specific RESTful service. The RESTful service's access address is required, which is determined by the user server address.
Figure 3 Publishing a connector
- Connect to the custom data source.
- In the navigation pane on the left, choose Data Sources. In the upper right corner of the page, click Access Data Source.
- On the Custom tab page, select the custom connector MysqlConnector and click Next.
- On the page, configure the data source connection information. Select an instance of the connector as the connection instance and enter the data source information defined by the connector.
- The following uses a custom data source as the source and MySQL as the destination to describe how to create a scheduled task.
Connect the custom data source at the source and the MySQL data source at the destination and create a scheduled task. For details, see Creating a Common Data Integration Task. After the configuration is complete, run the task to migrate data from the custom data source to MySQL tables.

After the task is executed, FDI reads or writes data based on the connection address (http://127.0.0.1:19091/mysql) defined by the custom connection instance. (Add /reader to the address for data read or add /writer for data write.)
Feedback
Was this page helpful?
Provide feedbackThank you very much for your feedback. We will continue working to improve the documentation.See the reply and handling status in My Cloud VOC.
For any further questions, feel free to contact us through the chatbot.
Chatbot


