
RESTful API Demo
Huawei Cloud BCS provides RESTful APIs to simplify the usage of blockchains. You only need to develop applications that support RESTful APIs to access blockchains without the need to learn Hyperledger Fabric SDKs for Golang, Java, and Node.js. This demo uses a Golang client to show how RESTful APIs are used to invoke a chaincode.

This is a demo only and is not for actual use.
Creating a BCS Instance
- Log in to the BCS console.
- Click Buy next to Enhanced Hyperledger Fabric Instance.
- Configure basic information about the BCS instance by referring to Table 1.

To ensure that the demo runs properly, set the parameters as described in the following table.
Table 1 Basic settings Parameter
Setting
Billing Mode
Select Pay-per-use.
Region
Retain the default value.
Enterprise Project
Select default.
Instance Name
Enter demo.
Edition
Select Basic.
Blockchain Type
Select Private.
Enhanced Hyperledger Fabric Version
v2.2
Consensus Mechanism
Raft(CFT)
Resource Access Initial Password
Enter a password.
Confirm Password
Confirm the password.
- Click Next: Configure Resources. Table 2 describes the resource parameters.
Table 2 Resource configurations Parameter
Example
Environment Resources
Select Custom.
Cluster
Select Create a new CCE cluster.
AZ
Select an AZ.
ECS Specifications
Select the flavor for 4 vCPUs | 8 GB.
ECS Quantity
Enter 1.
High Availability
Select No.
VPC
Select Automatically create VPC.
Subnet
Select Automatically create subnet.
ECS Login Method
Select Password.
Password of Root User
If you do not enter a password here, the previously specified resource access initial password will be used.
Confirm Password
-
Use EIP of a CCE Node
Select Yes.
EIP Billed By
Retain the default value.
EIP Bandwidth
Set it to 5 Mbit/s.
- Click Next: Configure Blockchain. Table 3 describes the blockchain parameters.
Table 3 Blockchain configurations Parameter
Example
Blockchain Configuration
Select Custom.
Blockchain Mgmt. Initial Password
If you do not enter a password here, the previously specified resource access initial password will be used.
Confirm Password
-
Volume Type
Select SFS Turbo.
Storage Capacity of Peer Organization (GB)
Retain the default value.
Ledger Storage
Select File database (GoLevelDB).
Peer Organization
A peer organization named organization has been automatically created. Change the peer quantity to 1.
Channel Configuration
The organization organization has been added to the channel automatically. Retain this default setting.
Orderer Quantity
Retain the default value.
Security Mechanism
Select ECDSA.
NOTICE:Only ECDSA can be selected.
Configure Block Generation
Select No.
Enable Support for RESTful API
Select Yes. If you select No, you can enable support for RESTful APIs later by performing the following steps:
- In the navigation pane on the left, choose Add-on Management.
- On the Add-on Repository tab page, hover the mouse pointer over the baas-restapi card.
- Click Install and select the purchased BCS instance.
- Click Next: Confirm.
- Confirm the configurations and finish the purchase process.
Wait for several minutes. After a message is displayed indicating successful installation, check the status of the instance. If it is Normal, the deployment is completed.
Installing and Instantiating a Chaincode
- Log in to the BCS console.
- Find the instance you just created and click Manage Blockchain to go to the Blockchain Management console.
- On the login page, enter the username and password, and click Log In.
The username is admin, and the password is the Blockchain Mgmt. Initial Password set when you created the BCS instance. If you have not set this password, use the resource access initial password.
- Click
 in the upper left corner of the page. The parameters for chaincode installation are as follows.
Parameter
Setting
Chaincode Name
Enter bcsysq.
Chaincode Version
Enter 1.0
Ledger Storage
File database (goleveldb)
Select All Peers
Check the box.
Organization & Peer
Select peer-0.
Language
Select Golang.
Chaincode File
Add the downloaded chaincode file chaincode_example02.zip.
Chaincode Description
Enter a description of the chaincode.
Code Security Check
This option is displayed only when the chaincode language is Golang. Enable this option to check chaincode security.
- Click Install.
- After installing the chaincode, click Instantiate in the Operation column of the chaincode list. The parameters for chaincode instantiation are as follows.
Parameter
Setting
Channel
Select channel.
Chaincode Version
Enter 1.0
Initialization Function
Enter init.
Chaincode Parameters
Enter a,200,b,250.
Endorsement Policy
Select Endorsement from any of the following organizations.
Endorsing Organizations
Select organization.
Privacy Protection Configuration
Select No.
Configuring the Application
- On the Instance Management page, click Download Client Configuration on an instance card.
- Select Peer Certificates, select organization for Peer Organization, and select User certificate to download.
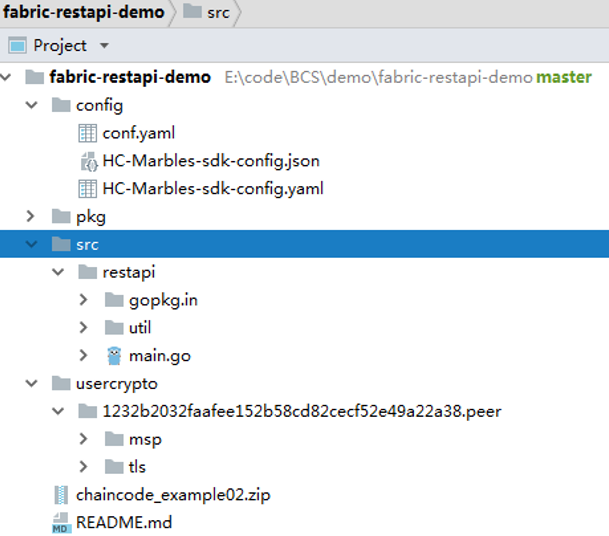
- Download and decompress the demo project code package fabric-restapi-demo.zip to the local PC, and use an IDE to open it.
This demo project is a RESTful client compiled using Golang. It enables chaincode invocation through RESTful APIs to achieve chaincode-based money transfer. Use an IDE such as GoLand to open the package. The following figure shows the content of the project.
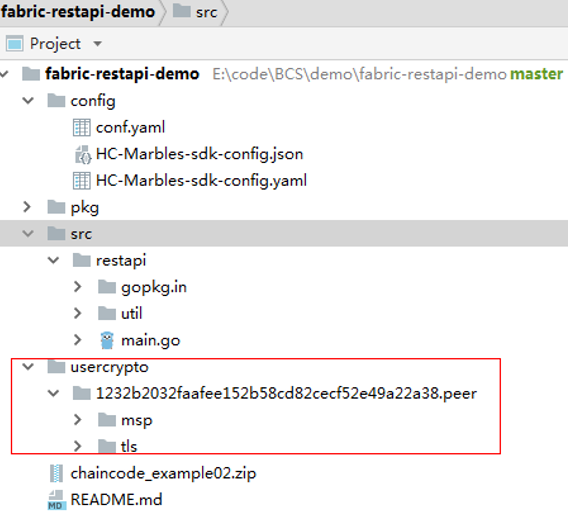
- Decompress the downloaded user certificate to the usercrypto directory of the project, as shown in the following figure.
- Modify parameter settings.
- Modify the parameters in the conf.yaml file in the config directory as shown and described in the following figure and tables.
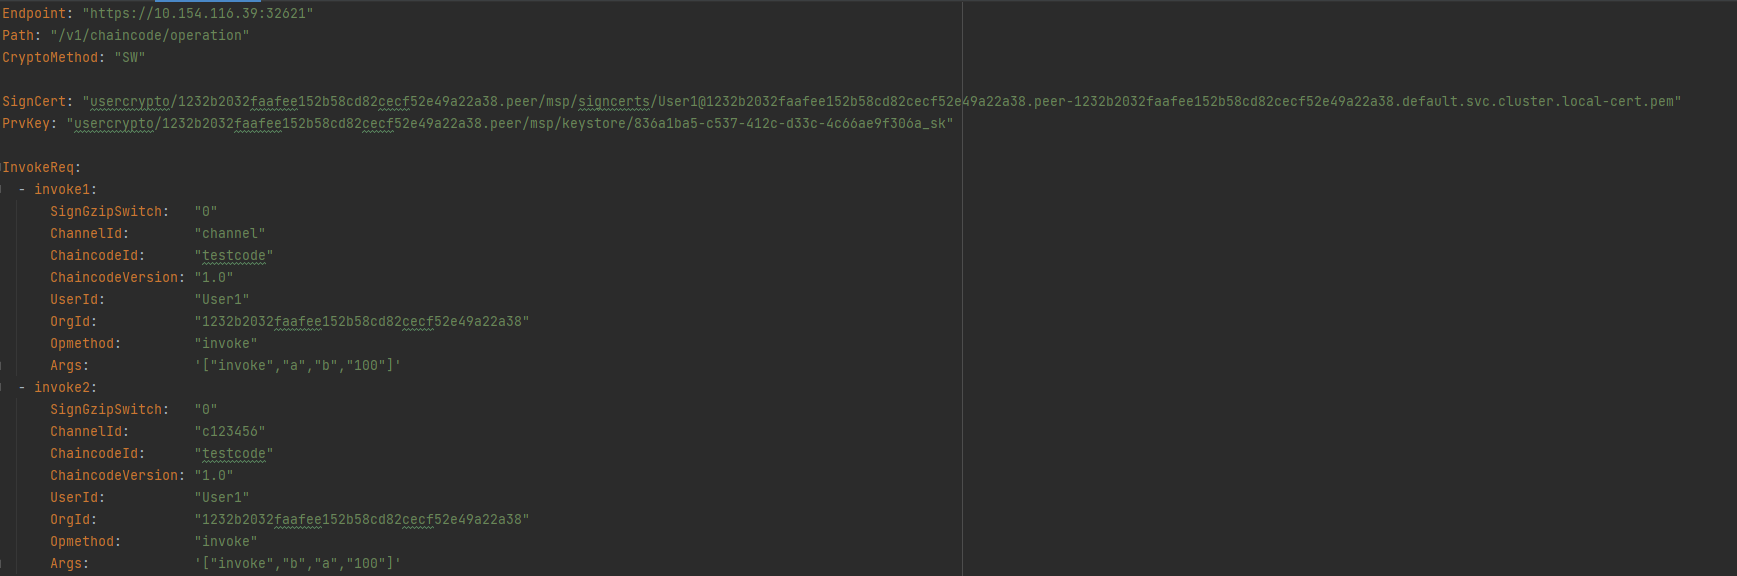
- Modify the main.go file in the src/restapi directory, as shown in the following figure and tables.

For each peer that needs to participate in the endorsement, construct an OrgPeer structure including the organization ID and the domain name of the peer. Add the structure to an array of the OrgPeer type, convert the structure into a byte array using the json.Marshal() method, and then convert the structure into a character string. The OrgPeer structure is as follows:
type OrgPeer struct {
OrgId string `json:"orgId"`
PeerDomainName string `json:"peerDomainName"`
}
Table 4 Parameters Parameter
Description
Endpoint
IP address and port number of the server bearing the RESTful service endpoint, which can be obtained by performing the following steps:
- On an instance card, click Container Cluster to go to the CCE console.
- Click an instance's cluster. In the navigation pane on the left, click .
- On the Deployments page, click the baas-restapi workload. Click the node where the instance is located. On the Nodes page, obtain the value of EIP in the IP Address column. This value allows you to access the RESTful API service. The port is fixed to 32621.
Path
Path to the RESTful APIs service. Retain the default value.
CryptoMethod
Encryption algorithm. If the ECDSA algorithm is used, set this parameter to SW.
SignCert
Path to the signature in the downloaded certificate.
PrvKey
Private key in the downloaded certificate.
InvokeReq
Request body parameters. Set these parameters based on the deployed chaincode. The InvokeReq parameter descriptions in the following table are for your reference.
QueryReq
Similar to InvokeReq. Set this parameter based on the deployed chaincode.
Table 5 InvokeReq parameters Parameter
Description
Example Value
SignGzipSwitch
Indication of whether GZIP compression is enabled. 0 indicates disabling, and 1 indicates enabling.
"1"
ChannelId
Blockchain channel name.
"channel"
ChaincodeId
Chaincode name.
"testcode"
ChaincodeVersion
Chaincode version.
"1.0"
UserId
User ID issued by the organization CA. The default value for BCS is User1.
"User1"
OrgId
Organization ID in a blockchain.
NOTE:On the Channel Management page, click View Peer. The organization ID is the value of MSP ID without "MSP". For example, if the MSP ID is 1232b2032faafee152b58cd82cecf52e49a22a38MSP, the blockchain organization ID is 1232b2032faafee152b58cd82cecf52e49a22a38.
"1232b2032faafee152b58cd82cecf52e49a22a38"
OrgPeers
Organization ID and domain name of each peer.
"[{OrgId:" 1232b2032faafee152b58cd82cecf52e49a22a38", PeerDomainName:"peer-1232b2032faafee152b58cd82cecf52e49a22a38-0 .peer-1232b2032faafee152b58cd82cecf52e49a22a38.default.svc.cluster.local "}]"
Opmethod
Purpose, that is, to invoke or query chaincodes.
"invoke"
Args
Chaincode invoking parameters.
["invoke","a","b","100"]
- Modify the parameters in the conf.yaml file in the config directory as shown and described in the following figure and tables.
- Build and run main().
The code will read the QueryReq and InvokeReq parameters in conf.yaml and main.go and call /v1/chaincode/operation of the RESTful APIs to invoke the chaincode. The code running result is as follows.
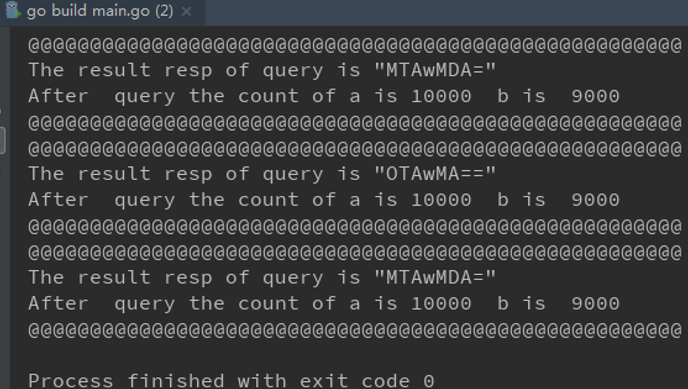
This demo uses a simple REST client to invoke the chaincode through RESTful APIs. The returned invocation result is TransactionID encrypted using Base64, and the query result is data encrypted using Base64. The code is for reference only. You can use this project code to understand how to invoke RESTful APIs.
Feedback
Was this page helpful?
Provide feedbackThank you very much for your feedback. We will continue working to improve the documentation.See the reply and handling status in My Cloud VOC.
For any further questions, feel free to contact us through the chatbot.
Chatbot


