
JavaScript
Scenarios
To use JavaScript to call an API through app authentication, obtain the JavaScript SDK, create a project, and then call the API by referring to the API calling example.
The JavaScript SDK can run in a Node.js or browser environment.
This section describes the procedure of using IntelliJ IDEA 2018.3.5 to establish a Node.js environment. It also provides examples of calling APIs using a browser.
Preparing the Environment
- You have obtained API calling information. For details, see Preparation.
- You have installed Node.js 15.10.0 or a later version. If not, download it from the official Node.js website and install it.
- You have installed IntelliJ IDEA 2018.3.5 or a later version. If not, download it from the official IntelliJ IDEA website and install it.
- You have installed the Node.js plug-in on IntelliJ IDEA. If not, install the Node.js plug-in according to Figure 1.

Obtaining the SDK
On the APIG console, choose Help Center > Using SDKs, and download the SDK of the desired language.
Alternatively, download the latest SDK version. Then obtain the ApiGateway-javascript-sdk.zip package. The following table shows the files decompressed from the package.
| Name | Description |
|---|---|
| signer.js | SDK code |
| node_demo.js | Node.js sample code |
| demo.html | Browser sample code |
| demo_require.html | Browser sample code (loaded using require) |
| test.js | Test case |
| js\hmac-sha256.js | Dependencies |
| licenses\license-crypto-js | Third-party licenses |
| licenses\license-node |
Creating a Project
- Start IntelliJ IDEA and choose File > New > Project.
In the New Project dialog box, choose Static Web and click Next.
Figure 2 Static Web
- Click ..., select the directory where the SDK is decompressed, and click Finish. Figure 3 Selecting the SDK directory of JavaScript after decompression

- View the directory structure shown in the following figure. Figure 4 Directory structure of the new project JavaScript
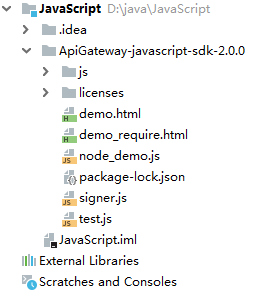
- node_demo.js: Sample code in Node.js. Modify the parameters in the sample code as required. For details about the sample code, see API Calling Example (Node.js).
- demo.html: Browser sample code. Modify the parameters in the sample code as required. For details about the sample code, see API Calling Example (Browser).
- Click Edit Configurations. Figure 5 Click Edit Configurations

- Click + and select Node.js. Figure 6 Selecting Node.js
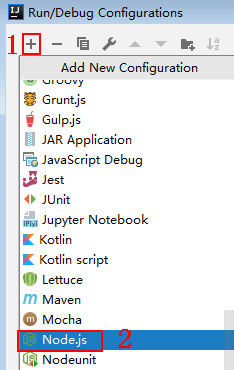
- Set JavaScript file to node_demo.js and click OK. Figure 7 Selecting node_demo.js

API Calling Example (Node.js)
- Import signer.js to your project.
var signer = require('./signer') var https = require('https') - Generate a new signer and enter the AppKey and AppSecret.
- In this example, the AK and SK stored in the environment variables are used. Specify the environment variables HUAWEICLOUD_SDK_AK and HUAWEICLOUD_SDK_SK in the local environment first. The following uses Linux as an example to describe how to set the obtained AK/SK as environment variables.
- Open the terminal and run the following command to open the environment variable configuration file:
- Set environment variables, save the file, and exit the editor.
export HUAWEICLOUD_SDK_AK="Obtained AK"
export HUAWEICLOUD_SDK_SK="Obtained SK"
- Run the following command to apply the modification:
- Generate a new signer and enter the configured environment variables.
var sig = new signer.Signer()
// Directly writing AK/SK in code is risky. For security, encrypt your AK/SK and store them in the configuration file or environment variables.
// In this example, the AK/SK are stored in environment variables for identity authentication. Before running this example, set environment variables HUAWEICLOUD_SDK_AK and HUAWEICLOUD_SDK_SK.
sig.Key = process.env.HUAWEICLOUD_SDK_AK
sig.Secret = process.env.HUAWEICLOUD_SDK_SK
- In this example, the AK and SK stored in the environment variables are used. Specify the environment variables HUAWEICLOUD_SDK_AK and HUAWEICLOUD_SDK_SK in the local environment first. The following uses Linux as an example to describe how to set the obtained AK/SK as environment variables.
- Generate a request, and specify the method, request URI, and request body.
var r = new signer.HttpRequest("POST", "c967a237-cd6c-470e-906f-a8655461897e.apigw.exampleRegion.com/app1?a=1"); r.body = '{"a":1}' - Add the x-stage header to the request to specify an environment name. Add other headers to be signed as necessary.
r.headers = { "x-stage":"RELEASE" } - Execute the following function to generate HTTP(s) request parameters, and add the X-Sdk-Date and Authorization headers for signing the request:
var opts = sig.Sign(r)
- Access the API and view the access result. If you access the API using HTTPS, change http.request to https.request.
var req=http.request(opts, function(res){
        console.log(res.statusCode)
        res.on("data",	function(chunk){
		console.log(chunk.toString())
	})
})
req.on("error",function(err){
	console.log(err.message)
})
req.write(r.body)
req.end()
API Calling Example (Browser)
- The browser restricts the initiation of cross-domain requests from page scripts. Therefore, before accessing an API, you need to create a CORS policy on the APIG console to allow the browser to send XMLHttpRequest requests to the server in a different domain, and bind the policy to the API. For details about how to create a CORS policy, see CORS"CORS" in the API Gateway User Guide.Figure 8 Example for creating a CORS policy

- Import signer.js and dependencies to the HTML page.
<script src="js/hmac-sha256.js"></script>
<script src="js/moment.min.js"></script>
<script src="js/moment-timezone-with-data.min.js"></script>
<script src='signer.js'></script>
- Sign the request and access the API.
- In this example, the AK and SK stored in the environment variables are used. Specify the environment variables HUAWEICLOUD_SDK_AK and HUAWEICLOUD_SDK_SK in the local environment first. The following uses Linux as an example to describe how to set the obtained AK/SK as environment variables.
- Open the terminal and run the following command to open the environment variable configuration file:
- Set environment variables, save the file, and exit the editor.
export HUAWEICLOUD_SDK_AK="Obtained AK"
export HUAWEICLOUD_SDK_SK="Obtained SK"
- Run the following command to apply the modification:
- Enter the configured environment variables for signature and access.
var sig = new signer.Signer()
sig.Key = getenv('HUAWEICLOUD_SDK_AK')
sig.Secret = getenv('HUAWEICLOUD_SDK_SK')
var r= new signer.HttpRequest()
r.host = "c967a237-cd6c-470e-906f-a8655461897e.apigw.exampleRegion.com"
r.method = "POST"
r.uri = "/app1"
r.body = '{"a":1}'
r.query = { "a":"1","b":"2" }
r.headers = { "Content-Type":"application/json" }
var opts = sig.Sign(r)
var scheme = "https"
$.ajax({
	type: opts.method,
	data: req.body,
	processData: false,
	url: scheme + "://" + opts.hostname + opts.path,
	headers: opts.headers,
	success: function (data) {
		$('#status').html('200')
		$('#recv').html(data)
	},
	error: function (resp) {
		if (resp.readyState === 4) {
			$('#status').html(resp.status)
			$('#recv').html(resp.responseText)
		} else {
			$('#status').html(resp.state())
		}
	},
	timeout: 1000
});
- In this example, the AK and SK stored in the environment variables are used. Specify the environment variables HUAWEICLOUD_SDK_AK and HUAWEICLOUD_SDK_SK in the local environment first. The following uses Linux as an example to describe how to set the obtained AK/SK as environment variables.
Feedback
Was this page helpful?
Provide feedbackThank you very much for your feedback. We will continue working to improve the documentation.See the reply and handling status in My Cloud VOC.
For any further questions, feel free to contact us through the chatbot.
Chatbot


