
Help Center/ Cloud Eye/ FAQs/ Troubleshooting/ Permissions Management/ What Can I Do If the System Displays a Message Indicating Insufficient Permissions When I Click Configure on the Server Monitoring Page?
Updated on 2025-10-27 GMT+08:00
What Can I Do If the System Displays a Message Indicating Insufficient Permissions When I Click Configure on the Server Monitoring Page?
Symptoms
When an IAM user clicked Configure on the Server Monitoring page, a message indicating insufficient permissions was displayed.
Possible Causes
The IAM agency permissions are not configured for the IAM user.
Procedure
- Add a policy for querying the agencies.
- Log in to the Huawei Cloud management console using an account or IAM user that has the permissions to create custom policies and grant permissions to other IAM users.
- Ensure that the account has been granted the Agent permissions for the region by performing the following operations: On the Cloud Eye console, choose Server Monitoring > Elastic Cloud Server. Check whether Configure is displayed above the ECS list.
- If no, the Agent permissions have been granted for the region.
- If yes, click Configure to enable the Agent permissions for the region.
- Hover your mouse over the username in the upper right corner and choose Identity and Access Management from the drop-down list.
- In the navigation pane, choose Permissions > Policies/Roles. Search for the CES agency policy CES AgencyCheck Access. If the policy can be found, grant permissions by referring to Step 2. If the policy does not exist, perform the following steps to create a custom policy:
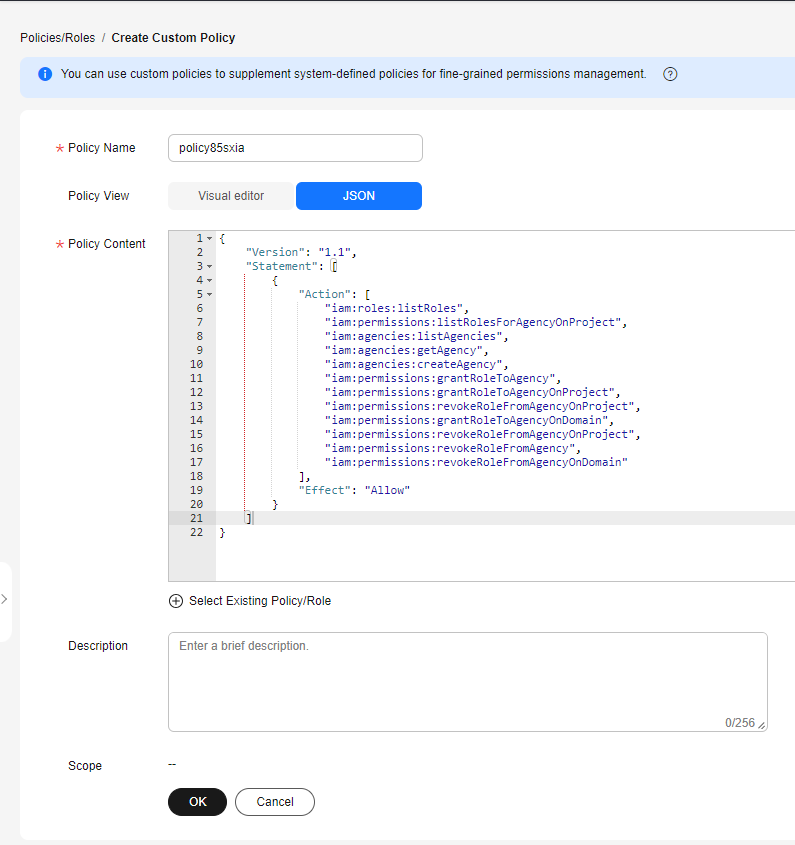
- Click Create Custom Policy in the upper right corner.
- Configure the following parameters:
- Policy Name: Specify a custom policy name.
- Policy View: Select JSON.
- Policy Content: Copy the following code and paste it to the text box.
{ "Version": "1.1", "Statement": [ { "Action": [ "iam:agencies:createAgency", "iam:agencies:getAgency", "iam:agencies:listAgencies", "iam:permissions:grantRoleToAgency", "iam:permissions:grantRoleToAgencyOnDomain", "iam:permissions:grantRoleToAgencyOnProject", "iam:permissions:listRolesForAgency", "iam:permissions:listRolesForAgencyOnDomain", "iam:permissions:listRolesForAgencyOnProject", "iam:permissions:revokeRoleFromAgency", "iam:permissions:revokeRoleFromAgencyOnDomain", "iam:permissions:revokeRoleFromAgencyOnProject", "iam:roles:createRole", "iam:roles:listRoles", "iam:roles:updateRole" ], "Effect": "Allow" } ] } - Description: (Optional) Provide supplementary information about the policy.
- Confirm the policy content(see Figure 1) and click OK to save the policy.
- Configure the following parameters:
- Click Create Custom Policy in the upper right corner.
- Assign permissions to the IAM user.
- In the navigation pane, choose User Groups, locate the user group that contains the IAM user, and choose Authorize in the Operation column.

- Search for the added custom policy name or CES AgencyCheck Access, select the policy, and click Next.

- Select Global services and click OK.
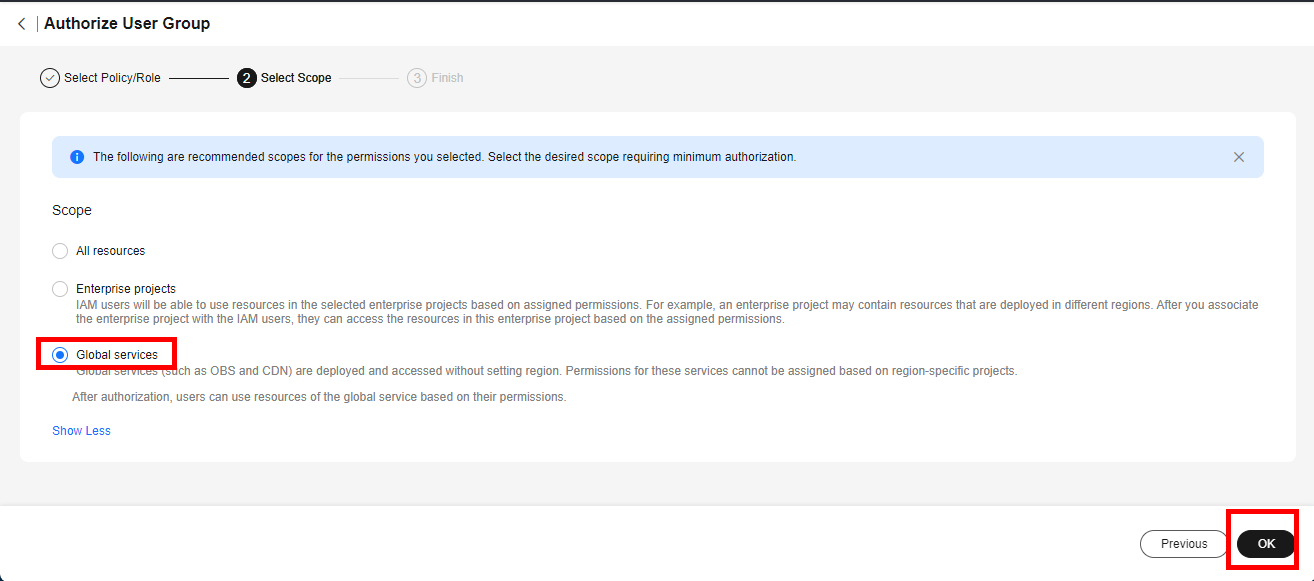
- If Authorization successful is displayed, click Finish.

- In the navigation pane, choose User Groups, locate the user group that contains the IAM user, and choose Authorize in the Operation column.
Parent topic: Permissions Management
Feedback
Was this page helpful?
Provide feedbackThank you very much for your feedback. We will continue working to improve the documentation.See the reply and handling status in My Cloud VOC.
The system is busy. Please try again later.
For any further questions, feel free to contact us through the chatbot.
Chatbot


