
Pulling an Image Through Dragonfly
Scenario
As business grows, the scale of container clusters for running enterprise applications also increases. When a cluster reaches a certain scale, the distribution of container images in the cluster faces some challenges. The first challenge is the bandwidth of the SWR service or of the backend storage. In some large clusters, hundreds or even thousands of nodes may pull an image at the same time, and high bandwidth is required.
There are many methods to solve this problem, such as dividing clusters, increasing caches, and load balancing. However, a better solution is P2P container image distribution that stores image data in a P2P network cluster and pulls the image from multiple P2P nodes. There are many P2P container image distribution technologies such as Kraken, BitTorrent, and Dragonfly. This section uses Dragonfly as an example to describe how to deploy Dragonfly in a CCE cluster and pull images through Dragonfly and a proxy. For details about other functions or configurations of Dragonfly, see the documents provided at the end of this section.
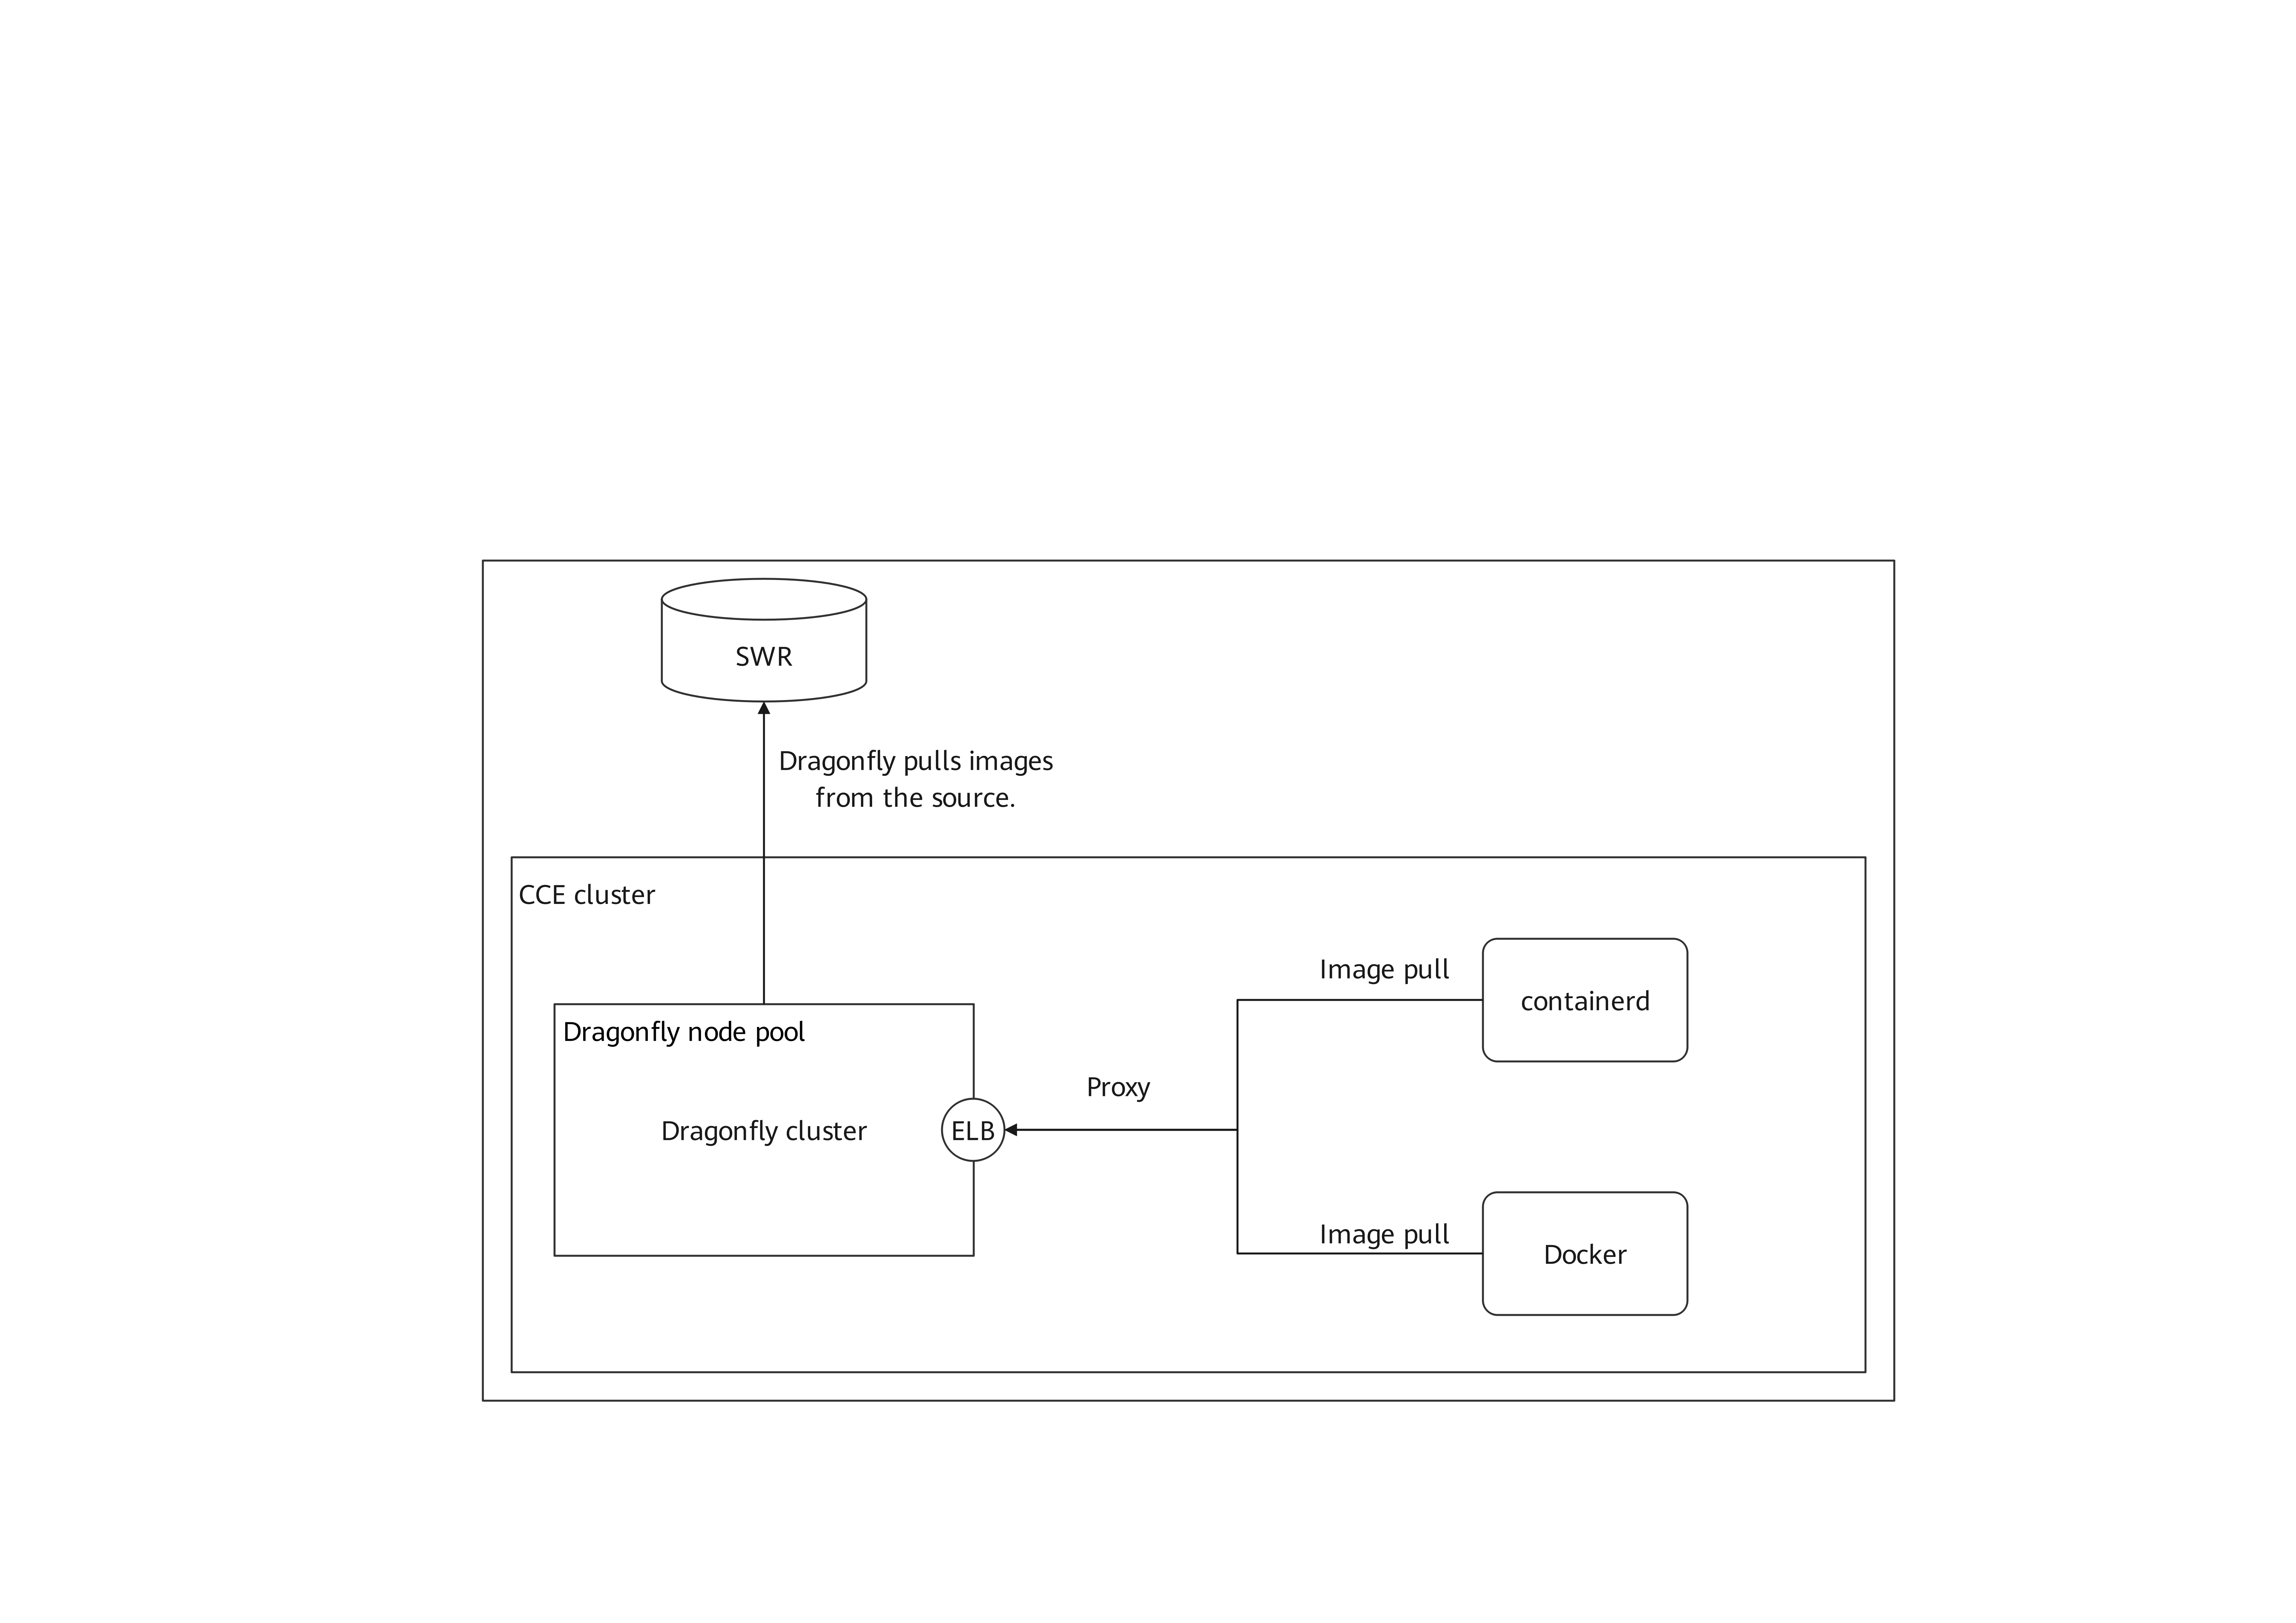
The following figure shows the deployment structure of Dragonfly.
Dragonfly Overview
Architecture
Dragonfly consists of four components: Manager, Scheduler, Seed Peer, and Peer. The following figure shows the details.
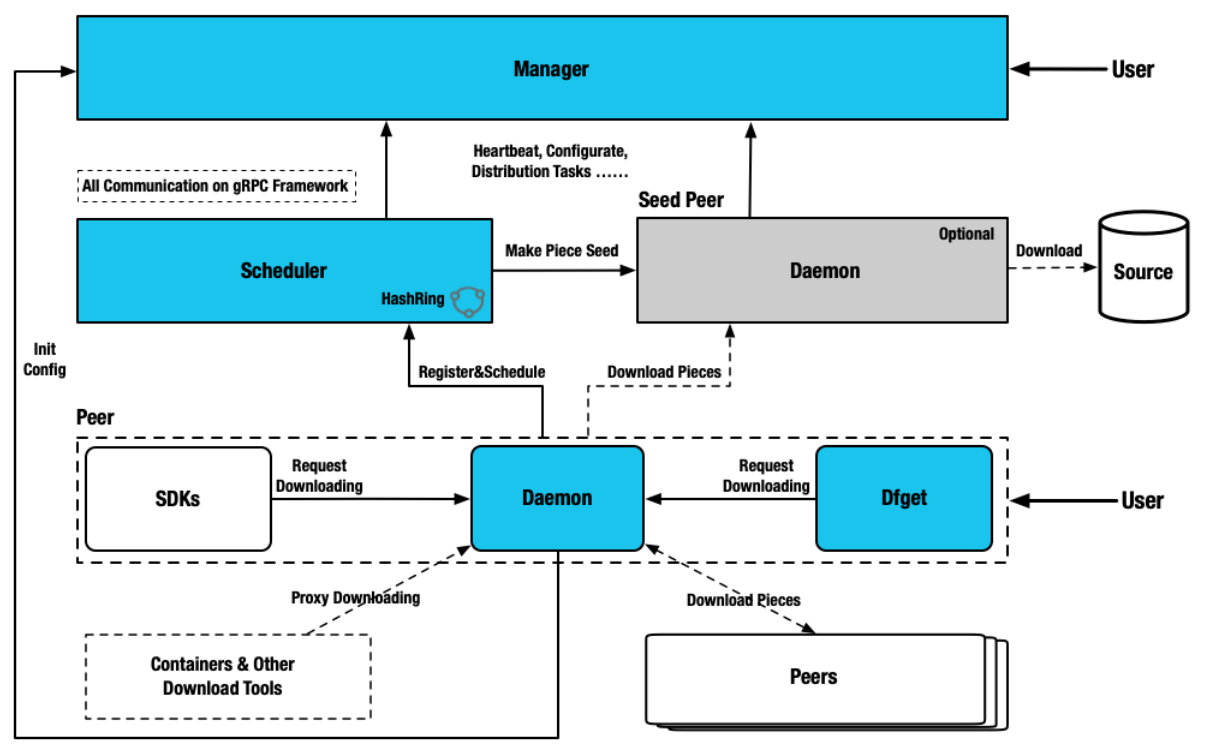
- Manager: maintains the relationships between P2P clusters and provides functions such as dynamic configuration management and data collection. It also contains a frontend console, which allows users to operate and manage clusters in a visualized manner.
- Scheduler: selects the optimal parent node for downloading images and triggers the Seed Peer to download images from the source at an appropriate time.
- Seed Peer: uploads, downloads, and distributes image pieces. It can function as the root node in a P2P network and allows the Scheduler to proactively initiate image retrieval from the source.
- Peer: uploads, downloads, and distributes image pieces in a P2P network.
How Dragonfly works

- The download request is forwarded to Dragonfly through the HTTP proxy Peer. The Peer registers the task with the Scheduler, which then checks the task metadata to determine whether the task is downloaded for the first time in the P2P cluster.
- If the task is downloaded for the first time, the Seed Peer is triggered to download the image from the source and divide the task into pieces. After the registration is successful, the Scheduler schedules the Seed Peer to the Peer for streaming based on the piece level. When a piece is successfully downloaded, the metadata of the piece is reported to the Scheduler for the next scheduling. The piece is distributed to multiple Peers.
- If the piece is not downloaded for the first time, the Scheduler schedules another group of optimal Peers to download the piece. The HTTP proxy Peer downloads the piece from different Peers, combines the pieces, and returns the entire file. The P2P download is complete.
Prerequisites
- A CCE cluster is available and a node pool has been created in the cluster. Dragonfly will be installed on the nodes in the node pool. The following uses the test-dragonfly-nodepool node pool as an example.
- Helm has been installed on a node in the CCE cluster.
Deploying Dragonfly Components
- Download and decompress the Helm chart package of Dragonfly to the node where Helm has been installed in the CCE cluster.
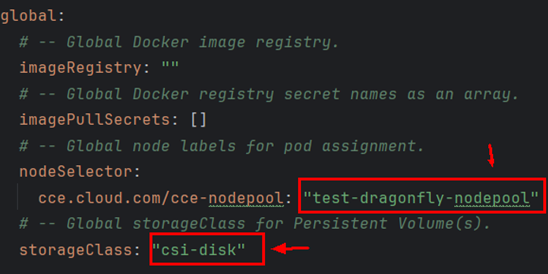
- Change the value of storageClass in dragonfly/values.yaml to csi-disk.
Change the value of nodeSelector to the label (cce.cloud.com/cce-nodepool: "test-dragonfly-nodepool") of the Dragonfly node pool. The label is automatically generated after the node pool is created. Change test-dragonfly-nodepool to the name of the node pool. This configuration is used to deploy the Dragonfly components in the Dragonfly node pool that is isolated from the service node pool.
- Start to install Dragonfly.
- Go to the Dragonfly directory generated after the Helm chart package is decompressed and run the following command:
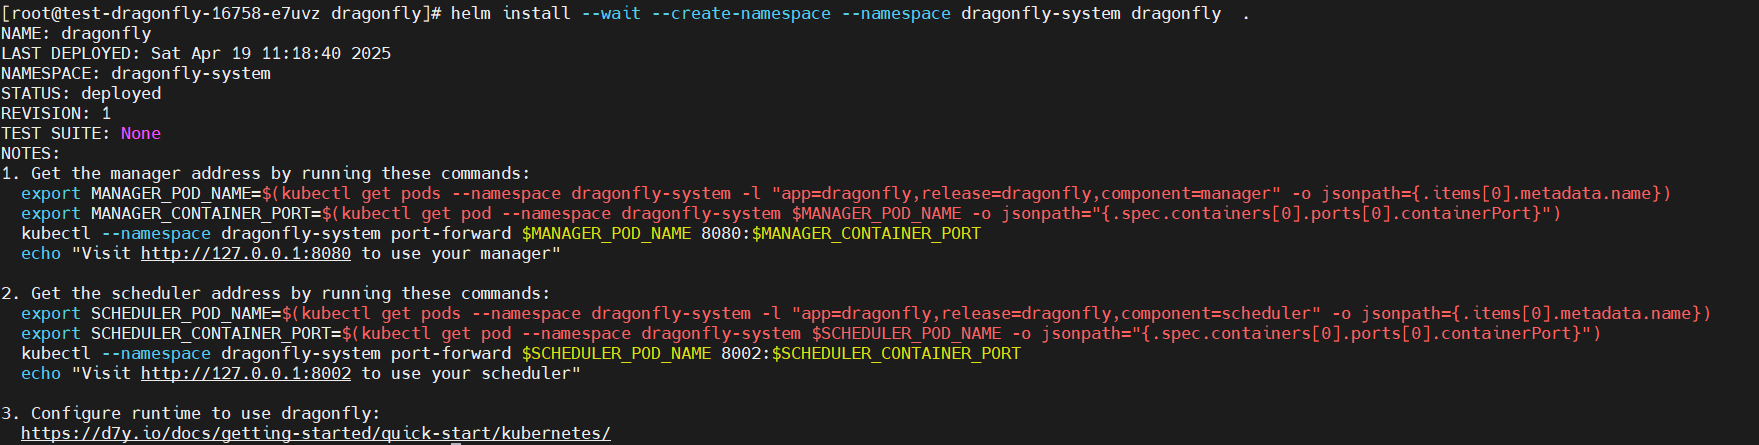
helm install --wait --create-namespace --namespace dragonfly-system dragonfly .

If the installation fails, uninstall the Dragonfly and install it again. After the uninstallation, you need to clear the Dragonfly-related PVCs for your cluster. If the PVCs are not deleted, the next Dragonfly reinstallation will fail. The uninstallation command is as follows:
helm uninstall --namespace dragonfly-system dragonfly
- Wait for several minutes until information similar to the following is displayed (indicating all Dragonfly components are running normally):
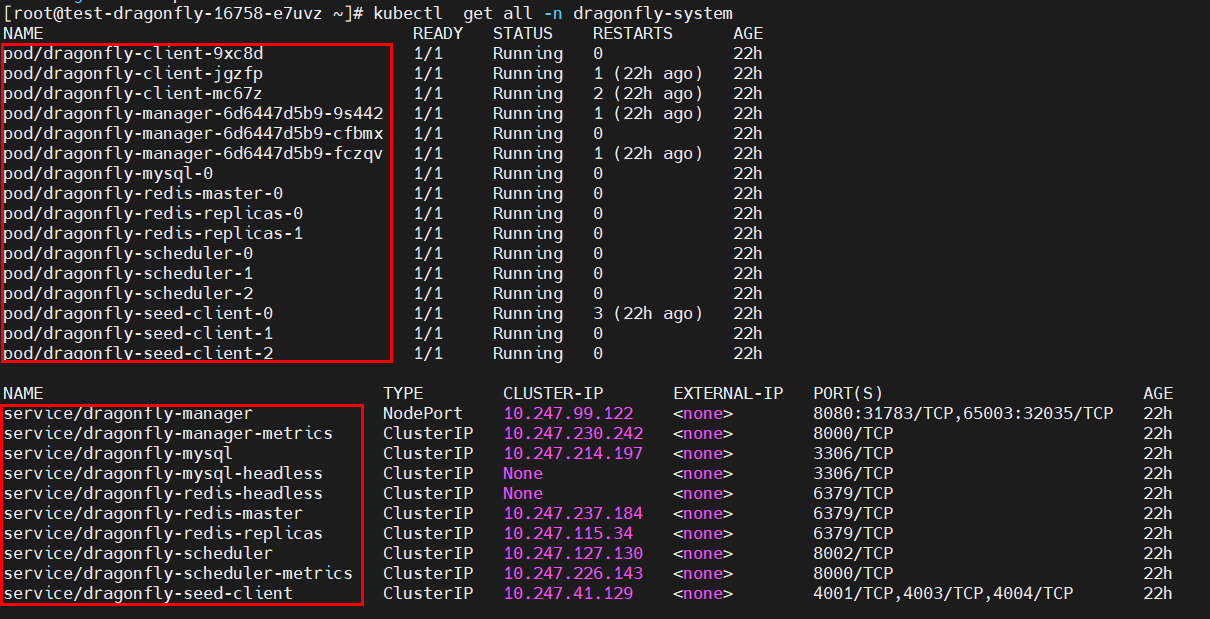

dragonfly-client indicates each Peer in the architecture diagram, and dragonfly-seed-client indicates each Seed Peer.
After the deployment is complete, some Services, such as dragonfly-manager and dragon-mysql, are created. The dragonfly-manager Service needs to be exposed to users on the console.
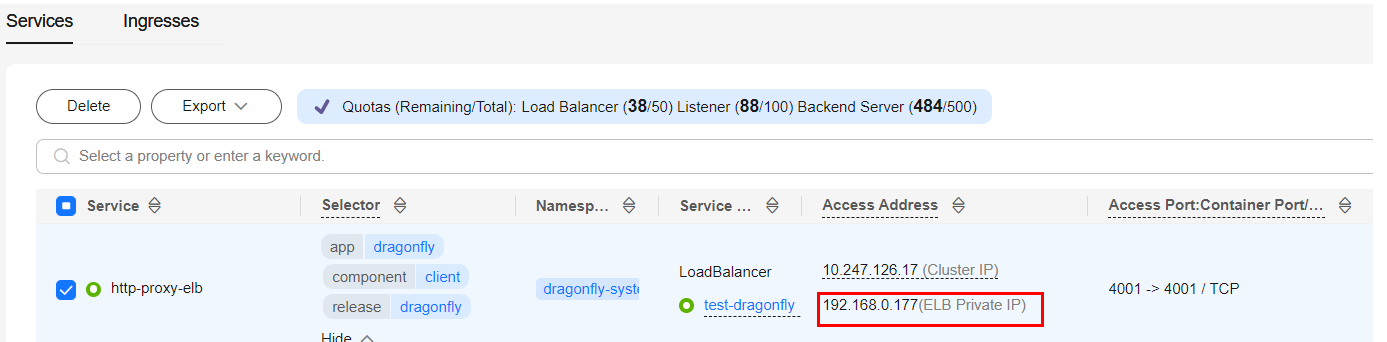
- Wait until all pods are running and then create a LoadBalancer Service for the DaemonSet named dragonfly-client in the cluster. Set both Container Port and Service Port to 4001 so that traffic is forwarded to port 4001 of each dragonfly-client pod. Record the load balancer private IP address in the Access Address column (192.168.0.177:4001 in this example) of the LoadBalancer Service. This address will be used as the proxy address of the Docker or containerd client.
- Go to the Dragonfly directory generated after the Helm chart package is decompressed and run the following command:
- Log in to the CCE console, access your cluster, and choose Services in the navigation pane. Update the access type of the dragonfly-manager Service to NodePort so that the Service can be accessed externally.

Access <node-IP-address>:<node-port>. The node port in this example is 8080.
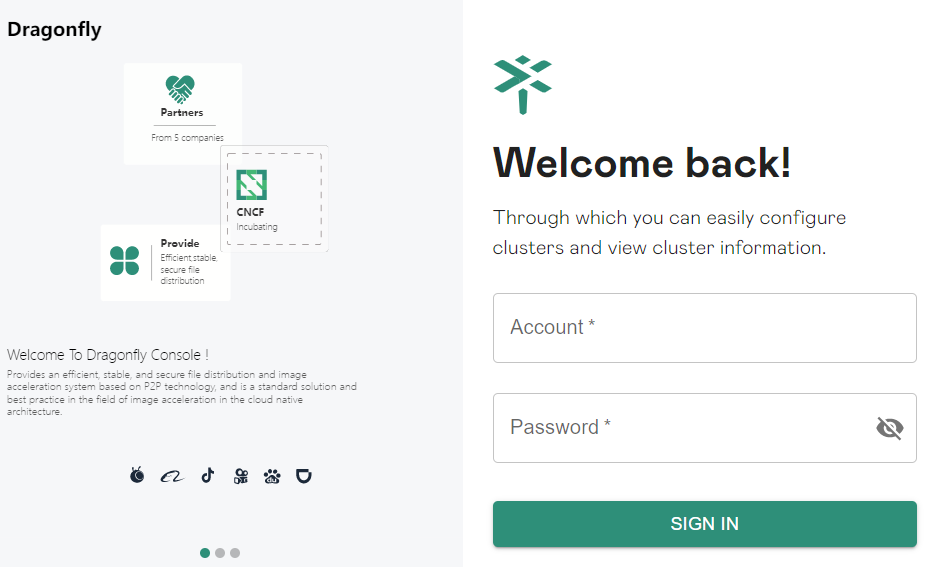
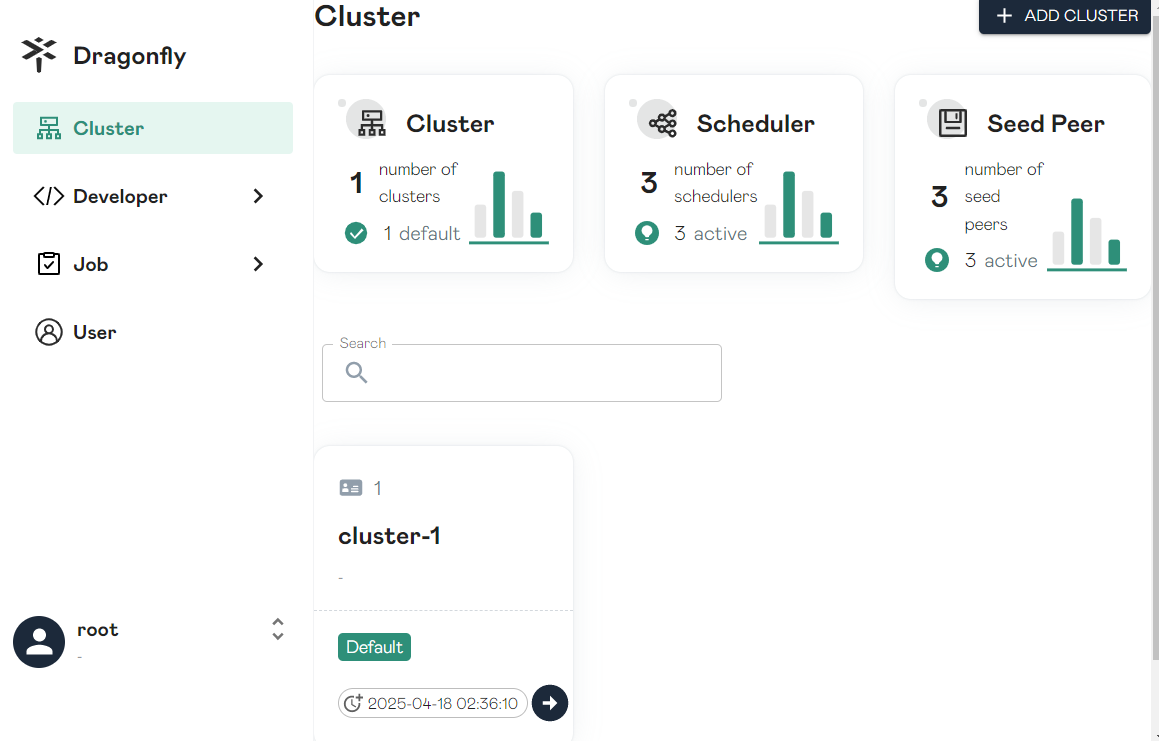
The preset username is root and the preset password is dragonfly. You can view the information about each component and job on the console.
Now, Dragonfly has been deployed and port 4001 of dragonfly-client has been exposed as the HTTP proxy port through the LoadBalancer Service.
Verifying that Images Can Be Pulled Using Dragonfly
You have set up a Dragonfly cluster and created a LoadBalancer Service (whose access address is 192.168.0.177:4001 in this example) to expose dragonfly-client. Now, you can use this Service to receive the traffic from the containerd client and Docker client to Dragonfly.
- Configure the containerd client to connect to Dragonfly through an HTTP proxy.
When configuring the proxy, pay special attention NO_PROXY. You are advised to configure all requests in NO_PROXY except image pull requests. This prevents network access exceptions or even service exceptions.
- Edit the http-proxy.conf file in the /etc/systemd/system/containerd.service.d/ directory. If this directory does not exist, manually create it.
vim /etc/systemd/system/containerd.service.d/http-proxy.conf
- Copy the following content to the http-proxy.conf file and change 192.168.0.177:4001 to the address recorded in 3.c (the HTTP proxy forwards the traffic for pulling images to Dragonfly):
[Service]
Environment="HTTP_PROXY=http://192.168.0.177:4001"
Environment="HTTPS_PROXY=http://192.168.0.177:4001"
Environment="NO_PROXY=localhost,127.0.0.1,127.0.0.0/8,.cluster.local,.svc"
- Edit the http-proxy.conf file in the /etc/systemd/system/containerd.service.d/ directory. If this directory does not exist, manually create it.
- Ignore the certificate verification.
- If no HTTPS certificate is configured for Dragonfly, edit the containerd configuration file config.toml to ignore the certificate verification.
vim /etc/containerd/config.toml
Copy the following content to the config.toml file (replace test-uvpv1j.swr-pro.myhuaweicloud.com/library/busybox:latest with the address of the target image):
[plugins."io.containerd.grpc.v1.cri".registry.configs]
  [plugins."io.containerd.grpc.v1.cri".registry.configs."test-uvpv1j.swr-pro.myhuaweicloud.com".tls]
        insecure_skip_verify = true
- If a valid HTTPS certificate has been configured for Dragonfly, skip this step.
- If no HTTPS certificate is configured for Dragonfly, edit the containerd configuration file config.toml to ignore the certificate verification.
- Restart containerd and pull the image.
systemctl daemon-reload  &&  systemctl restart containerd.service
crictl -debug pull test-uvpv1j.swr-pro.myhuaweicloud.com/library/mysql:8.0.36-debian-12-r10
Replace test-uvpv1j.swr-pro.myhuaweicloud.com/library/busybox:latest in the crictl -debug pull command with the address of the target image.
If you verify the image repeatedly, you need to delete the image that has been pulled locally. If the image to be pulled already exists locally, the image will not be pulled again.
crictl rmi test-uvpv1j.swr-pro.myhuaweicloud.com/library/mysql:8.0.36-debian-12-r10
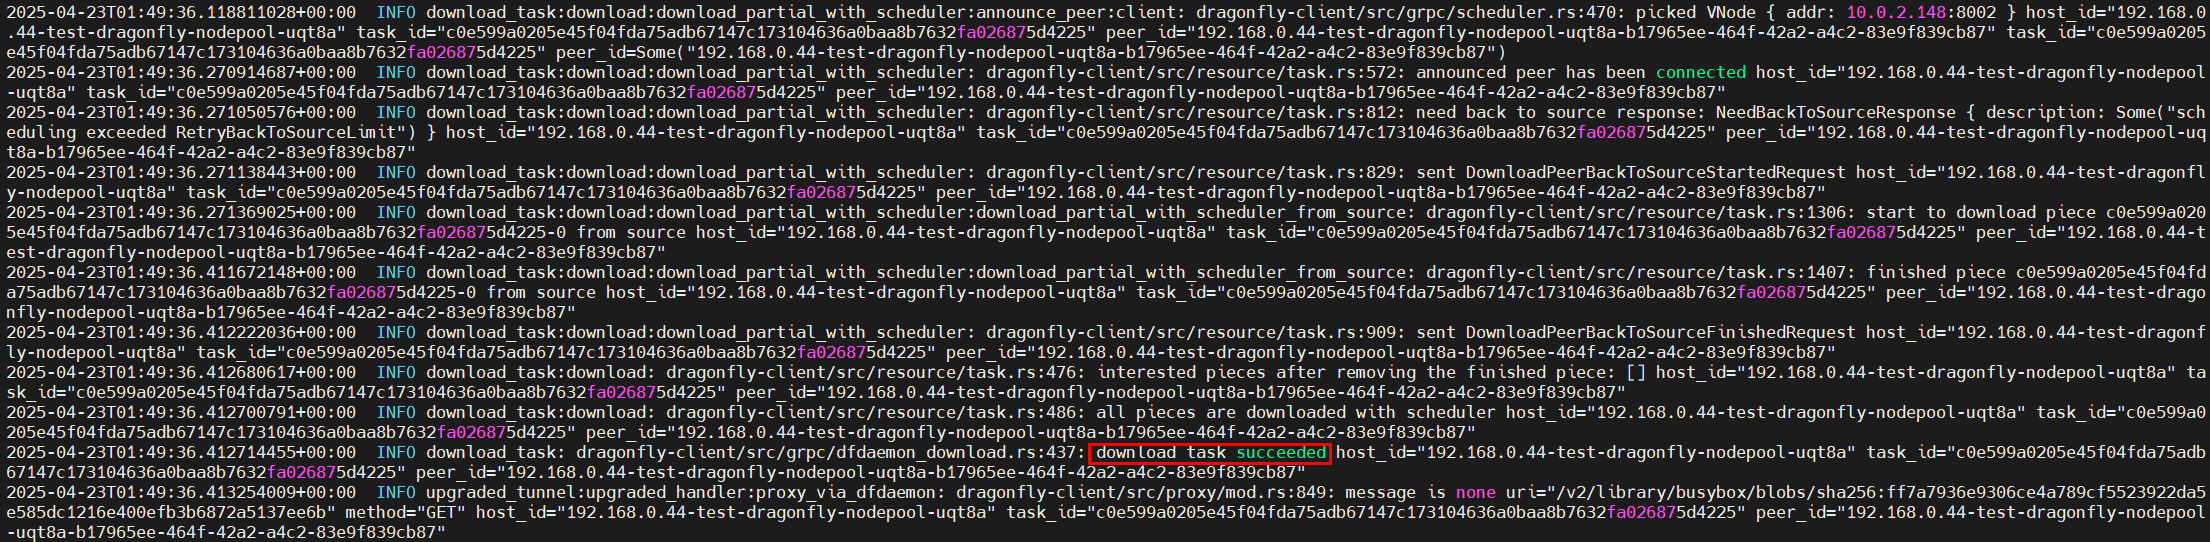
- Log in to the CCE console, access your cluster, and choose Workloads in the navigation pane. On the DaemonSets tab, locate the dragonfly-client DaemonSet and click View Log in the Operation column. If the following information is displayed, the image is successfully pulled using Dragonfly.

- Configure the Docker client to connect to Dragonfly through an HTTP proxy.
When configuring the proxy, pay special attention NO_PROXY. You are advised to configure all requests in NO_PROXY except image pull requests. This prevents network access exceptions or even service exceptions.
- Edit the http-proxy.conf file in the /etc/systemd/system/docker.service.d/ directory. If this directory does not exist, manually create it.
vim /etc/systemd/system/docker.service.d/http-proxy.conf
- Copy the following content to the http-proxy.conf file and change 192.168.0.177:4001 to the address recorded in 3.c (the HTTP proxy forwards the traffic for pulling images to Dragonfly):
[Service]
Environment="HTTP_PROXY=http://192.168.0.177:4001"
Environment="HTTPS_PROXY=http://192.168.0.177:4001"
Environment="NO_PROXY=localhost,127.0.0.1,127.0.0.0/8,.cluster.local,.svc"
- Edit the http-proxy.conf file in the /etc/systemd/system/docker.service.d/ directory. If this directory does not exist, manually create it.
- Ignore the certificate verification.
- If no HTTPS certificate is configured for Dragonfly, edit /etc/docker/daemon.json and set insecure-registries to the domain name of the target image repository.
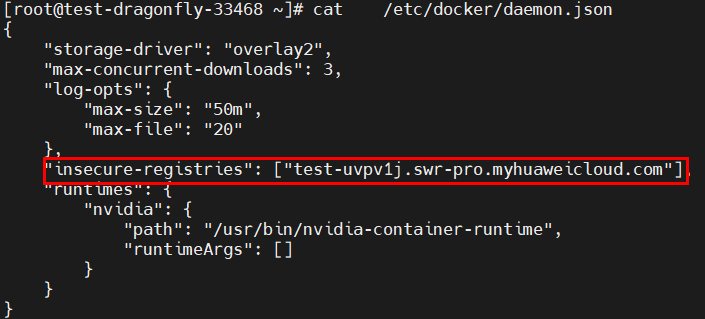
- If a valid HTTPS certificate has been configured for Dragonfly, skip this step.
- If no HTTPS certificate is configured for Dragonfly, edit /etc/docker/daemon.json and set insecure-registries to the domain name of the target image repository.
- Restart Docker and pull the image.
systemctl daemon-reload && systemctl restart docker.service
docker pull  test-uvpv1j.swr-pro.myhuaweicloud.com/library/busybox:latest
Replace test-uvpv1j.swr-pro.myhuaweicloud.com/library/busybox:latest in the docker pull command with the address of the target image.
If you verify the image repeatedly, you need to delete the image that has been pulled locally. If the image to be pulled already exists locally, the image will not be pulled again.
docker rmi test-uvpv1j.swr-pro.myhuaweicloud.com/library/busybox:latest
- Log in to the CCE console, access your cluster, and choose Workloads in the navigation pane. On the DaemonSets tab, locate the dragonfly-client DaemonSet and click View Log in the Operation column. If the following information is displayed, the image is successfully pulled using Dragonfly.
Reference
Feedback
Was this page helpful?
Provide feedbackThank you very much for your feedback. We will continue working to improve the documentation.See the reply and handling status in My Cloud VOC.
For any further questions, feel free to contact us through the chatbot.
Chatbot


