
Solution Overview
You can use SecMaster to collect security logs on and off the cloud, as well as transfer security logs from SecMaster to a third-party system and product.
| Scenario | Operation Guide |
|---|---|
| Enabling SecMaster to collect logs on Huawei Cloud | For details, see Enabling Log Access. |
| Enabling SecMaster to transfer logs from SecMaster to a third-party system or product | Refer to the procedure in this guide. |
| Enabling SecMaster to collect security logs off Huawei Cloud | Refer to the procedure in this guide. |
Log Collection Principles
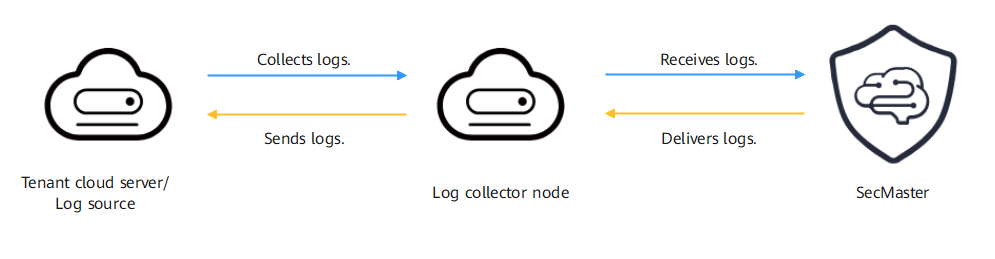
The log collector node works as an intermediate node. It collects, uploads, and delivers logs between SecMaster and the tenant server.
Basic Concepts
This part describes basic concepts and functions of the log collection.
- Log collection component Logstash: collects and transfers logs.
- Component controller (isap-agent): manages log collection component Logstash and other components.
- Log collector node: collects logs, transfers logs to SecMaster, and transfers logs out of SecMaster.
A log collector node is an ECS with the SecMaster component controller installed. The component controller has the log collection component installed. Only one log collector node is required for a tenant.
Figure 2 Architecture of the log collector node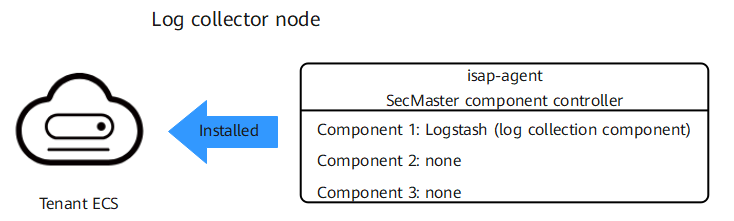
- Collector: custom Logstash. A collector node is a custom combination of Logstash+ component controller (isap-agent).
- Connector: A connector is a basic element for Logstash. It defines the way Logstash receives source data and the standards it follows during the process. Each connector has a source end and a destination end. Source ends and destination ends are used for data inputs and outputs, respectively. The SecMaster pipeline is used for log data transmission between SecMaster and your devices.
- Parser: A parser is a basic element for configuring custom Logstash. Parsers mainly work as filters in Logstash. SecMaster preconfigures varied types of filters and provides them as parsers. In just a few clicks on the SecMaster console, you can use parsers to generate native scripts to set complex filters for Logstash. In doing this, you can convert raw logs to the format you need.
- Collection channel: A collection channel is equivalent to a Logstash pipeline. Multiple pipelines can be configured in Logstash. Each pipeline consists of the input, filter, and output parts. Pipelines work independently and do not affect each other. You can deploy a pipeline for multiple nodes. A pipeline is considered one collection channel no matter how many nodes it is configured for.
Transmission Protocols and Log Formats Supported
| Scenario | Protocol | Log Format |
|---|---|---|
| Integrating logs into SecMaster | TCP | JSON, syslog, and plain |
| UDP | JSON, syslog, and plain | |
| OBS | JSON and plain | |
| Kafka | JSON and plain | |
| SecMaster | JSON and plain | |
| ElasticSearch CSS | JSON and plain | |
| Transferring logs out from SecMaster | TCP | json |
| UDP | json | |
| Kafka | json | |
| OBS | json | |
| SecMaster | json |
OSs Supported by the Data Collector
| OS | ECS OS Version You Can Select When Buying an ECS |
|---|---|
| EulerOS 2.9 (x86/Arm) | Public-CAD-EulerOS-BaseTemplate-2.9.x-x86_64/arm64-Standard |
| Huawei Cloud EulerOS 2.0 (x86/Arm) | Huawei Cloud EulerOS 2.0 x86_64/arm64-Standard |
Feedback
Was this page helpful?
Provide feedbackThank you very much for your feedback. We will continue working to improve the documentation.See the reply and handling status in My Cloud VOC.
For any further questions, feel free to contact us through the chatbot.
Chatbot


