
Migrating MySQL Data to MRS Hive with CDM
Scenarios
Cloud Data Migration (CDM) is an efficient and easy-to-use service for batch data migration. Leveraging cloud-based big data migration and intelligent data lake solutions, CDM offers user-friendly functions for migrating data and integrating diverse data sources into a unified data lake. These capabilities simplify the complexities of data source migration and integration, significantly enhancing efficiency.
Hive partitions are implemented by using the HDFS subdirectory function. Each subdirectory contains the column names and values of each partition. If there are multiple partitions, there are many HDFS subdirectories. It is not easy to load external data to each partition of the Hive table without using tools.
With the Cloud Data Migration (CDM) service, you can easily load data of the external data sources (relational databases, object storage services, and file system services) to Hive partitioned tables.
This practice demonstrates how to use CDM to import MySQL data to the partitioned Hive table in an MRS cluster. The process is as follows.
Solution Architecture
Figure 1 shows the solution for migrating MySQL data to the MRS cluster with CDM.

Prerequisites
- You have purchased an MRS cluster that contains the Hive service.
- You have obtained the IP address, port, database name, username, and password for connecting to the MySQL database. In addition, the user must have the read and write permissions on the MySQL database.
- You have uploaded the MySQL database driver by referring to Managing Drivers.
Creating a Hive Partitioned Table on MRS Hive
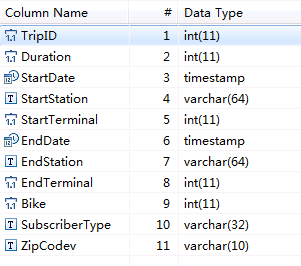
- Assume that there is the trip_data table in the MySQL database. The table stores cycling activity records such as the start time, end time, start sites, end sites, and rider IDs.
For details about the fields in the trip_data table, see Figure 2.
- On the MRS Hive client, run the following SQL statement to create a partitioned Hive table named trip_data with three new fields y, ym, and ymd used as partition fields.
The SQL statement is as follows:
1create table trip_data(TripID int,Duration int,StartDate timestamp,StartStation varchar(64),StartTerminal int,EndDate timestamp,EndStation varchar(64),EndTerminal int,Bike int,SubscriberType varchar(32),ZipCodev varchar(10))partitioned by (y int,ym int,ymd int);

- The trip_data table has three partition fields: year, year and month, and year, month, and date of the start time of a ride.
For example, if the start time of a ride is 2018/5/11 9:40, the record is saved in the trip_data/2018/201805/20180511 partition.
- When the records in the trip_data table are summarized, only part of the data needs to be scanned, greatly improving the performance.
- The trip_data table has three partition fields: year, year and month, and year, month, and date of the start time of a ride.
Creating a CDM Cluster and Binding an EIP to the Cluster
- If CDM is deployed as an independent service, create a CDM cluster by referring to Creating a CDM Cluster. If it is deployed as a component of the DataArts Studio service, create a CDM cluster by referring to Creating a CDM Cluster.
The key configurations are as follows:
- The flavor of the CDM cluster is selected based on the amount of data to be migrated. Generally, cdm.medium meets the requirements for most migration scenarios.
- The VPC, subnet, and security group of the CDM cluster must be the same as those of the MRS cluster.
- After the CDM cluster is created, on the Cluster Management page, click Bind Elastic IP in the Operation column to bind an EIP to the cluster. The CDM cluster uses the EIP to access MySQL.
Figure 3 Cluster list

If SSL encryption is configured for the access channel of a local data source, CDM cannot connect to the data source using the EIP.
Creating a MySQL Link
- On the Cluster Management page of CDM, click Job Management in the Operation column of the CDM cluster. On the displayed page, click the Links tab and then Create Link.
Figure 4 Selecting a connector

- Select MySQL and click Next. On the page that is displayed, configure MySQL link parameters.
You can click Show Advanced Attributes for more optional parameters. For details, see Link to Relational Databases. For this example, retain the default values of the optional parameters and configure the mandatory parameters according to Table 1.
Table 1 MySQL link parameters Parameter
Description
Example Value
Name
Enter a unique link name.
mysqllink
Database Server
IP address or domain name of the MySQL database
192.168.1.110
Port
MySQL database port
3306
Database Name
Name of the MySQL database
sqoop
Username
User who has the read, write, and delete permissions on the MySQL database
admin
Password
Password of the user
-
Use Agent
Whether to extract data from the data source through an agent
Yes
Agent
Click Select and select the created agent.
-
- Click Save. The Links page is displayed.
If an error occurs during the saving, the security settings of the MySQL database are incorrect. In this case, you need to enable the EIP of the CDM cluster to access the MySQL database.
Creating a Hive Link
- On the Links page, click Create Link and select MRS Hive to create an MRS Hive link.
- Click Next and configure the MRS Hive link parameters. See Figure 5.
Table 2 describes the parameters. You can configure the parameters as required.
Table 2 MRS Hive link parameters Parameter
Description
Example Value
Name
Link name, which should be defined based on the data source type, so it is easier to remember what the link is for
hivelink
Manager IP
Floating IP address of MRS Manager. Click Select next to the Manager IP text box to select an MRS cluster. CDM automatically fills in the authentication information.
127.0.0.1
Authentication Method
Authentication method used for accessing MRS- SIMPLE: Select this for non-security mode.
- KERBEROS: Select this for security mode.
SIMPLE
HIVE Version
Hive version. Set it to the Hive version on the server.
HIVE_3_X
Username
If Authentication Method is set to KERBEROS, you must provide the username and password used for logging in to MRS Manager. If you need to create a snapshot when exporting a directory from HDFS, the user configured here must have the administrator permission on HDFS.
To create a data link for an MRS security cluster, do not use user admin. The admin user is the default management page user and cannot be used as the authentication user of the security cluster. You can create an MRS user and set Username and Password to the username and password of the created MRS user when creating an MRS data link.NOTE:- If the CDM cluster version is 2.9.0 or later and the MRS cluster version is 3.1.0 or later, the created user must have the permissions of the Manager_viewer role to create links on CDM. To perform operations on databases, tables, and data of a component, you also need to add the user group permissions of the component to the user.
- If the CDM cluster version is earlier than 2.9.0 or the MRS cluster version is earlier than 3.1.0, the created user must have the permissions of Manager_administrator or System_administrator to create links on CDM.
- A user with only the Manager_tenant or Manager_auditor permission cannot create links.
cdm
Password
Password used for logging in to MRS Manager
-
OBS storage support
The server must support OBS storage. When creating a Hive table, you can store the table in OBS.
No
Run Mode
This parameter is used only when the Hive version is HIVE_3_X. Possible values are:- EMBEDDED: The link instance runs with CDM. This mode delivers better performance.
- Standalone: The link instance runs in an independent process. If CDM needs to connect to multiple Hadoop data sources (MRS, Hadoop, or CloudTable) with both Kerberos and Simple authentication modes, select STANDALONE or configure different agents.
Note: The STANDALONE mode is used to solve the version conflict problem. If the connector versions of the source and destination ends of the same data link are different, a JAR file conflict occurs. In this case, you need to place the source or destination end in the STANDALONE process to prevent the migration failure caused by the conflict.
EMBEDDED
Use Cluster Config
You can use the cluster configuration to simplify parameter settings for the Hive link.
No
Cluster Config Name
This parameter is valid only when Use Cluster Config is set to Yes. Select a cluster configuration that has been created.
For details, see Managing Cluster Configurations.
hive_01
- Click Save. The Links page is displayed.

Creating a Migration Job
- On the Cluster Management page, locate the row containing the desired cluster, and click Job Management in the Operation column. On the page that is displayed, click the Table/File Migration tab and then Create Job to create a data migration job. See Figure 6.
Set Clear Data Before Import to Yes so that the data that has been imported to the Hive table is cleared each time before data is imported.
- After the parameters are configured, click Next. The Map Field page is displayed, as shown in Figure 7.
Map the fields of the MySQL table and Hive table. The Hive table has three more fields y, ym, and ymd than the MySQL table, which are the Hive partition fields. Because the fields of the source table cannot be directly mapped to the destination table, you need to configure an expression to extract data from the StartDate field in the source table.
- Click
 to display the Converter List dialog box, and then choose .
The expressions for the y, ym, and ymd fields are as follows:
DateUtils.format(DateUtils.parseDate(row[2],"yyyy-MM-dd HH:mm:ss.SSS"),"yyyy")
DateUtils.format(DateUtils.parseDate(row[2],"yyyy-MM-dd HH:mm:ss.SSS"),"yyyyMM")
DateUtils.format(DateUtils.parseDate(row[2],"yyyy-MM-dd HH:mm:ss.SSS"),"yyyyMMdd")
CDM expressions have built-in ability to convert fields of common strings, dates, and numbers. For details, see Field Conversion.
- Click Next to set task parameters. Generally, retain the default values for all parameters.
In this step, you can configure the following optional functions:
- Retry Upon Failure: If the job fails to be executed, you can determine whether to automatically retry. Retain the default value Never.
- Group: Select the group to which the job belongs. The default group is DEFAULT. On the Job Management page, jobs can be displayed, started, or exported by group.
- Scheduled Execution: For details about how to configure scheduled execution, see Scheduling Job Execution. Retain the default value No.
- Concurrent Extractors: Enter the number of extractors to be concurrently executed. Retain the default value 1.
- Write Dirty Data: Specify this parameter if data that fails to be processed or filtered out during job execution needs to be written to OBS for future viewing. Before writing dirty data, create an OBS link. Retain the default value No so that dirty data is not recorded.
- Delete Job After Completion: Retain the default value Do not delete.
- Click Save and Run. The Job Management page is displayed, on which you can view the job execution progress and result.
- After the job is successfully executed, in the Operation column of the job, click Historical Record to view the job's historical execution records and read/write statistics.
On the Historical Record page, click Log to view the job logs.


Feedback
Was this page helpful?
Provide feedbackThank you very much for your feedback. We will continue working to improve the documentation.See the reply and handling status in My Cloud VOC.
For any further questions, feel free to contact us through the chatbot.
Chatbot


