Migrating Data from Hadoop to MRS with CDM
Scenarios
Cloud Data Migration (CDM) is an efficient and easy-to-use service for batch data migration. Leveraging cloud-based big data migration and intelligent data lake solutions, CDM offers user-friendly functions for migrating data and integrating diverse data sources into a unified data lake. These capabilities simplify the complexities of data source migration and integration, significantly enhancing efficiency.
This section describes how to migrate data from Hadoop clusters in an on-premises IDC or on a public cloud to Huawei Cloud MRS. The data volume can be tens of TBs or less.
Solution Architecture
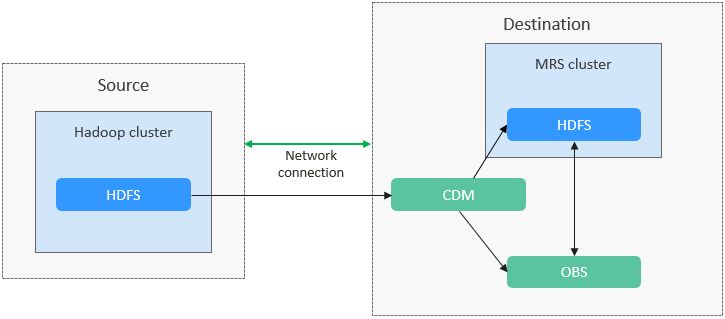
CDM supports both full and incremental file migration. Full migration is implemented by copying files. You can implement incremental migration by setting Duplicate File Processing Method to Skip.
- Full migration
- Create two links on CDM to connect HDFS of the source cluster and the HDFS or OBS file system of Huawei Cloud MRS.
- Create a full migration job on CDM, configure source and destination parameters, and start the job.
- Incremental migration
- Create a migration job on CDM again. When configuring destination parameters, select Skip for Duplicate File Processing Method.
- Start the migration job.
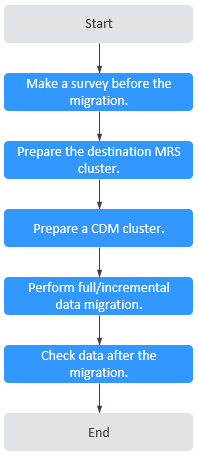
The process for using CDM to migrate Hadoop data to an MRS cluster is as follows.
Solution Advantages
- Easy-to-use: The wizard-based development interface frees you from programming but helps you develop migration tasks by simple configurations in minutes.
- High migration efficiency: The performance of data migration and transmission is enhanced based on the distributed computing framework. Data write performance of specific data sources is optimized to improve data migration efficiency.
- Real-time monitoring: During the migration, automatic real-time monitoring, alarms, and notifications can be performed.
Impact on the System
- During the migration, data inconsistency may occur if the changes on the HDFS files in the source cluster are not timely synchronized to the destination cluster.
You can use the verification tool to identify inconsistent data, and migrate or add the data.
- The migration may cause the performance of the source cluster to deteriorate, increasing the response time of source services. It is recommended that you migrate data during off-peak hours and properly configure resources, including compute, storage, and network resources, in the source cluster to ensure that the cluster can handle the migration workloads.
Migration Survey
Before migrating HDFS data, you need to conduct a survey on the source HDFS component to evaluate the product compatibility, risks that may occur during the migration, and impact on the system. For details, see Table 1.
|
No. |
Survey Item |
Survey Question |
|---|---|---|
|
1 |
Version compatibility |
What is the HDFS cluster version? |
|
2 |
Total capacity |
What is the total storage capacity required by the user? (Planned total disk capacity = Estimated capacity x Number of replicas) |
|
3 |
Total data volume |
How much data is processed by HDFS? |
|
4 |
Number of files |
How many files are stored on HDFS? |
|
5 |
Number of replicas |
What is the number of replicas? It is three by default, and can be changed if required. |
|
6 |
Percentage of small files |
What is the approximate distribution of large and small files? (Percentage of small files and percentage of large files. Files smaller than 128 MB are considered small files.) |
|
7 |
Number of reads/writes |
What are the peak reads/writes per second? (11,000 reads/second and 3,000 writes/second on a single node) |
|
8 |
Throughput |
What is the peak read/write throughput per second? (100 MB/s per node) |
Networking Types
The migration solution supports various networking types, such as the public network, VPN, and Direct Connect. Select a networking type based on the site requirements. The migration can be performed only when the source and destination networks can communicate with CDM.
|
Migration Network Type |
Advantage |
Disadvantage |
|---|---|---|
|
Direct Connect |
|
|
|
VPN |
|
|
|
Public IP address |
|
|
Notes and Constraints
- Migrating a large volume of data has high requirements on network communication. When a migration task is executed, other services may be adversely affected. You are advised to migrate data during off-peak hours.
- Data attributes, such as the owner, ACL, and checksum, cannot be migrated using CDM.
- This section uses Huawei Cloud CDM 2.9.2.200 as an example to describe how to migrate data. The operations may vary depending on the CDM version. For details, see the operation guide of the required version.
- For details about the data sources supported by CDM, see Supported Data Sources. If the data source is Apache HDFS, the recommended version is 2.8.X or 3.1.X. Before performing the migration, ensure that the data source supports migration.
Creating a Data Connection
- Log in to the CDM console.
- Create a CDM cluster. The security group, VPC, and subnet of the CDM cluster must be the same as those of the destination cluster to ensure that the CDM cluster can communicate with the MRS cluster.
- On the Cluster Management page, locate the row containing the desired cluster and click Job Management in the Operation column.
- On the Links tab page, click Create Link.
- Create two HDFS links, one to the source cluster and the other to the destination cluster. For details, see Creating a Link Between CDM and a Data Source.
Set the connector type based on the actual cluster. For an MRS cluster, select MRS HDFS. For a self-built cluster, select Apache HDFS.
Figure 3 HDFS link
Creating a Migration Job
- On the Table/File Migration tab page, click Create Job.
- Select the source and destination links.
- Job Name: Enter a custom job name, which can contain 1 to 256 characters consisting of letters, underscores (_), and digits.
- Source Link Name: Select the HDFS link of the source cluster. Data is exported from this link when the job is running.
- Destination Link Name: Select the HDFS link of the destination cluster. Data is imported to this link when the job is running.
- Configure source job parameters by referring to From HDFS. You can set Directory Filter and File Filter to specify the directories and files to be migrated.

- If you use CDM to perform full data migration, select REPLACE for Duplicate File Processing Method in the Destination Job Configuration area.
- If you use CDM to perform incremental data migration, select Skip for Duplicate File Processing Method in the Destination Job Configuration area.
For example, if you need to migrate files in the /user/test* folder, set File Format to Binary.Figure 4 Configuring job parameters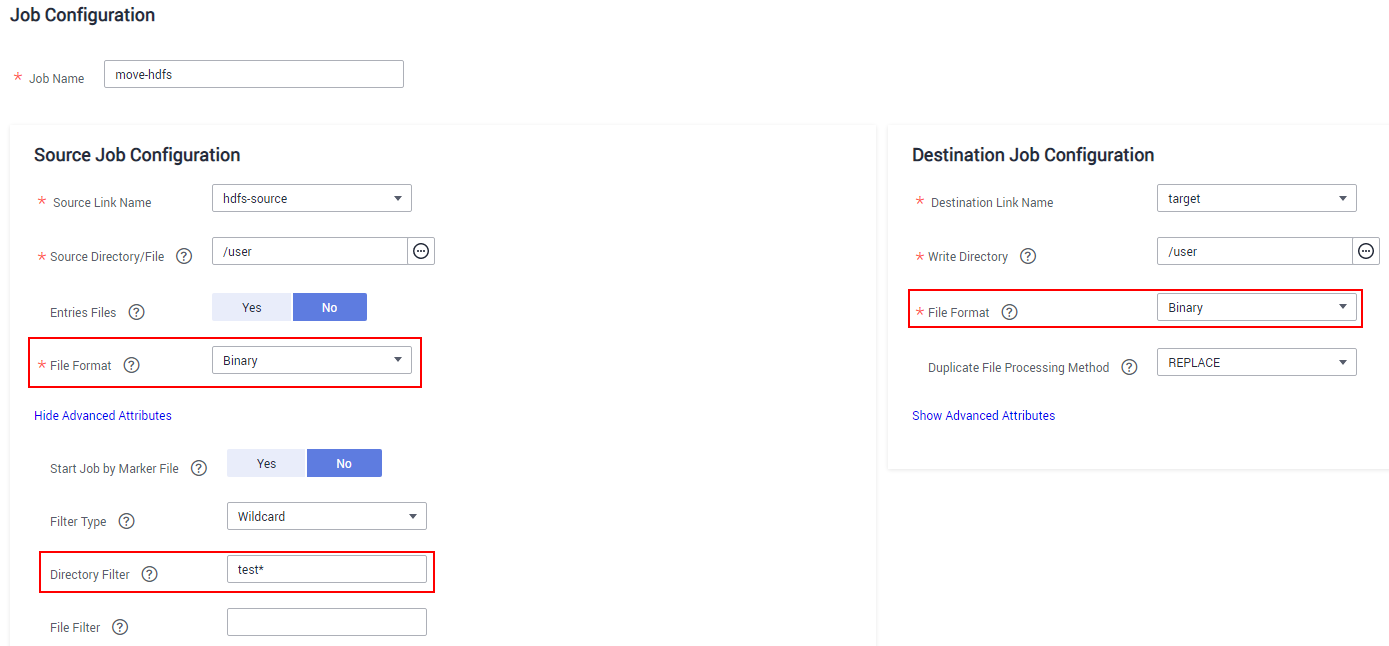
- Configure destination job parameters by referring to To HDFS.
- Click Next. The task configuration page is displayed.
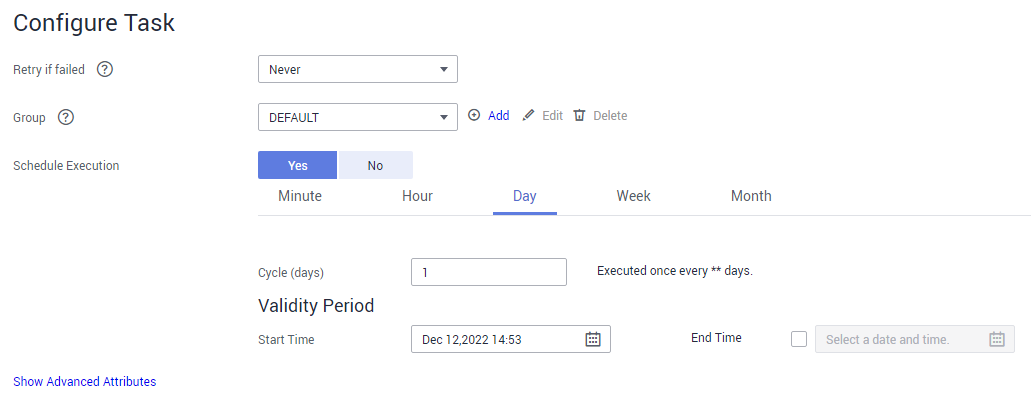
- If you need to periodically migrate new data to the destination cluster, configure a scheduled task on this page. Alternatively, you can configure a scheduled task later by referring to 3.
- If no new data needs to be migrated periodically, skip the configurations on this page and click Save.
Figure 5 Task configuration
- Choose Job Management and click the Table/File Migration tab. Click Run in the Operation column of the job to be executed to start migrating HDFS files. Wait until the job execution is complete.
Checking the Migrated Files
- Log in to the client node of the destination cluster as the client installation user.
- Run the following commands to check the files that have been migrated to the destination cluster:
cd Client installation directoryLoad environment variables.
source bigdata_env
If Kerberos authentication has been enabled for the cluster (in security mode), run the following command for user authentication. If Kerberos authentication is disabled for the cluster (in normal mode), user authentication is not required.
kinit Component service userhdfs dfs -ls -h /user/
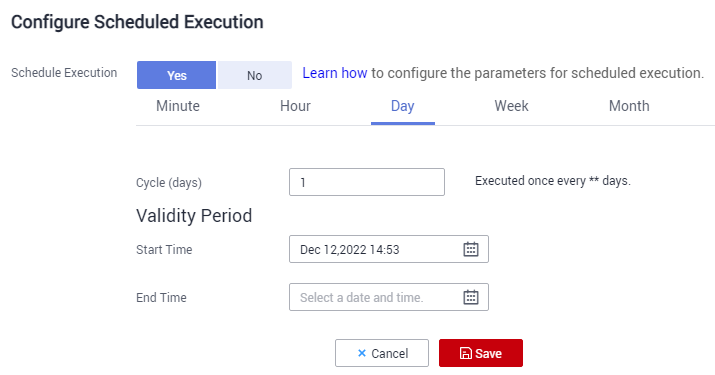
- (Optional) If new data in the source cluster needs to be periodically migrated to the destination cluster, configure a scheduled task for incremental data migration until all services are migrated to the destination cluster.
- On the Cluster Management page of the CDM console, choose Job Management and click the Table/File Migration tab.
- In the Operation column of the migration job, click More and select Configure Scheduled Execution.
- Enable the scheduled job execution function, configure the execution cycle based on service requirements, and set the end time of the validity period to the time after all services are migrated to the new cluster.
Figure 6 Configuring schedule execution
FAQs
If blocks cannot be obtained during HDFS file migration, handle the fault by referring to What Should I Do If an Error Message Is Displayed Indicating that the Block Is Missing During HDFS File Migration?
Feedback
Was this page helpful?
Provide feedbackThank you very much for your feedback. We will continue working to improve the documentation.See the reply and handling status in My Cloud VOC.
For any further questions, feel free to contact us through the chatbot.
Chatbot


