
Using Hive to Load HDFS Data and Analyze Book Scores
Application Scenarios
MRS offline processing clusters enable you to analyze and process massive amount of data as well as provide the results for later use.
Offline processing has low requirements on processing time. However, a large amount of data needs to be processed, which occupies a large number of compute and storage resources. Generally, offline processing is implemented through Hive/SparkSQL or MapReduce/Spark2x.
This practice describes how to import and analyze raw data using Hive after you create an MRS cluster and how to implement elastic and low-cost offline big data analysis.
Solution Architecture
Hive is a data warehouse built on Hadoop. It provides batch computing capability for the big data platform and is able to batch analyze and summarize structured and semi-structured data for data calculation. Hive operates structured data using Hive Query Language (HQL), a SQL-like language. HQL is automatically converted into MapReduce tasks for the query and analysis of massive data in the Hadoop cluster.
Hive is able to:
- Analyze massive structured data and summarizes analysis results.
- Allow complex MapReduce jobs to be compiled in SQL languages.
- Support flexible data storage formats, including JavaScript object notation (JSON), comma-separated values (CSV), TextFile, RCFile, SequenceFile, and ORC.
Hive functions as a data warehouse based on HDFS and MapReduce architecture and translates HQL statements into MapReduce jobs or HDFS operations.

- Metastore: reads, writes, and updates metadata such as tables, columns, and partitions. Its lower layer is relational databases.
- Driver: manages the lifecycle of HQL execution and participates in the entire Hive job execution.
- Compiler: translates HQL statements into a series of interdependent Map or Reduce jobs.
- Optimizer: is classified into logical optimizer and physical optimizer to optimize HQL execution plans and MapReduce jobs, respectively.
- Executor: runs Map or Reduce jobs based on job dependencies.
- ThriftServer: functions as the servers of JDBC, provides Thrift APIs, and integrates with Hive and other applications.
- Clients: include the web UI and JDBC APIs and provides APIs for user access.
Procedure
In this practice, we use user comments from a book website as raw data. The data is then imported into a Hive table, where you can run SQL queries to find popular books.
The operation process is as below:
Creating an MRS Offline Query Cluster
- Go to the Buy Cluster page.
- Click the Quick Config tab and set the configuration parameters. The following takes Pay-per-use as an example.
Table 1 Software parameters (for reference only) Parameter
Description
Example Value
Billing Mode
Billing mode of the cluster.
Pay-per-use
Region
Region where the MRS resources belong.
MRS clusters in different regions cannot communicate with each other over an intranet. For lower network latency and quick resource access, select the region nearest to you.
CN-Hong Kong
Cluster Name
Name of the MRS cluster.
MRS_demo
Cluster Type
Type of the cluster.
Custom
Version Type
Version type of the MRS cluster.
Normal
Cluster Version
MRS cluster version.
MRS 3.1.0
Component
Components in the MRS cluster.
Hadoop Analysis Cluster
AZ
Available AZ associated with the cluster region.
AZ1
VPC
VPC where you want to create the cluster. You can click View VPC to view the name and ID. If no VPC is available, create one.
vpc-01
Subnet
Subnet where your cluster belongs. You can access the VPC management console to view the names and IDs of existing subnets in the VPC. If no subnet is created under the VPC, click Create Subnet to create one.
subnet-01
Cluster Nodes
Cluster node details.
Default settings
Kerberos Authentication
Whether to enable Kerberos authentication when logging in to Manager.
Disabled
Username
Name of the administrator of MRS Manager. admin is used by default.
admin/root
Password
Password of the MRS Manager administrator.
Set the password for logging in to the cluster management page and ECS node, for example, Test!@12345.
Confirm Password
Enter the password of the Manager administrator again.
Enter the password again.
Enterprise Project
Enterprise project to which the cluster belongs.
default
Secure Communications
If the secure communications function is not enabled, MRS clusters cannot be created.
Select the check box.
- Click Buy Now and wait until the MRS cluster is created.
Importing Local Data to HDFS
- Obtain the book comments file book_score.txt from the background of the book website and save it on the local host.
The file contains the following fields: user ID, book ID, book score, and remarks.
Some data is as follows:202001,242,3,Good! 202002,302,3,Test. 202003,377,1,Bad! 220204,51,2,Bad! 202005,346,1,aaa 202006,474,4,None 202007,265,2,Bad! 202008,465,5,Good! 202009,451,3,Bad! 202010,86,3,Bad! 202011,257,2,Bad! 202012,465,4,Good! 202013,465,4,Good! 202014,465,4,Good! 202015,302,5,Good! 202016,302,3,Good! ...
- Log in to OBS Console, click Parallel File Systems in the navigation pane. On the displayed page, click Create Parallel File System, set the following parameters, and click Create Now.
Table 2 Parallel file system parameters Parameter
Description
Example Value
Region
Geographic area where a bucket resides.
CN-Hong Kong
Data Redundancy Policy
- Multi-AZ storage: Data is stored in multiple AZs to achieve higher reliability.
- Single-AZ storage: Data is stored in a single AZ, with lower costs.
Single-AZ storage
File System Name
Name of a file system, which must be globally unique.
mrs-hive
Policy
Read and write permission control for the file system.
Private
Direct Reading
Direct reading allows you to download objects from the Archive storage class without restoring them in advance.
Disable
Enterprise Project
Enterprise project where your bucket belongs, which facilitates unified management.
default
Tags
(Optional) Tags used to identify and classify buckets in OBS.
-
Click the name of the created file system and click Upload File in the Files tab to upload the data file to the OBS parallel file system.
- Switch back to the MRS console and click the name of the created MRS cluster. On the Dashboard page, click Synchronize next to IAM User Sync. The synchronization takes about five minutes.
Figure 2 Synchronizing IAM users

- Upload the data file to the HDFS.
- On the Files page, click the HDFS File List and go to the data storage directory, for example, /tmp/test.
The /tmp/test directory is only an example. You can use any directory on the page or create a new one.
- Click Import Data.
- OBS Path: Select the name of the created OBS parallel file system, find the book_score.txt file, select I confirm that the selected script is secure, and I understand the potential risks and accept the possible exceptions or impacts on the cluster, and click OK.
- HDFS Path: Select the /tmp/test directory and click OK.
Figure 3 Importing data from OBS to HDFS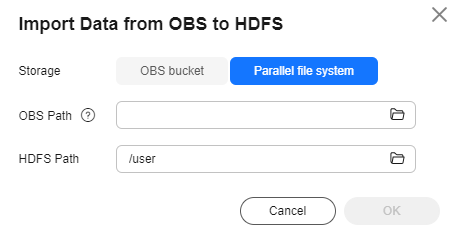
- Click OK. After the data is imported, the data file has been uploaded to HDFS of the MRS cluster.
- On the Files page, click the HDFS File List and go to the data storage directory, for example, /tmp/test.
Creating a Hive Table
- Download the cluster client, and install it, for example, in the /opt/client directory of the active master node. For details, see Installing a Client.
You can also use the cluster client provided in the /opt/Bigdata/client directory of the master node.
- Bind an EIP to the active Master node and allow port 22 in the security group. Log in to the active Master node as user root, go to the directory where the client is located, and load variables.
cd /opt/client
source bigdata_env
- Run the beeline -n'hdfs' command to go to the Hive Beeline page.
Run the following command to create a Hive table whose fields match the raw data fields:
create table bookscore (userid int,bookid int,score int,remarks string) row format delimited fields terminated by ','stored as textfile;
- Run the following command to check whether the table is successfully created:
show tables;
+------------+
|  tab_name  |
+------------+
| bookscore  |
+------------+
Importing Raw Data to Hive for Analysis
- Run the following command on Hive Beeline to import the raw data that has been imported to HDFS to the Hive table:
load data inpath '/tmp/test/book_score.txt' into table bookscore;
- After data is imported, run the following command to view content in the Hive table:
select * from bookscore;
+-------------------+-------------------+------------------+--------------------+
| bookscore.userid  | bookscore.bookid  | bookscore.score  | bookscore.remarks  |
+-------------------+-------------------+------------------+--------------------+
| 202001            | 242               | 3                | Good!              |
| 202002            | 302               | 3                | Test.              |
| 202003            | 377               | 1                | Bad!               |
| 220204            | 51                | 2                | Bad!               |
| 202005            | 346               | 1                | aaa                |
| 202006            | 474               | 4                | None               |
| 202007            | 265               | 2                | Bad!               |
| 202008            | 465               | 5                | Good!              |
| 202009            | 451               | 3                | Bad!               |
| 202010            | 86                | 3                | Bad!               |
| 202011            | 257               | 2                | Bad!               |
| 202012            | 465               | 4                | Good!              |
| 202013            | 465               | 4                | Good!              |
| 202014            | 465               | 4                | Good!              |
| 202015            | 302               | 5                | Good!              |
| 202016            | 302               | 3                | Good!              |
...
Run the following command to count the number of rows in the table:
select count(*) from bookscore;
+------+
| _c0  |
+------+
| 32   |
+------+
- Run the following command to filter the top 3 books with the highest scores in the raw data after the MapReduce task is complete:
select bookid,sum(score) as summarize from bookscore group by bookid order by summarize desc limit 3;
Finally, the following information is displayed:
...
INFO  : 2021-10-14 19:53:42,427 Stage-2 map = 0%,  reduce = 0%
INFO  : 2021-10-14 19:53:49,572 Stage-2 map = 100%,  reduce = 0%, Cumulative CPU 2.15 sec
INFO  : 2021-10-14 19:53:56,713 Stage-2 map = 100%,  reduce = 100%, Cumulative CPU 4.19 sec
INFO  : MapReduce Total cumulative CPU time: 4 seconds 190 msec
INFO  : Ended Job = job_1634197207682_0025
INFO  : MapReduce Jobs Launched:
INFO  : Stage-Stage-1: Map: 1  Reduce: 1   Cumulative CPU: 4.24 sec   HDFS Read: 7872 HDFS Write: 322 SUCCESS
INFO  : Stage-Stage-2: Map: 1  Reduce: 1   Cumulative CPU: 4.19 sec   HDFS Read: 5965 HDFS Write: 143 SUCCESS
INFO  : Total MapReduce CPU Time Spent: 8 seconds 430 msec
INFO  : Completed executing command(queryId=omm_20211014195310_cf669633-5b58-4bd5-9837-73286ea83409); Time taken: 47.388 seconds
INFO  : OK
INFO  : Concurrency mode is disabled, not creating a lock manager
+---------+------------+
| bookid  | summarize  |
+---------+------------+
| 465     | 170        |
| 302     | 110        |
| 474     | 88         |
+---------+------------+
3 rows selected (47.469 seconds)
The books whose IDs are 456, 302, and 474 are the top 3 books with the highest scores.
Feedback
Was this page helpful?
Provide feedbackThank you very much for your feedback. We will continue working to improve the documentation.See the reply and handling status in My Cloud VOC.
For any further questions, feel free to contact us through the chatbot.
Chatbot


