Procedure
Process
|
Procedure |
Description |
|---|---|
|
Preparations |
Upload the Windows Server 2019 private image created from the Windows Server 2019 image to the IMS console so that you can select the Windows Server 2019 private image when purchasing FlexusL instances. |
|
Purchase a FlexusL instance and select the Windows Server 2019 private image. |
|
|
Configure inbound rules for a security group to ensure that the FlexusL instance can be accessed. |
|
|
Set a password and log in to the FlexusL instance server. |
|
|
Set the session time and remove the session time limit to avoid repeated logins due to session timeout. |
|
|
After the preceding steps are complete, you have obtained a complete Windows Server FlexusL instance with a fixed EIP bound. You can create accounts, and open and manage stores on e-commerce websites. |
Preparations
To use the Windows Server 2019 image, create a private image from it on the IMS console first.
- If your image format is VMDK, VHD, QCOW2, VHDX, QED, VDI, QCOW, or ZVHD, see Creating a Windows System Disk Image from an External Image File.
- If your image format is ISO, see Creating a Windows System Disk Image from an ISO File.
- If your image format is RAW or ZVHD2, see Quickly Importing an Image File.

Images are regional resources. FlexusL instances only can use private images that are in the same region as them. Ensure that the image is in the same region as the FlexusL instance.
Step 1: Purchase FlexusL Instances
- Log in to the FlexusL console.
- Click Buy FlexusL.
- Configure parameters required for purchasing a FlexusL instance.
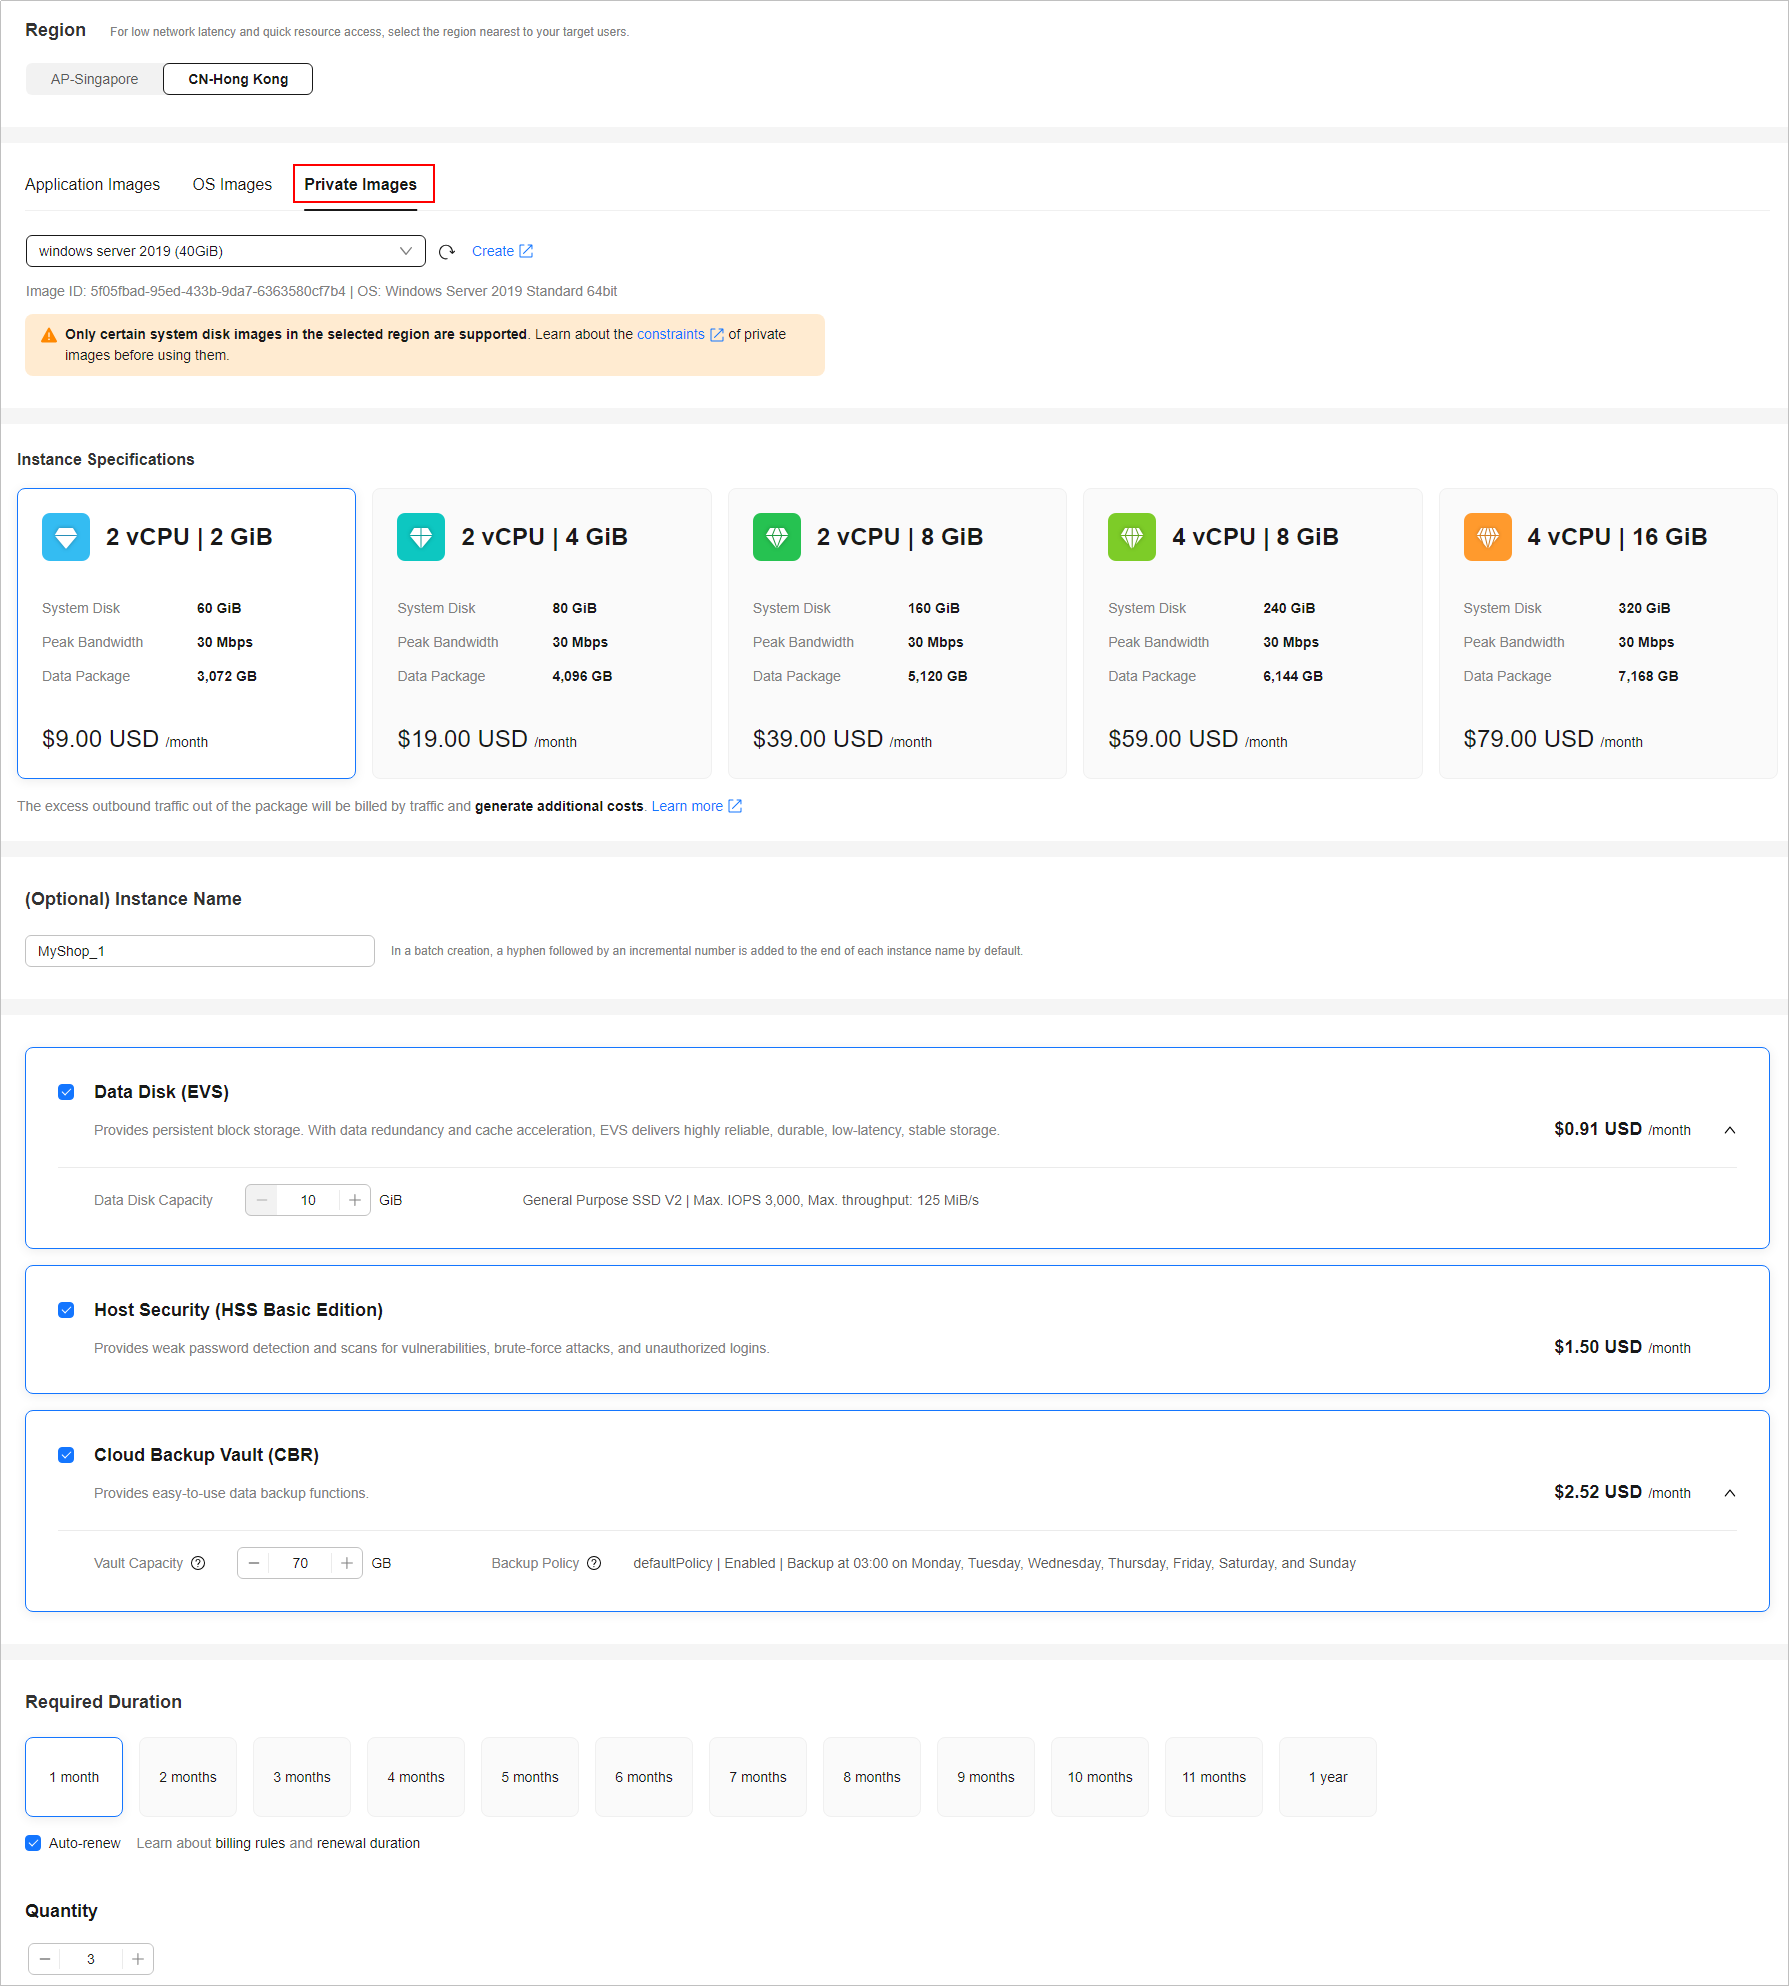
Parameter
Example
Description
Region
CN-Hong Kong
For low network latency and quick resource access, select the region nearest to your target users. After a FlexusL instance is created, the region cannot be changed. Exercise caution when selecting a region.
Image
Windows Server 2019
In the private image list, select the Windows Server 2019 private image which is in the same region (CN-Hong Kong) as the instance and has been uploaded to the IMS console.
Instance Specifications
2 vCPUs | 2 GiB memory and 60 GiB system disk
Select instance specifications as required.
Instance Name
MyShop_1
Customize an instance name that is easy to identify, for example, MyShop_1, MyShop_2, and MyShop_3.
(Optional) Associated Services
- Data disk: 10 GiB
- Host security
- Cloud backup vault: 70 GiB
You can bundle any of the services to your FlexusL instances as needed: EVS, HSS (basic edition), and CBR.
Required Duration
- 1 month
- Enabling auto-renew
The minimum duration of a purchase is one month and the maximum duration is three years.
Auto-renew is enabled by default, which means the purchased FlexusL instances will be automatically renewed before they expire. If you do not enable auto-renew during the purchase process, you can still enable it later after the instances are created. Monthly subscription allows you to renew the subscription for one month every time. The number of renewal times is not limited.
For more information about auto-renewal rules, see Auto-Renewal Rules.
Quantity
3
Set the number of FlexusL instances to be purchased, for example, three in this example.
- Click Buy Now.
On the displayed page, confirm the order details, read and select the agreement, and click Submit.
- Select a payment method and complete the payment.
- Go back to the FlexusL console and view the purchased FlexusL instance.

- Hover the pointer over a resource card, click
 next to the instance name, and change it to MyShop_1, MyShop_2, and MyShop_3, respectively.
Step 2: Configure Security Groups
Configure inbound rules for security groups to ensure that the FlexusL instance can be accessed.
- Log in to the FlexusLconsole and click a resource card to go to the instance details page.
- In the navigation pane on the left, choose Cloud Servers and then click the server name.
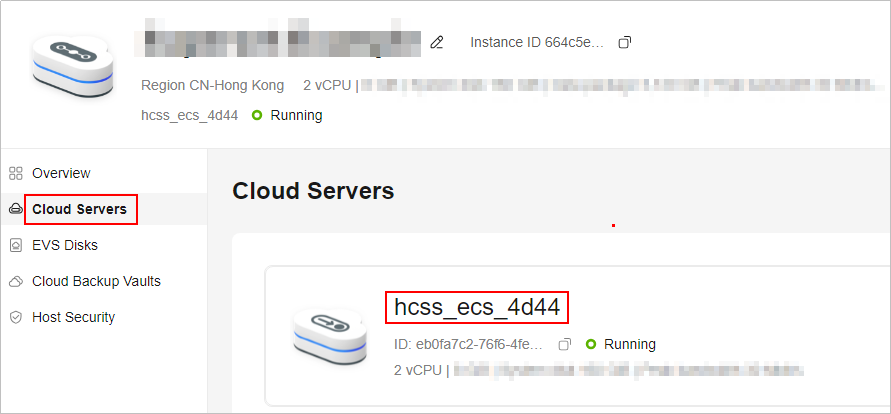
- On the Security Groups tab, click Add Rule. In the displayed dialog box, add rules displayed in the following figure and click OK.
The following figure only displays common rules. You can add more rules as needed.
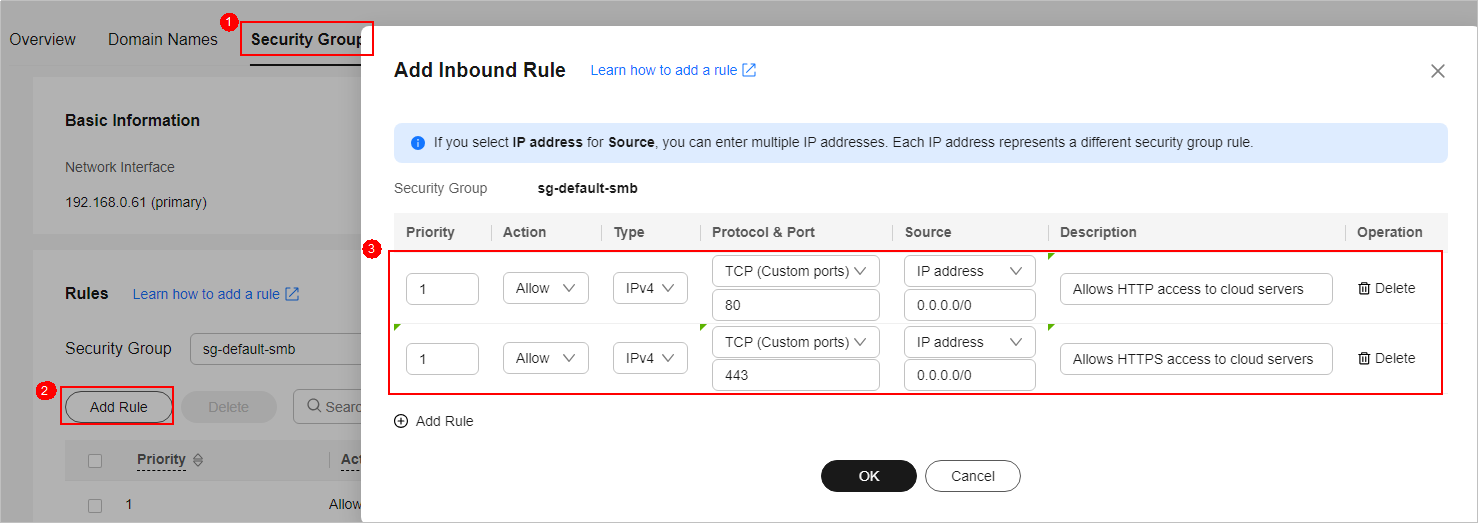
Table 1 Security group rules Priority
Action
Type
Protocol & Port
Source
Description
1
Allow
IPv4
TCP: 80
0.0.0.0/0
Allows HTTP traffic to FlexusL instances.
1
Allow
IPv4
TCP: 443
0.0.0.0/0
Allows HTTPS traffic to FlexusL instances.
Step 3: Log In to a FlexusL Instance Server
For Windows FlexusL instances, the administrator username is Administrator and there is no default password. Set a password before logging in to the server.
- Enable Batch operation, select Select all, and click Reset Password.

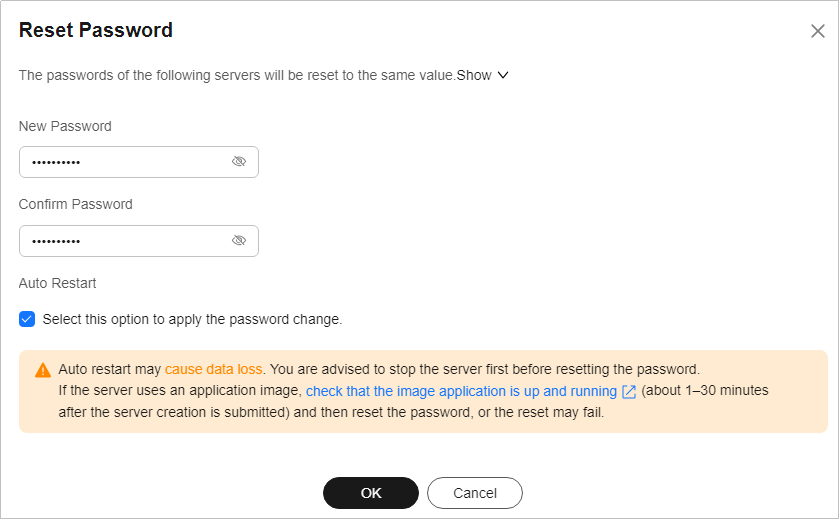
- Set a new password for the FlexusL instance servers and click OK.
If you reset the password for running servers, the password change is applied only after the next restart. Select Auto Restart. After the password is reset, the server status becomes Restarting. Wait until the status changes to Running and go to the next step.
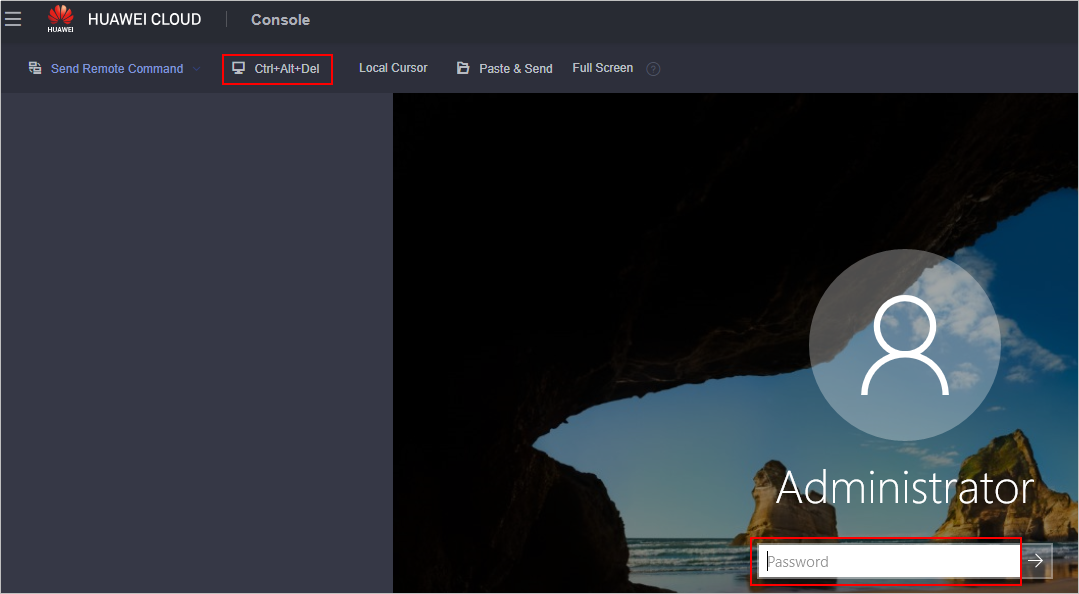
- In the resource card, click Remote Login to remotely log in to the cloud server using VNC.
- Click Ctrl+Alt+Del in the upper left corner to unlock the desktop.
Follow the instructions to enter the password set in step 2 and press Enter.
Step 4: Remove the Session Time Limit
A session is a sequence of uninterrupted requests and responses between a user and a server. Session timeout occurs when a user does not perform any action within a specified period and the session of the user is terminated. Once the session times out, you need to log in to the FlexusL instance server again. This section describes how to remove the session time limit.
- In the search box at the lower left corner of the page, search for RUN.
- Enter gpedit.msc in the RUN dialog box and click OK.
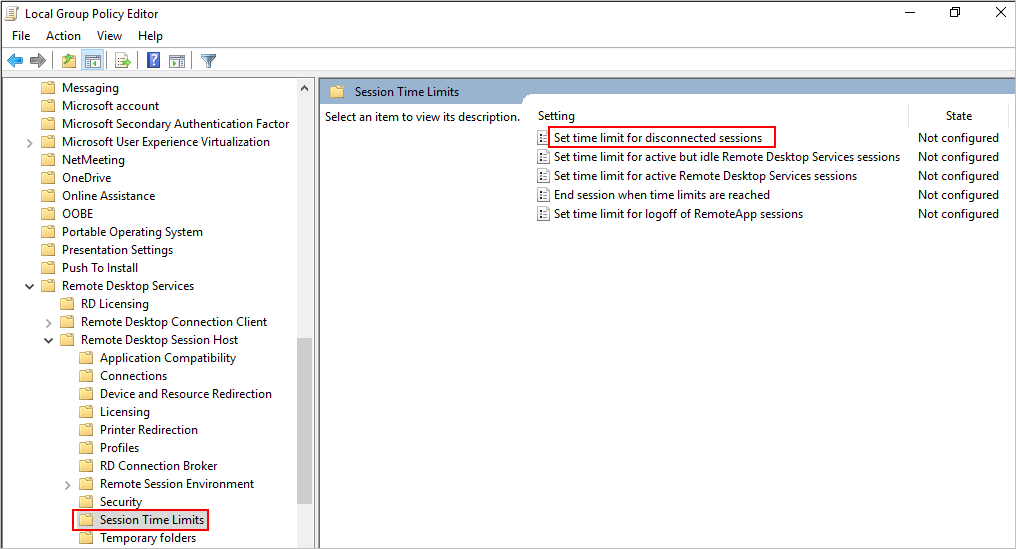
- In the Local Group Policy Editor window, choose Computer Configuration > Administrative Templates > Windows Components > Remote Desktop Services > Remote Desktop Session Host > Session Time Limits, and double-click Set time limit for disconnected sessions in the right pane.
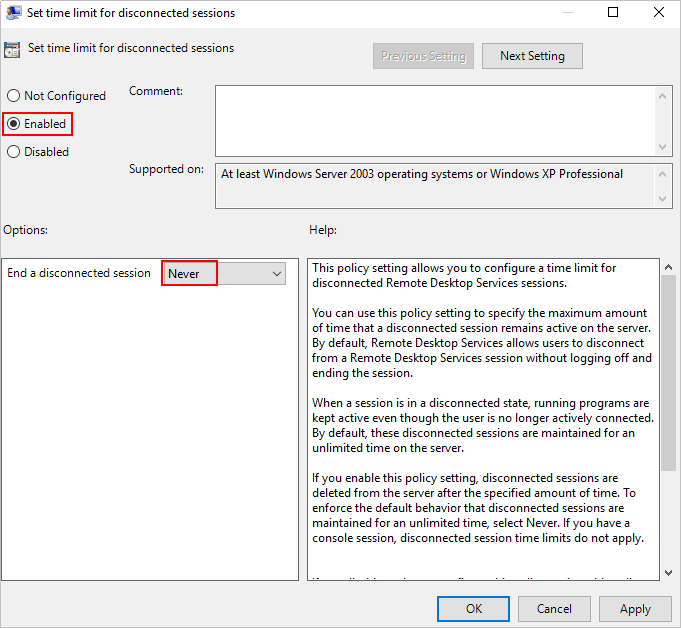
- In the displayed dialog box, select Enabled and set End a disconnected session to Never. Click OK.
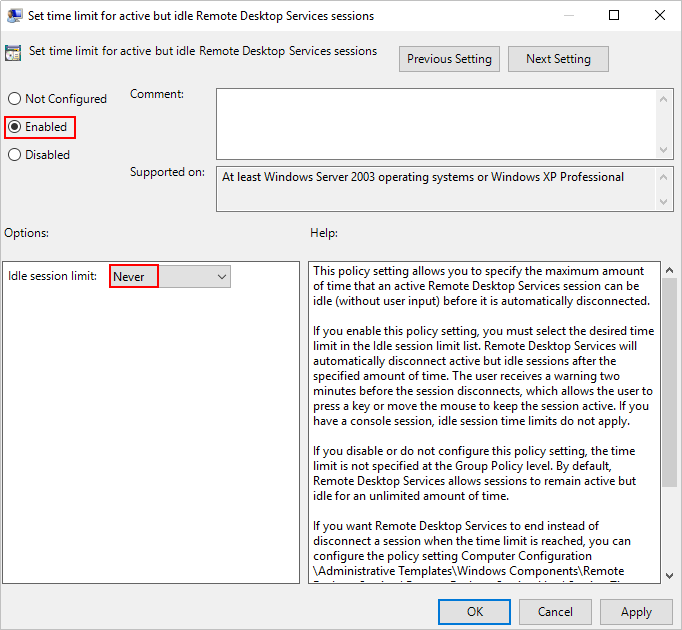
- In the Local Group Policy Editor window, double-click Set time limit for active but idle Remote Desktop Services sessions in the right pane.
- In the displayed dialog box, select Enabled and set Idle session limit to Never. Click OK.
Step 5: Open Stores
Now you have obtained a Windows Server FlexusL instance with a fixed EIP bound. You can create accounts, and open and manage stores on e-commerce websites.
When running e-commerce stores, you may need to upload your local files to cloud servers. For details, see How Do I Upload Files to My ECS (The method also applies to uploading files to FlexusL instances).
Feedback
Was this page helpful?
Provide feedbackThank you very much for your feedback. We will continue working to improve the documentation.See the reply and handling status in My Cloud VOC.
For any further questions, feel free to contact us through the chatbot.
Chatbot


