

Test Case Execution
All test cases are required to pass the execution.
The partner's test engineer Execute test cases.
Manual case execution
- The specified partner test case executor click the [Execute] button of the manual case. Figure 1 Case Management

- Complete the test case operations according to the test case steps, fill in the actual result, and determine whether the test case is passed based on the expected result.
Table 1 Test case execution information Information item
Description
Actual Results
The text description is usually a description of the screenshot. Screenshots are not required for "self-check" cases and cases where the execution result is "N/A". You can directly paste screenshots into the text box of "Actual result". Please provide screenshots according to the case steps. The screenshot must be a full screen screenshot, including the function menu and system time in the lower right corner. If there is sensitive information, the sensitive information can be desensitized. (If the screenshot is saved to another document and copied to the actual result, it may be incompatible.)
Case Status
- Pending:the execution has not started.
- Executing:the execution is in progress. The execution is not complete.
- Completed:the execution is complete.
Execution result
- Failed:the actual structure does not meet the expected result.
- Pass:the actual structure meets the expectation.
- Pass conditionally:actual results do not fully match expected results, which can be ignored after confirmation with Huawei test engineers.
- N/A:the software does not have the functions described in the test case.
Attachments
File that describes the execution result.(optional)
Figure 2 Case Execution

- Click [Confirm Go to Next] or [OK].
Performance automation case execution
- The test case executor accesses the test case management page and clicks the [execution] button of the performance test case. Figure 3 Test Case Management

- Go to the CPTS script page, allows users to edit preset requests and add new requests. Figure 4 Performance Automation Case

- Packet: data sent between applications. For details, see the operation guide.
- Think Time: specifies the waiting time between operations. This parameter is not required in authentication tests. For details, see the operation guide.
- Response extraction: The output of the previous packet is extracted as the input of the next packet. For details, see the operation guide.
- Checkpoint: Checkpoints are used to check whether the content returned by the server is correct based on customized verification information. For details, see the operation guide. Figure 5 Case script

- After the CPTS script is complete, you can click [Debug] to quickly detect syntax or configuration errors and ensure that the model is available in the task.Click [Next] when you are finished.

Prerequisites
- The resource group is in the running state.
- Ports 32001 and 32003 on the debugging node of the resource group are enabled in the security group.
- The execution node of the resource group and applications under the pressure test are connected through the network.
Debugging a Test Case
After you create or edit a test case, you can debug it to detect syntax or configuration errors before testing.
- Click [Debug] in the upper right corner of the page.
- Select the target test resource group as the executor and click [Start].
- Click [View log] to view the test case debugging details.
If an error was reported in the debugging result, edit the case based on the log information and debug it again.
- On the Debug log tab page, you can view the debugging history.
- Configure the Pressure Configuration.
Configure the duration of the script based on the requirements in the requirement description
- Pressure test for basic function points:5 to 10 minutes
- Pressure test in hybrid scenarios:0.5 to 2 hours
- Comprehensive service fatigue test:4 to 6 hours
after the configuration is complete,click [Save].For details, see the operation guideFigure 6 Test Case Management
 Figure 7 Pressure Configuration

Click [Next] when you are finished.
7. Monitoring configuration to capture the CPU and memory performance scheduling of the target server during the stress test.
Figure 8 Editing Test Cases

- If you need to add performance automation test cases, click the [Performance Automation] Test Case tab and click [Create],and design test cases by referring to If you do performance te.... Figure 9

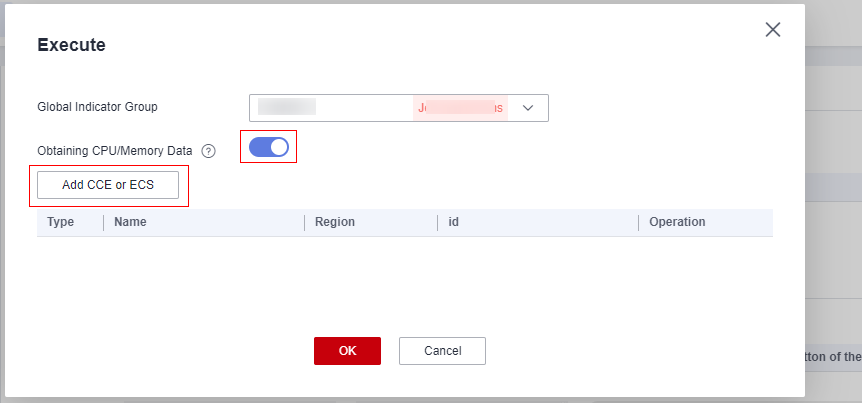
- In the displayed dialog box,Obtains the CPU and memory performance scheduling of the monitored target server during the pressure test.
- Select [global indictor group]:The execution result determines whether a test case is passed based on this indictor group.
- enable [Obtaining CPU/Memory Data]:the CPU and memory usage of the object under pressure test can be obtained.
- and click [Add CCE or ECS]:select the machine to be tested. Figure 10 Performance Test Case Execution
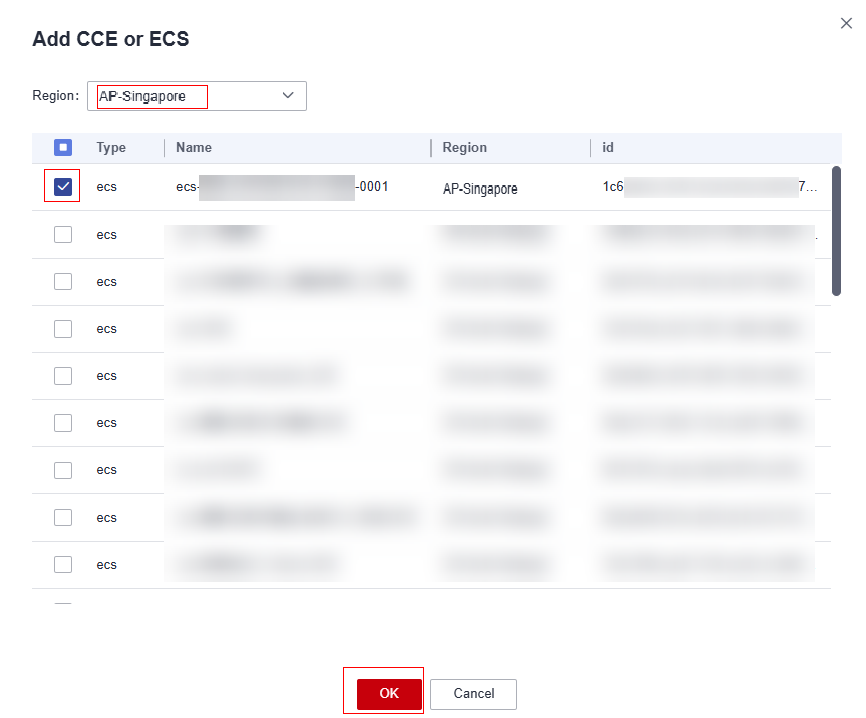
- Select the region where the CCE or ECS is deployed,add the CCE or ECS to be tested.Click [OK] to start the pressure test. Figure 11 Add The CCE or ECS
- After the pressure test is complete, refresh the test case list to check whether the test case is executed successfully. Figure 12 Case management
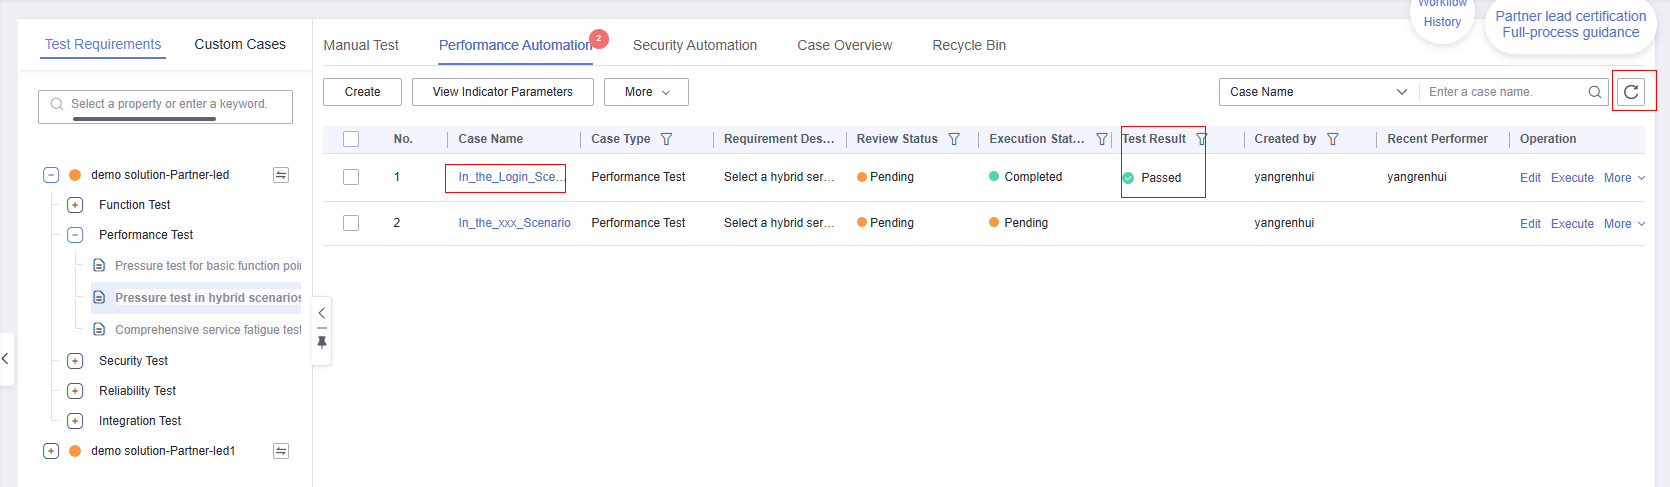
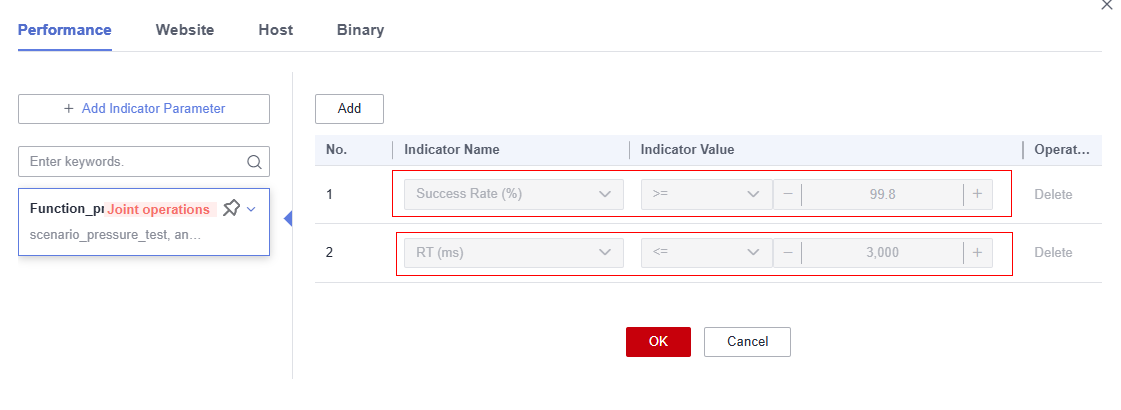
The system determines whether the test case is successful based on the automatically loaded indicator parameters.
- click the case name to go to the case basic information page and view the case result. Figure 13 Basic Information

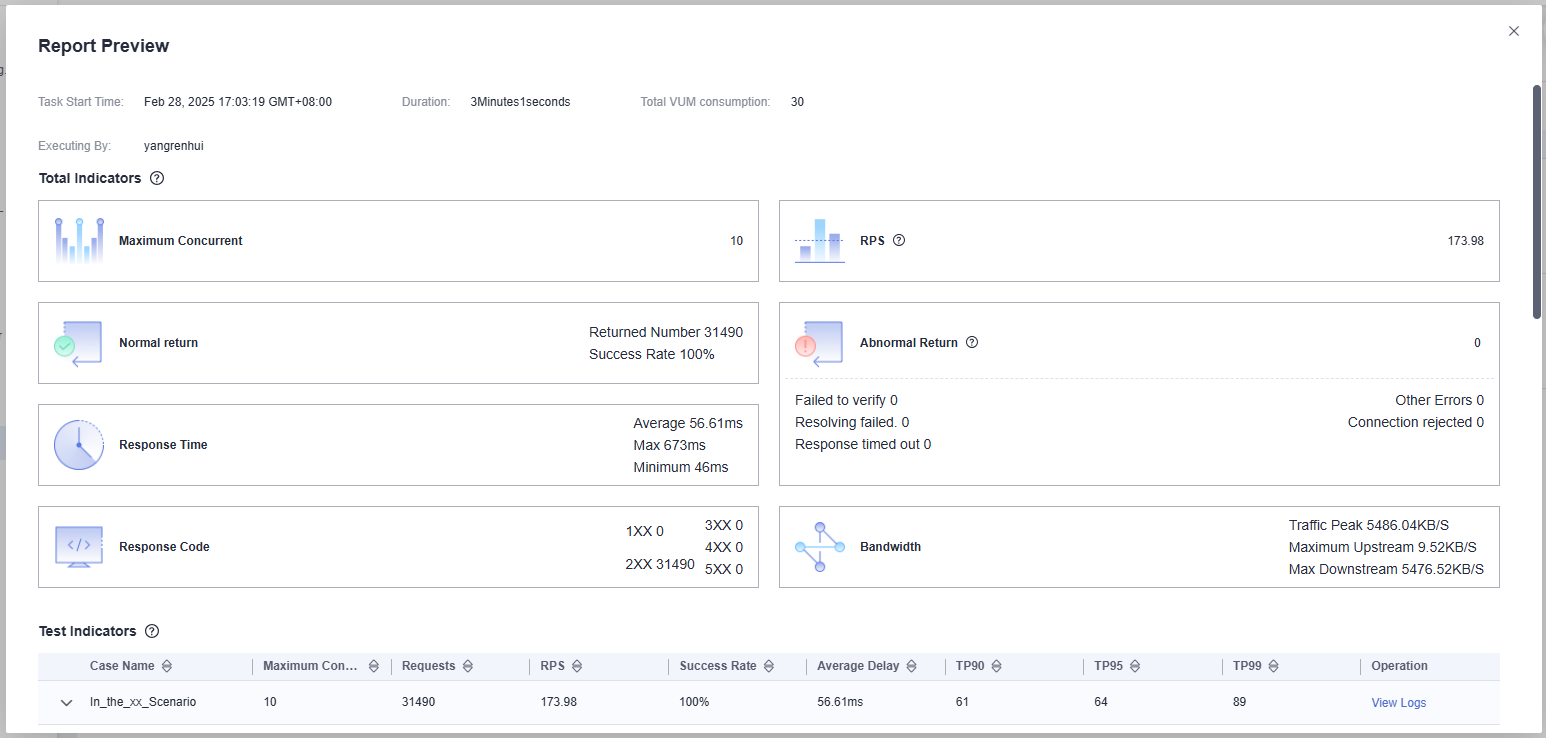
- Click the [Execution result] -> [Report preview] to view the pressure test report. Figure 14 Execution Result
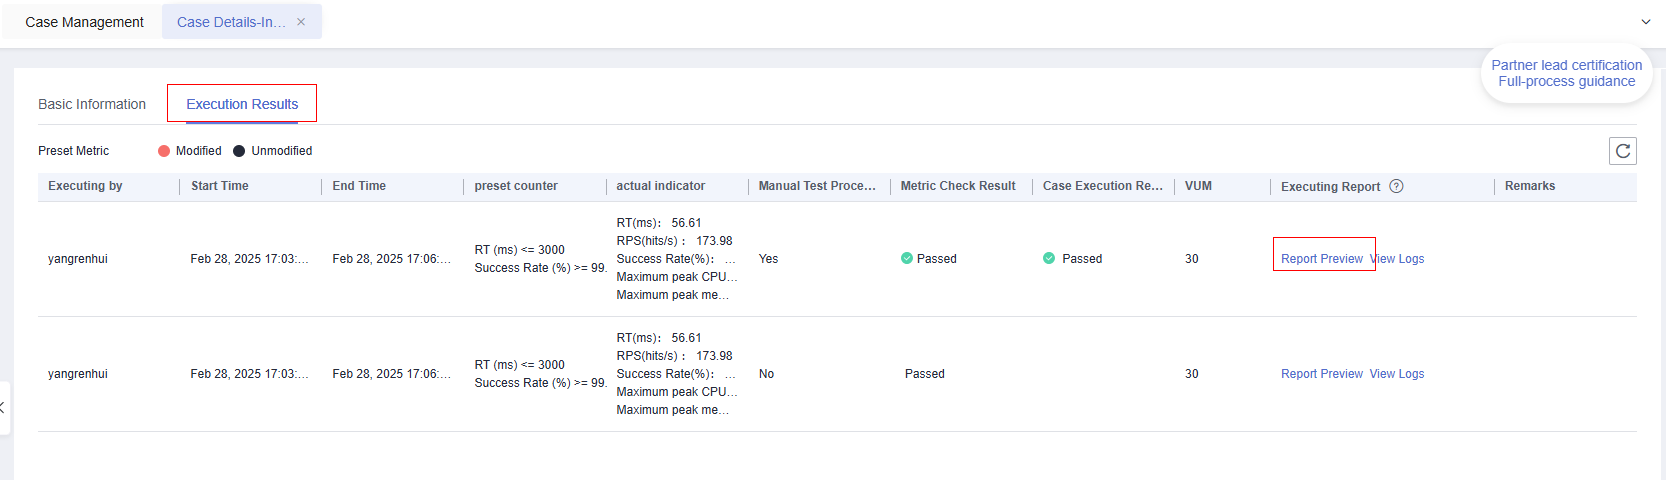 Figure 15 Report Preview
Security scanning case execution
- if you use the security scanning function provided by InnoStage Workbench to scan binary,complete the binary scanning case in security automation,vulnerabilities and viruses can be scanned at a time.
- Select the Security Automation case type,and click the [Execute] button of the Binary Scanning test case. Figure 16 Case Management

- Click [Upload File] to upload the binary package file to be scanned,and click [Execute]. Figure 17 Upload File And Execute

Copy all complete binary files (such as the deployment package and installation package) of the solution. For details about the file type, see https://support.huaweicloud.com/vss_faq/vss_01_0083_01.html. Packaged and uploaded as the scanning object. (If the file size exceeds the limit, split it into multiple packages and scan it in multiple cases.)
- After the scanning is complete, the test case status is displayed as Completed. You can click the test case name to view the test case execution result. Figure 18 Case Management
 Figure 19 Execution Result

If the Scanning result is fails, view the result details list, fix the vulnerabilities or clear the virus, and upload and scan the file again.
- Select the Security Automation case type,and click the [Execute] button of the Binary Scanning test case.
- If you use the third-party tool to scan binary
- For non-image package scanning.For details, see Binary Virus Scanning(non-image)
- For Linux image scanning.For details, see Linux Image Viruses Scanning
- For Windows image scanning.For details, seeWindows Image Viruses Scanning
What is your overall rating for this page?
Thank you very much for your feedback. We will continue working to improve the documentation.See the reply and handling status in My Cloud VOC.
For any further questions, feel free to contact us through the chatbot.
Chatbot


