
Procedure
The following figure illustrates the process of enterprise project management for addressing company A's requirements.
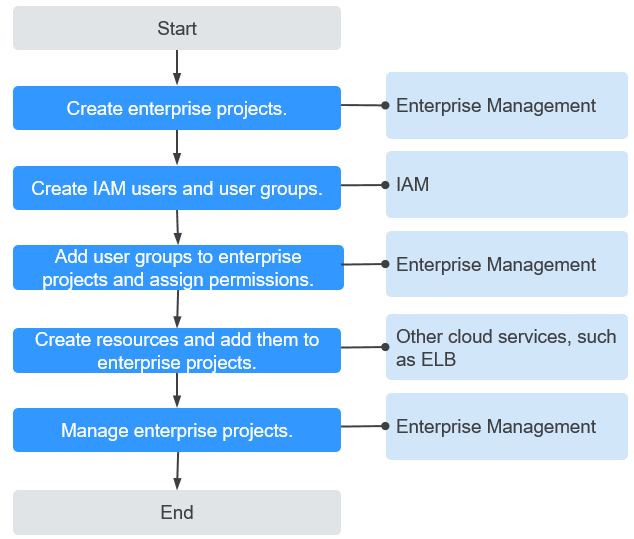
Step 1: Create enterprise projects on the Enterprise Management console.
Step 2: On the IAM console, create a user group for each functional team, create IAM users for employees, and add the users to different user groups.
Step 3: On the Enterprise Management console, assign the required permissions to each user group, and add the user group to the corresponding enterprise project. Users in the group automatically inherit its permissions.
Step 4: Create resources on other cloud service consoles and add the resources to the corresponding enterprise projects.
Follow-Up Operation: Enterprise Project Management: Manage users and resources on the Enterprise Management console.
Creating Enterprise Projects
Perform the following procedure to create two enterprise projects (A and B) on the Enterprise Management console.
- Log in to the management console.
- Go to the management console. In the upper right corner, choose Enterprise Management from the drop-down list of your account name.
The Enterprise Project Management page is displayed.
- On the Enterprise Project Management page, click Create Enterprise Project.
- Enter EnterpriseProject_A for Name and click OK.
- Repeat 3 to 4 to create EnterpriseProject_B.
The two enterprise projects are displayed on the Enterprise Project Management page.
Creating IAM Users and User Groups
The following is an example procedure for creating a user group (Enterprise Project A_Development) and user (Murphy) and adding the user to the user group.
- Create a user group.
- On the management console, choose .
- On the IAM console, choose User Groups from the left navigation bar, and click Create User Group in the upper right corner.
- Set the user group name to Enterprise Project A_Development and click OK.
- Repeat 2 to 3 to create accounting, security maintenance, and operation teams for the two enterprise projects.
The user groups are displayed in the user group list.
- Create an IAM user and add the user to a user group. For details, see Identity and Access Management User Guide.
- On the Create User page, enter user information, select Access Type, Credential Type, and Login Protection, and click Next.
- Enter the target user group to add the user. Then the user will inherit permissions from the group. Click Create and the IAM user Murphy is created.
The user is displayed in the user list. You can view the IAM users of each user group on the Users tab page.
Adding User Groups to Enterprise Projects
The following is an example of associating a user group, Enterprise Project A_Development, with an enterprise project, project A, and adding the EPS FullAccess policy to the user group. Then users in Enterprise Project A_Development can manage project A.
- Log in to the management console.
- Go to the management console. In the upper right corner, choose Enterprise Management from the drop-down list of your account name.
The Enterprise Project Management page is displayed.
- On the Enterprise Project Management page, click View User Group in the row that contains enterprise project A.
- On the details page of enterprise project A, choose Permissions > User Groups and click Assign Permissions.
- In the Assign Permission dialog box, select Enterprise Project A_Development and click Next.
- Search for and select EPS FullAccess and click OK. User group, Enterprise Project A_Development, then has the permissions for managing enterprise project A.
To view or modify user group permissions of an enterprise project, go to the enterprise project details page, click the Permissions tab, click Attach Policy in the row that contains the target user group, and view or modify the permissions of the user group.
Creating Resources and Adding Them to Enterprise Projects
The following is an example procedure for creating a load balancer and adding it to enterprise project A.
- Log in to the management console, click
 in the upper left corner, and choose .
 - Click Create Elastic Load Balance in the upper right corner of the page.
- Configure the load balancer information and select enterprise project A from the Enterprise Project drop-down list.
- Click Create Now in the lower right corner of the page.
- Confirm the configuration and submit your request.
- Repeat 1 to 5 to create required resources for the two enterprise projects.
To view the created resources, go to the Enterprise Management console and click View Resource in the row that contains enterprise project A or B.

- Currently, Enterprise Management only supports specific cloud services. For details, see Supported Services.
- If you have already created required resources, you can directly add them to enterprise projects. For details, see Adding Resources to an Enterprise Project.
Follow-Up Operation: Enterprise Project Management
After completing the preceding steps, you can manage your enterprise projects on the Enterprise Project Management page.
- Resource management: Click View Resource in the Operation column to view the existing resources of an enterprise project and add more resources to the enterprise project.
- User management: Click View User Group to view the users and user groups of an enterprise project, and modify their permissions.
Feedback
Was this page helpful?
Provide feedbackThank you very much for your feedback. We will continue working to improve the documentation.See the reply and handling status in My Cloud VOC.
For any further questions, feel free to contact us through the chatbot.
Chatbot


