
Creating CSV File Data Connections
You can upload local CSV files to OBS and establish a data connection with DLV. Alternatively, you can create a data connection between a CSV file stored in OBS and DLV. Then, the data in the CSV file can be displayed on DLV screens.
Before establishing a data connection to CSV files, ensure that the following conditions are met:
- You have obtained an Access Key ID (AK) and Secret Access Key (SK).
For details about how to obtain them, see Obtaining AK and SK.
- An OBS bucket is available.
CSV File Format Description
The CSV file data source supports the following CSV file formats:
- Only commas (,) can be used as separators in CSV files. CSV files are encoded in UTF-8 format (without BOM).
- When a screen uses the CSV data source, the first row in the CSV file is parsed as the table header by default.
If the CSV file to be uploaded does not have a table header, you can add one before uploading the file. Alternatively, you can select Default Table Header in the data source settings of the screen to add a default table header to the CSV file.
- In a CSV file, if a field value is enclosed in double quotation marks, the double quotation marks are parsed as a part of the field value, and are displayed as "\"" on the screen. If a field value contains single quotation marks, the field is not affected.
For example, if the CSV file contains the following records, "abc" is displayed as "\"abc\"".
1,"abc",2
- Only one CSV file can be uploaded through a data connection, and the file size cannot exceed 10 MB. If the size of a CSV file exceeds 10 MB, the file can be uploaded only through the OBS client.
Adding CSV File Data Sources
- Log in to the DLV console.
- On the Data page, click the workspace drop-down list at the top of the page, select the workspace to be accessed, and click New Data Connection.
Figure 1 Creating a data connection

- In the New Data Connection dialog box, set Data Source Type to CSV and set the related parameters. Click OK.
Figure 2 Creating a CSV data connection
 Table 1 describes the data connection parameters of CSV files.
Table 1 CSV file data connection parameters Parameter
Description
Name
Name of the data connection. Must contain 1 to 32 characters and contain only letters, digits, hyphens (-), and underscores (_).
Access Key
Enter the AK. Obtain it by referring to Obtaining AK and SK.
Secret Access Key
Enter the SK. Obtain it by referring to Obtaining AK and SK.
File Source
Local files and OBS files are supported.
File Path
- If you set File Source to Local files, click OBS in File Path. In the displayed dialog box, select an OBS directory. The local files will be uploaded to the OBS directory first. See Figure 3.
- If you set File Source to OBS files, click OBS in File Path. In the displayed dialog box, select the CSV file in the OBS bucket. See Figure 4.
For details about the CSV file format requirements, see CSV File Format Description.
Ensure that you have the read and write permissions on the specified OBS bucket.
File
If you set File Source to Local files, click Select File. In the displayed dialog box, select the CSV file to be uploaded. Click OK. For details about the CSV file format requirements, see CSV File Format Description.
- When File Source is set to Local files:
- When File Source is set to OBS files:


Using CSV File Data Sources
- Log in to the DLV console and click the Screens tab.
- On the Screens page, locate the screen to be edited and click
 on the screen. The screen development page is displayed.
Figure 5 Editing a screen
on the screen. The screen development page is displayed.
Figure 5 Editing a screen
- Select a component, for example, a bar chart. The component is displayed in the canvas. Click the component and then the Data panel on the right of the page.
- Set the following parameters on the Data panel:
- Data Source Type: Set this parameter to CSV.
- Data Connection: Select a CSV file data connection from Data Connection.
Figure 6 Selecting a CSV file data connection
- Click Preview Response Result to view the data response result.
Figure 7 Viewing the response result

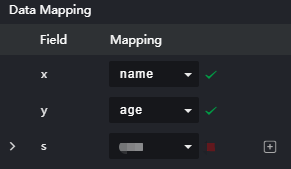
- Configure the field mapping based on the attribute name of the response data. In this example, x is set to name, y is set to age, and s is left blank or set to any value.
Figure 8 Configuring the mapping
- View the effect of the configured screen component.
Figure 9 Screen effect

Feedback
Was this page helpful?
Provide feedbackThank you very much for your feedback. We will continue working to improve the documentation.See the reply and handling status in My Cloud VOC.
For any further questions, feel free to contact us through the chatbot.
Chatbot


