
Configuring the /etc/hosts File of a Pod Using hostAliases
Application Scenarios
If DNS or other related settings are inappropriate, you can use hostAliases to overwrite the resolution of the hostname at the pod level when adding entries to the /etc/hosts file of the pod.
Procedure
- Use kubectl to connect to the cluster.
- Create the hostaliases-pod.yaml file.
vi hostaliases-pod.yaml
The field in bold in the YAML file indicates the image name and tag. You can replace the example value as required.
apiVersion: v1
kind: Pod
metadata:
  name: hostaliases-pod
spec:
  hostAliases:
  - ip: 127.0.0.1
    hostnames:
    - foo.local
    - bar.local
  - ip: 10.1.2.3
    hostnames:
    - foo.remote
    - bar.remote
  containers:
    - name: cat-hosts
      image: tomcat:9-jre11-slim
      lifecycle:
        postStart:
          exec:
            command:
              - cat
              - /etc/hosts
  imagePullSecrets:
    - name: default-secret
Table 1 pod field description Parameter
Mandatory
Description
apiVersion
Yes
API version number
kind
Yes
Type of the object to be created
metadata
Yes
Metadata definition of a resource object
name
Yes
Name of a pod
spec
Yes
Detailed description of the pod. For details, see Table 2.
Table 2 spec field description Parameter
Mandatory
Description
hostAliases
Yes
Host alias
containers
Yes
For details, see Table 3.
- Create a pod.
kubectl create -f hostaliases-pod.yaml
If information similar to the following is displayed, the pod is created.
pod/hostaliases-pod created
- Query the pod status.
kubectl get pod hostaliases-pod
If the pod is in the Running state, the pod is successfully created.
NAME                  READY          STATUS       RESTARTS      AGE
hostaliases-pod       1/1            Running      0             16m
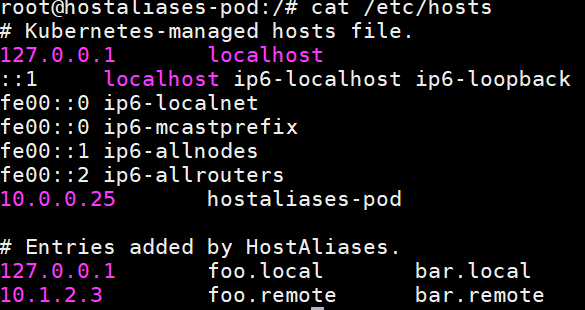
- Check whether the hostAliases functions properly.
docker ps |grep hostaliases-pod
docker exec -ti Container ID /bin/sh
Feedback
Was this page helpful?
Provide feedbackThank you very much for your feedback. We will continue working to improve the documentation.See the reply and handling status in My Cloud VOC.
For any further questions, feel free to contact us through the chatbot.
Chatbot


